Learn to use the tools and make pictures with MS Paint
These instructions are for MSPaint in Windows Vista.
As some tools behave differently, you may prefer to read the instructions for MSPaint in Windows 98 or MSPaint in Windows XP or MS Paint for Windows7.
There are better programs than MS Paint, but it's the only one that comes with your operating system—it's free and you don't have to locate and download it. Having such a small number of tools and capabilities, it's easy to learn and a little perseverance will quickly make you an expert in its use.
If you would like to work in Paint while you follow these instructions, do remember that you can resize your browserA Browser is the program you use to visit sites on the Internet. Internet Explorer (IE) may be the browser that you use, but there are many others, such as Firefox, Opera, Google Chrome, K-Meleon and Blackbird.
You can have as many browsers as you like, and run more than one at the same time. window. Just hover your cursor over a side edge of the browser window until a double-headed arrow appears, press your left mouse button and drag left or right until the window is a suitable size.
You can then grab the browser window by the title bar and drag it to the position that you want it in. You can do this with almost any window on your computer.
Popup help from CSSplay where you'll find other amazing demos
If you're going to print this article, please read the tips and suggestions on printing.
Skip the contents table and go straight to work.
TABLE OF CONTENTS
The Paint Window
This is the window that you see when you open Paint.
 I like to use a big drawing area, probably because I'm a messy worker! Yours may be just a small square. It makes no difference to the operation of the program, except that, with a window as small as that shown here, some parts of the status bar are not visible. The status bar need not concern you just yet, and is explained further down the page.
The dashed rectangle in this picture shows that a selection has been made. When you first open the window it is quite blank.
If, however, your Paint window doesn't have colors along the top and a double line of tiny symbols down the left side as this one does, click View on the menu bar at the top of the window and tick the items shown here.
 Text Toolbar, which is dimmed in this picture, only becomes available when you're working with text.
The items Zoom and View Bitmap offer different views of your work. The Zoom tool is dealt with under its own heading. View Bitmap gives you a full-screen view. (On my computer it usually causes Paint to crash, but I suppose every machine has its little ways.) Just be sure that you've saved your work before you go to this view.
Menus
Four of the Paint menus—File, Edit, View and Help—are common to almost all Windows programs. Some of those available, though, are specific to this program.
Menus that are special to Windows Paint are Image and Colors.
The menu of greatest interest is the Image Menu, which I'll discuss as soon as we've looked at the different areas of the Paint window.
The toolbox
 All the little picture symbols down the left are called the tools and together they make the toolbox.
The individual tools will each be explained separately further down.
Under the toolbox is a small area where you see different options according to which tool you're using.
It may show line thickness, spray can density, size and shape of the paintbrush or whether a shape is to be filled or hollow. Some tools have no options, and when any of these tools is active—selected or in use—the area below the toolbox remains blank.
Paste Options
 In this picture, with the selection tool active, you have a
choice between paste opaque and paste transparent (selected, as you can tell by the colored background).
In this picture, with the selection tool active, you have a
choice between paste opaque and paste transparent (selected, as you can tell by the colored background).
When you have white as your background color—the color selected by the right mouse button—and have chosen paste transparent, anything you select from a picture with a white background can be pasted without a rectangle of white surrounding it.
If the item you want to select is sitting on a background of a color other than white, clicking your right button on that color will make it possible for you to select the item without its background.
The Color Palette
![]() Above the main window is the color palette. The two squares set apart from the rest at the left end of the palette show the active colors; the colors presently in use.
Above the main window is the color palette. The two squares set apart from the rest at the left end of the palette show the active colors; the colors presently in use.
When you click on a color in the palette with the left mouse button, that color will be the primary or foreground color, here shown as black.
The color you click on with the right mouse button will be the secondary or background color, here shown as white.
These terms are the same in all the graphics programs I've used—programs including painting and drawing programs as well as small programs with a single function, such as recoloring.
Using the older, brighter colors
If you have used a previous version of Windows, you may find the offered colors in Vista too soft for your liking. If that's so, there are two ways that you can use the brighter colors.
Importing colors
![]() If you paste this sampler into your Paint window, you'll have access to the first 16 colors in the XP and 98 palettes.
If you paste this sampler into your Paint window, you'll have access to the first 16 colors in the XP and 98 palettes.
(If you should want to work in 16 colors in Vista, you'd need these colors. Only a very few colors—black, white, red, yellow and grey—on the Vista palette work in 16 colors. For the rest you get grey.)
- Right click on the color sampler
- Click on Save Image As, Save Image or Save Picture As.
- Notice where it's being saved. My Pictures is a good place for it.
- The suggested name should be 16_color_sampler.gif. Click Save.
When you want to use those colors, here are the steps.
- I'm presuming that you already have a Paint window open, and that you have saved and given the file a name.
- Click on the Rectangular Selection tool
 and have the option set to Transparent.
  Make sure that you have white as your background color.
It doesn't matter what color you have on your left or foreground button.- In your Paint window, go to the Edit menu and click Paste From.
- Navigate to the saved 16_color_sampler.gif and click it.
- Click Open.
- Back in your Paint window, drag the sampler to a convenient position.
- Click on the Color Picker
 and then on the color you want to use.
Editing colors
This only works on a per session basis. Colors that you make in this way are saved in any picture that you use them in, but there's no way that I know of to save an edited palette.


If you double click any color patch on the palette, this window will open and you can choose a different color to occupy that place in the palette.
Your choice will remain in that place while you're working on your current piece. Once you close Paint, or open a different picture, the original colors will be restored.
I've found no way of saving special colors in the palette. If you make a small picture with your special colors and paste that into a new picture where you want to use them, you can choose them with the color picker.
 When you click "Define Custom colors", you're presented with a larger window that allows you to select colors very finely. By raising or lowering the little black arrow on the right, you can make a basic color softer or stronger.
You may then, if you wish, click an empty white space and then click "Add to Custom colors". There's not a great deal of point in doing that, however, because every time I tried to save custom colors they disappeared when I closed Paint.
.

.
The Status Bar
Right at the bottom of the Paint window is the Status Bar. It gives information according to what you're doing. If it can't think of anything pertinent to say, it has the “For Help” message, its variation on “Yes, Dear”. However, if you've made the window very small, some information will not be visible. Put your cursor over one edge of the window until a double-ended arrow appears, then drag it wider.
![]()
Help can also be invoked by pressing the F1 key at any time. This is true of most Windows programs.
Cursor Position
To the right of the help message is the cursor position (here shown as 131,95). The 131 refers to the distance in pixels away from the left margin and the 95 the distance in pixels down from the top margin. This pair of numbers changes as you move the mouse around the window with no buttons pressed. As soon as you press either button the number “sticks” and remains the same until you release the button.
The last part of the status bar tells you the size in pixels of the thing you're drawing or the selection you've made (here shown as 121x94). The 121 refers to the width of the shape or selection and the 94 to its height.
N.B. There's an odd thing about this pair of numbers—when you're drawing a shape, they're one off. Say you draw a rectangle and the status bar says it's 118x166. If you then use the rectangular selection tool to exactly trace that rectangle, you'll find it's 117x165. I've tried this on four different computers and it was the same in each case.
.
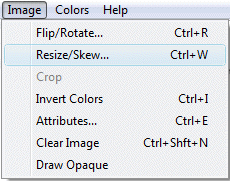
OK. Here's the image menu.
 Flip/Rotate lets you turn things upside down or sideways. You can only turn through 90 degrees, 180 and 270. Fancier programs let you rotate more finely.
Stretch/Skew lets you make things bigger, smaller or pushed sideways. Bitmaps greatly enlarged look pretty rough, so step carefully.
It's worth drawing a shape, selecting it and then investigating the effects of stretching and skewing.

Invert Colors attempts to change the colors of a selection to their opposites. Just how accurately it does this depends on the colors available, as can be seen here, where the right half of the picture is a copy of the left but has had its colors inverted.
Keystrokes
The letters beside the different items are keys you can press instead of going through the menu. Unless you're going to use this program every day, I wouldn't bother learning them because they clash with Word keys that you'd probably use more often, like (in Word) Ctrl + e means “Centre” and Ctrl + r means “Right”.
Furthermore, if a menu is open you'll get no response to these keys beyond a warning “ding”.
The usual Windows keys: Ctrl+s to save, Ctrl+z to undo, Ctrl+c to copy, Ctrl+x to cut and Ctrl+v to paste also work in Paint.
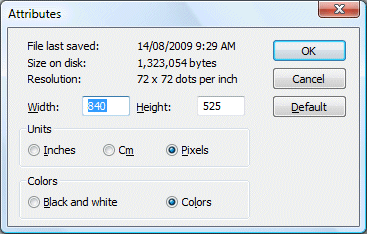
A useful item on the image menu is Attributes.
 I find it most convenient to have a large area in which to work, then later select the part I want to keep and save it separately, using the Copy To procedure.
If you click on Attributes you can change the size of the drawing area.
You can also click either inches or centimetres as your preferred measurement. This, however, will only tell you the size of your drawing area. Cursor position and the dimensions of drawn objects will still be shown on the status bar in pixels.
There is also an option to work in black and white.
Working in black and white is a thankless task. Many of the tools become meaningless. Leave black and white for experts or masochists.
Now for the different tools.
The button representing a selected tool will appear to be depressed.
The Zoom Tool in Vista
Make things look bigger or smaller.
![]() The little magnifying glass changes your view of a drawing. If you want to change some tiny thing that's really hard to see, click on the magnifying glass. It can be called the zoom tool or the view tool.
The little magnifying glass changes your view of a drawing. If you want to change some tiny thing that's really hard to see, click on the magnifying glass. It can be called the zoom tool or the view tool.


 In Vista, when you click the zoom tool a slider appears at the bottom of the Vista Paint toolbox.
Here you see the zoom slider,from left to right, in normal position—no zoom—at maximum zoom and at minimum zoom. This last option is useful if you need to see the overall appearance of a picture that is larger than the Paint window.
As well as dragging the slider up or down, you can position the magnifying glass over the part of the picture you want to examine more closely and click. Left clicks zoom in, right clicks zoom out. You get just three clicks in either direction.
If you zoom in to a magnification of 8x, it is easy to place single pixels of color with the pencil. Other tools can also be used very precisely.
.
If, after zooming in or out a few times, you aren't certain that you have come back to normal view, you can open the View menu, slide onto Zoom and then onto Custom. You will then see the present percentage of zoom and change it if necessary.
I'd mostly use this only to confirm that I'd returned to normal view. If you click on one of the magnifications in order to zoom in, you'll get a bigger view, but unless your window is very small you can't be sure which part of the picture you'll zoom in on. Therefore it's better to click the zoom tool directly on the picture.

Thumbnail and Grid
When you are zoomed in, two further options become available on the View Menu. These are Show Grid and Thumbnail.
 While you are working in a zoomed view, Thumbnail will give you a small window in which you can observe the results of changes as you make them. The Thumbnail window can be placed wherever you find it convenient, and it can be resized by dragging the sides or the corners.
Once you have it sized and positioned to your liking, it will follow as you move tools around the zoomed window.
Unfortunately, once you return to normal view the Thumbnail window is often lost and will have to be invoked again when next you zoom in.
.
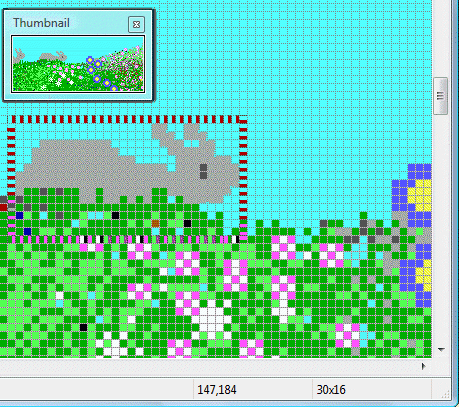 Show Grid becomes available on the View menu only when you are working in a window zoomed in to 8x. Each pixel (short for “picture cell”) of color can be seen individually. This is useful if you are trying to make a very precise selection or place one or two pixels of color in a precise location.
Here a selection is being made, and you can see that both its starting location (147 pixels from the left and 184 pixels from the top) and size (30 pixels wide and 16 pixels high) are reflected in the numbers in the status bar.
.
The Paintbrush
 This picture shows that I've chosen the paintbrush.
The palette says I'll be painting with black, unless I use the right button for drawing, in which case I'll paint with white, which won't really do me a lot of good.
I can change either color by clicking the appropriate button on the color I want it to use.
Under the tools and above the palette are a lot of different shapes with which I can choose to paint.
The one I've chosen (it shows as an oblique white line on a blue oblong) will give a thick line when I drag in one direction and a skinny one in the other direction, so you get a sort of calligraphy pen effect.
It's also useful for painting right up close to something.
The Eraser Tool
 Here we have the eraser, a clever little gadget.
When you press the left button, it rubs out everything you drag over.
Swapping Colors
When you press the right button it changes anything the color of the left button to the color of the right button. (This isn't standard through graphics programs; most use the buttons the other way round.)
Say you have a blue line and you change your mind and wish it were green. ![]()
- Select the eraser tool.
- Go up to the palette and click your right button on green.
- Click your left button on blue.
- Now, pressing the right button, drag over the blue line.
- Magic! You now have a green line.

This is very handy if you need to draw guidelines to help get a picture the way you want it. You draw the guidelines in a color you don't like much and won't use in the drawing.
When you've done your drawing, you put the nasty guideline color onto your left button and white (assuming that white is the color of your background) onto your right button and drag over the guidelines.
Your picture remains, but the guidelines disappear.
The squares under the toolbox show you the sizes of eraser from which you can choose.
The Color Picker
![]() This is the color picker. If you're working on a drawing, particularly if you're “zoomed in”, and you want to use one of the colors that's nearby in the part you're working on, instead of going down to choose the color from the palette you click on the color picker and then on the color in the drawing. It's even more useful when you've opened a picture made in another program or saved from the web—or even a photograph. There you may see many colors that are not available on the palette, but can be easily sampled with the color picker.
This is the color picker. If you're working on a drawing, particularly if you're “zoomed in”, and you want to use one of the colors that's nearby in the part you're working on, instead of going down to choose the color from the palette you click on the color picker and then on the color in the drawing. It's even more useful when you've opened a picture made in another program or saved from the web—or even a photograph. There you may see many colors that are not available on the palette, but can be easily sampled with the color picker.
This tool is also used with the color 16 color sampler mentioned earlier.
Usually, once you've chosen a color, the color picker will be replaced by the tool you were last using.
The Fill Bucket
![]() This is the fill color bucket tool. It's also called the flood tool. You use it to fill a shape with a color of your choice.
This is the fill color bucket tool. It's also called the flood tool. You use it to fill a shape with a color of your choice.
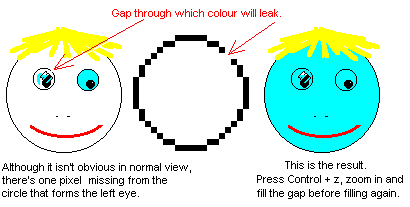
The shape must have absolutely no holes in it, or the color will leak out and go into places where you don't want it. If that were to happen, you'd hold down Control and press z.
Then zoom in and find the place where color leaks through. It can be just one pixel. It's most likely to happen if you've pasted a piece of clip art and are coloring it in.
Make an Abstract Mosaic

 If you're new to the program, being faced with a blank white screen can be pretty daunting. "What'll I draw?" Try making a big hollow square, criss-crossing it with lines at random angles, then use the fill bucket to color each little section. Alternatively, make a scribble pattern with the pencil tool and fill areas in the same way. You'll have something bright in no time!
Thanks to Ms Clyde Dawson for this idea.
If you're new to the program, being faced with a blank white screen can be pretty daunting. "What'll I draw?" Try making a big hollow square, criss-crossing it with lines at random angles, then use the fill bucket to color each little section. Alternatively, make a scribble pattern with the pencil tool and fill areas in the same way. You'll have something bright in no time!
Thanks to Ms Clyde Dawson for this idea.
Erasing a Color with the Flood Tool
Apart from filling shapes, this can be used as a sort of eraser. Say you've been scribbling away and you've left bits of blue all over the place. Flood the drawing area with blue, then with white, and all the bits and scraps of blue should vanish.
If you had some blue things that you wanted, though, they'd vanish too. Another job for good old Ctrl+z.
If you've used guidelines in constructing a picture, it's a good idea to draw a temporary border around it, using a color that isn't in the picture. This will limit the effect of the flood tool to just the area within the border.
When the Flood Tool Won't Work
 Sometimes you try to use this tool to change a color in an existing picture and nothing happens.
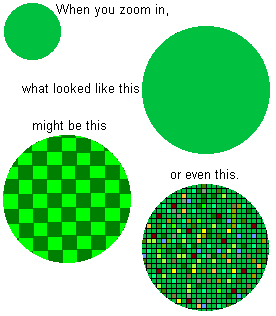
After you've done the virus check, rung the repair man, worried about your brain function, etc, etc, you should zoom in and have a close look at the area you're trying to color. What you'll see is not one color, but two, several or many colors mixed together. This applies particularly to photographs, but also happens with some clip art. colors are “smoothed” to make them look more natural; skin tones, for instance.
Dithering
There was also a process called dithering. This happened when a picture needed more colors than were available to it. For instance, the 16 early Windows colors included no soft pink. Pink would be simulated by mixing red and white pixels. It worked well, but such a picture makes the fill bucket impossible to use.
The only ways to deal with an old picture colored in this way is to use the color picker to select one color at a time and use the color eraser on each in turn, or else paint over difficult areas. All a bit fiddly!
The Line Tool
 This tool makes straight lines. You can drag freehand to make a line in any direction, or you can hold down the shift key and the line will be constrained to exactly vertical, exactly horizontal, or exactly 45 degrees.
The line thickness is chosen from the box under the toolbox.
The line thickness chosen here also affects the borders of rectangles, ellipses and polygons.
.
The Curve Tool
 This is the curve tool. At first it seems hard to learn, but once you get to know it you can have a lot of fun with it.
You choose a line thickness from under the toolbox, and you choose a color to draw with. I've used different thicknesses and different colors.
Drag a straight line, then click somewhere near it. Move your cursor and click again, or drag and click.
You only get two clicks per curve. If you don't like what happens you hold Ctrl and tap z and it'll go away.
The flower petal shapes are made differently. Imagine a triangle and click each of its points. You don't drag a line first. You have to practice for about a hundred years before you have the faintest idea which way up the shape will be. You might find it easier to get all organised and draw a grid to guide you. You can erase the grid when your picture is finished.
If you want to make something with several curves—like the dark blue squiggle here—just start a new one from one end of one you've completed. As you can see, I didn't line my second curve up quite as well as I was hoping. I'd need to zoom in and correct that bump with the pencil tool.
The Pencil Tool
![]() Used in normal view, the pencil draws freehand. It's very, very hard to learn to use as a writing tool. When you can write your name with the pencil you should rush out and buy a lot of balloons and otherwise congratulate yourself.
Used in normal view, the pencil draws freehand. It's very, very hard to learn to use as a writing tool. When you can write your name with the pencil you should rush out and buy a lot of balloons and otherwise congratulate yourself.
The true usefullness of the pencil is in editing tiny parts of a picture with absolute accuracy.
The pencil is always set at a size of one pixel. In zoom-in view, you can change part of a picture one pixel at a time.
The Shapes Tool
 This group of tools is used for drawing shapes. Three of them, the rectangle, ellipse and rounded rectangle, respond similarly to your holding the shift key. This constrains them to drawing either a circle or a square—with or without rounded corners. The polygon tool responds somewhat differently, in that it attempts to keep its lines exactly vertical, exactly horizontal, or exactly at 45 degrees.
Filled Circles and Rectangles and Hollow Regular Shapes
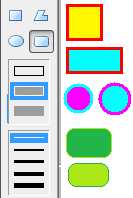
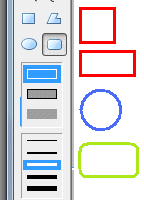 On the left are filled shapes. Which color is used as the fill and which as the border depends on the button you're holding as you drag. With the left button the background color is used as the fill.
Those shapes on the right have been drawn as hollow; they're just an outline. The background color is used if you drag with the right button. The foreground color is used if you drag with the left.
If you are using the third choice—a filled shape without a border—the color used will be that on whichever mouse button you press while you draw the shape.
Remember, if the one you started was wrong, Ctrl+z will undo it.
.
Polygons
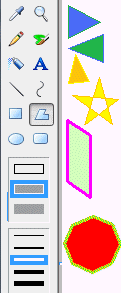
To draw a polygon, such as a star, a triangle or an odd-shaped quadrilateral, drag to make the first line, then click where you want subsequent lines to end. When you double click, a line will be drawn from the end of the last existing line to the beginning of the line that you dragged to begin.
If you want to make a fairly regular polygon, try first making a rough template. Use a thin black square or circle and draw lines through it, or mark the points where you think you should click.
Below the toolbox there are three representations of how you might like your polygon drawn. The top one is hollow; just an outline. The middle one is filled and has a border. The bottom one is a solid block of color without any border.
The polygons on the left were drawn with the middle choice, which means “filled shape with a border”. Those on the right are hollow shapes, top of the three options.
Border Thickness of Shapes
In Vista, the thickness of the outline of rectangles, ellipses and polygons can be chosen from the area at the bottom of the toolbox.
.
.
The Spray Paint Tool
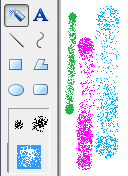 The spray can delivers pixels of color in a spray pattern.
Below the toolbox are three choices for width and density.
The dots are much closer together if you choose the small option.
This tool is one of the easiest to use and a good one to start with. Choose the wide spray, as shown selected here, and just drag all over the drawing area.
Change colors often. You'll find that it's much easier to draw some sort of recognisable shape—or even write your name—with this tool than with the pencil or brush. Spray one color over another, or try building up more color in one area than in another.
The density of the spray depends on the speed at which you drag; the faster, the softer.
The Selection Tools
![]() Now we have the selection tools. The one on the right is the one you'll almost always use. It selects a rectangular area. The blobby shaped one is more tricky.
Now we have the selection tools. The one on the right is the one you'll almost always use. It selects a rectangular area. The blobby shaped one is more tricky.
The Rectangular Selection Tool
![]() You use this tool when you want to move something to a different part of the drawing.
You use this tool when you want to move something to a different part of the drawing.
You also use it if you want two or more copies of the same thing.
A third thing you can use it for is to draw or write with a small part of your painting.
Last, you can use it to delete an area. The selection tools in this program work particularly well and without fuss. Don't tell the program writers, or they'll think of a way to make them less handy!
Here's How It Works.
 You drag across the thing or area you want to copy, move or delete. The usual way is to start at the top left and drag to bottom right. This makes a dashed rectangle around the area. Now you can let go and put your cursor anywhere inside the selected area. If you click anywhere else, the selection will be cancelled.
To move your selection, press with your left button and drag it to where you want it. If you press with your right button you'll get a menu instead. The menu seems to be mostly about doing things in a longer way, so just use the left button.
There are two things to think about when you're moving a selection. The first is your background color. This doesn't only mean the color that's the background of your picture.
It means the color that's on your right mouse button.
If it's say, a horrible dirty green, the place from which you moved the selection will assume that color, which is not likely to be what you want. Therefore, make sure that your right button color is the same color as the background of your picture—usually white.
Transparency
The other consideration is transparency. You may want to move the selection just as it is; a rectangular shape with a fair bit of white in it. On the other hand, you may want only what you've drawn, in which case you'll want the white to be transparent.This little pair of icons, which appear conveniently when you click on the selection tool, control transparency. With the bottom icon highlighted, as shown here, your selection will be transparent. With the top icon highlighted, the whole rectangular area will come along, no matter what colors are in it.
N.B. “Transparency” here refers only to what happens while you're working in Paint. As far as I know, Paint will not save with a transparent color. If you need to make a gif where the background shows through, you need to open your finished work in another program, such as IrfanView.
OK. That was about moving your selection. Now we'll use the same tool to make a copy.
Copying Parts of Your Drawing
Select the area as before, by dragging from top left to bottom right. Let go and place your cursor inside the dashed rectangle. Check that transparency is set the way you want it. Hold down the Ctrl key. Drag the selection to the place where you want the copy. Click. You can move it to lots of different places. Each time you click you'll leave a copy.
Drawing with A Cutout

Accidental Splodging.
Drawing with a part of your picture takes some practice. Select an area, move or copy it to where you want to begin, hold down the Shift key and start dragging. How it works out depends on speed and direction. If you drag quickly, you get the image repeated randomly but recognisably. If you drag more slowly you get a splodgy result. This may or may not be what you want.
Deliberate splodging.
![]() Select a tiny area from a picture. Hold the shift key while you drag it as though it were a paintbrush or crayon. Write a word or two.
Select a tiny area from a picture. Hold the shift key while you drag it as though it were a paintbrush or crayon. Write a word or two.
The word “splodging” has now been added to the dictionary!
.
Repeated Copy/Pasting

 Now, say you want to do something rather more controlled. OK. That's what the Ctrl key is for (in this case).
Let's say you've drawn a little flower.
And a leaf.
And a vine that you'd like them to grow from.
OK. First off, select the leaf. Don't make the selection tight and neat. Have a bit of space around the leaf. Open the Image menu. Click Flip/Rotate. Click Flip horizontal. Voila! Now you have two leaves, but one is facing the other way.
OK. Now it's simple. Select the flower. Hold the Ctrl key as you drag a copy to a new position. Click. Keep holding the control key and drag to another position. Click.
When you have enough flowers along the vine, go back and select one of the leaves. Hold down the Ctrl key and drag, position, click, drag, position, click. Did that go well?
.
The Freehand Selection Tool
![]() You'll only need to use this tool if you want to copy something that's in an awkward position. If two things are close together, so that you can't draw a straight line between them, you use this tool. You use it to make a freehand selection around the thing you're selecting. Drag as though you were drawing around the shape with a pencil, until you have the whole thing outlined. As soon as you release the mouse button the selection will be made, so if you let go too soon you'll need to start again.
You'll only need to use this tool if you want to copy something that's in an awkward position. If two things are close together, so that you can't draw a straight line between them, you use this tool. You use it to make a freehand selection around the thing you're selecting. Drag as though you were drawing around the shape with a pencil, until you have the whole thing outlined. As soon as you release the mouse button the selection will be made, so if you let go too soon you'll need to start again.


When the selection appears, it looks as though a rectangular area has been selected. However, when you move or copy the selection, you'll find that only the part you outlined has been selected. Move it into a clear area, so that you won't have so much trouble selecting it next time.
To delete something with a selection tool, select it and press the Delete key.
You can also delete things by drawing white squares or circles over them, or, if they're in solid blocks of color, by clicking the fill tool on them when it's loaded with white.
Text

Now text. Text is tricky. Text is horribly tricky. Always save before you start adding text, so that if you run out of undo levels you can exit without saving and have your picture as it was before you started the text.
I strongly recommend that you have your first adventures with text on an unimportant picture—one that you've made especially for learning the behaviour of this tool.
When you click the large A that represents the text tool and click on your page, a little font bar should pop up. If it doesn't, click the View menu and click Text Toolbar.

You use this toolbar just as you would in a word processor, choosing font, size, and special things like Bold or Italic. There's an icon at the right hand end that I don't understand. It doesn't have a tool tip and it isn't mentioned in help. Perhaps it's an emergency exit; a “break glass in case of fire” sort of thing.
You can drag the text toolbar out of your way while you're working.
It's good policy to make your text in a spare area, away from your main work. When you have it as you want it you can position it on your picture easily.

To make your initial text box, you can click or drag; it doesn't matter. If, while you're typing text, you realise that the box is too small, you can put your cursor over one of the “handles” (blue blocks) and drag it wider or taller or both. The text box doesn't contract to fit the text when you paste, nor have I found it possible to drag the box smaller.

It is possible to move a text box before pasting. You have to hover your cursor exactly over the dashed line until a normal-looking arrow appears. Press the left mouse button and drag the text box to a new position.
If you want some padding in front of the text you have to use spaces.
Before you click outside the text box—thus pasting the text into the picture—check your transparency icons. You may want the text pasted on a rectangular background so that it stands out from the rest of the picture. If so, have the top icon highlighted. If you want the text without a background, choose the lower icon.
If I were adding text to a picture in Paint, I'd have spare space on my drawing area, and I'd type my text there, make a block of color to fit it nicely if I wanted a colored background, paste the text onto the background and then paste the whole thing where I wanted it in the picture. It's too awkward doing it straight into position; too many things can go wrong.
By the way, if I wanted it on a white background, I'd make the background some other color until I had the box in position, and then I'd use the fill tool and/or the color eraser to make it white.
Well, that's it, as far as I can think. Just for fun, here's a template and directions for drawing a flower. Copy the picture, paste it into Paint, and see how you go. (If it appeals to you.)
Drawing a Collection of Flowers
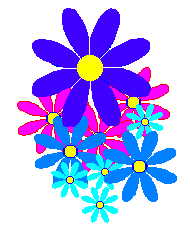 These directions will put you on the road to making something like this—or, probably, something much more interesting and creative. The results may not have the smooth finish you'd achieve in a top flight graphics program, but hey! Paint is free, you can produce something of your own in jig time, and you'll become familiar with many of the tools along the way.
To do this exercise without hassles, you'll need a really big drawing window.
Gif is the format to use for this work
You'll also be wise to save often. One nice thing about Paint in Vista is that you can save in the gif format without any fuss. This is true of cut-outs as well as whole files.
Take care when saving something for the first time. Paint defaults to jpg, which is exactly right for photographs, but quite wrong for the sort of work we're doing here.

Save before you begin
As soon as you open Paint, and before you do anything else, save the blank page as workspace.gif.
- Go to the File menu and click Save As.
- Click the drop-down arrow at the end of the place labelled Save as type: and choose GIF (*.GIF) from the menu.
- Drag your cursor over Untitled.jpg to highlight it and type workspace.
- Click the Save button.
Once a file is saved, you only need to hold down the Ctrl key and tap “s” to save as you work.
Ctrl+s will save in just about any Windows program. Using it often is a good habit to get into.

Getting Started
Copy the Template from Here
There are other ways to save pictures from the web—but not if Paint is your only graphics program. Other programs will save the picture at its true size; if Paint happens to have a large drawing area set, it will save all of the unused area as part of the picture. This is not an economical way to save pictures.
You can use this method to copy any picture from any web page. However, some pictures are protected and can't be copied. That's because the artist doesn't want their work freely distributed. Such pictures may have taken great skill and hours of work to produce.
If a web site has a notice requesting that you don't copy images, always heed it.
Right click on the picture.
Choose Save Picture As.
Make sure that the picture is being saved in a place of your choice,
then either accept the offered name or type in a new one.
In some cases the offered name is meaningless. Use a name that makes sense.
The default name for this picture is flower_template.gif.
Bring a Copy of the Template into Paint
Later, when you're ready, open Paint and make or open workspace.gif.
Check that you have white as your background (right button) color.
Click Edit on the menu bar, choose Paste From and navigate to the place where you've saved flower_template.gif.
If you can't see the name of the file you saved, make sure that Files of type shows either All Picture Files or GIF.
Click flower_template.gif and click Open.
When you're returned to the Paint window, there will be a dashed selection rectangle around flower_template.gif. If you'd like to move it to a different position, place your cursor anywhere inside the dashed rectangle and drag the picture.
Click anywhere outside the picture to paste it.
Save your work by pressing Ctrl+s.
N.B. Any small picture that you've saved can be brought into Paint in this way. You'll be working on a copy and the original will not be changed.
First Steps
Working over the Template
- Choose a strong color—but not red or black.
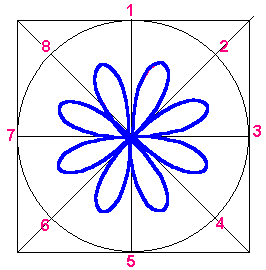
Click the curved line tool.
Set line width to the second thickness.
Click the centre of the circle.
Click where line 1 crosses the circle.
Click where line 2 crosses the circle. The first petal should appear.
Click the curved line tool to paste the petal.
Click the centre of the circle.
Click where line 2 crosses the circle.
Click where line 3 crosses the circle. The second petal should appear.
Click the curved line tool to paste the second petal.
Continue around the circle, following the pattern of centre, 1,2, paste, centre, 2, 3, paste, centre, 3, 4, paste, until you are back to line 1 and have an eight petalled flower.
 (This would work without the repeated clicking on the curve tool. However, I've found that if I leave this out and undo a mistake, Paint undoes all the curved lines I made since last clicking the tool.)
.
Now Remove the Template
Make sure that you have white as your background color.
That is, click your right mouse button on white in the color palette.Click your left mouse button on black.
Click on the eraser tool.
Pressing your right mouse button, drag over every black line or curve.
Now click your left button on red in the color palette.
Pressing your right mouse button, drag over every red number.
(If you have clicked on red in the palette and find that the color eraser doesn't work, it means that the red is not exactly the same as the red in your palette. If this happens, click on the Color Picker tool ![]() and click with it on the red of one of the numbers. Now the color eraser should work for you.)
and click with it on the red of one of the numbers. Now the color eraser should work for you.)
Color the Flower
You don't need to decide on your final colors—you can recolor as many times as you like.
Click your left mouse button on the color you'd like your flower to be.
For the first one, make this a different color from the one that you used to make the outline. After you've made some copies, you might like to fill some of those with the outline color.Click on the fill bucket tool.
Click inside one of the petals.
Make a Centre for the Flower
Click on the line tool and then on the third thickness in the box below the tools.
Choose foreground and background colors that are different from the colors already in the picture.
Click on the circle/ellipse tool.
Click on the filled shape below the tools.
In an empty part of your drawing window, hold the shift key while you draw a filled circle.
Make several of these circles until you're happy with the size.With your right mouse button, click on white in the color palette.
Click on the rectangular selection tool.
Click on the transparent selection icon.
Draw a selection rectangle around the circle you want to use as the centre of your flower.
Drag the circle onto the centre of your flower.
When you're satisfied with the position, click an empty part of your drawing window.
Make Copies of the Flower.
With white as your background color, and with the transparency icon selected,
draw a selection rectangle around your flower.Press and hold the Ctrl key.
Drag a copy of your flower to an empty part of the drawing window.
Click to paste, then continue dragging until you have another copy.
Change the Size of the Flower.
Draw a selection rectangle around one copy of the flower.
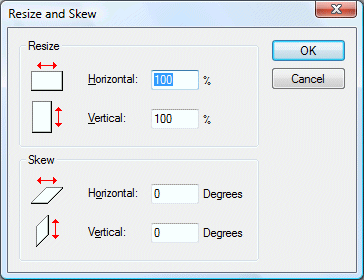
On the View menu, choose Stretch and Skew.
In the dialogue box that appears, change 100 to 50 in both the horizontal and vertical slots.
Click OK.
.
 The resultant size change here is rather dramatic.
Select another copy of your flower, go through the same procedure,
using different numbers. Try the effects of the
Skew dialogue as well.
The resultant size change here is rather dramatic.
Select another copy of your flower, go through the same procedure,
using different numbers. Try the effects of the
Skew dialogue as well.
You can, of course, change the Stretch numbers to something greater than 100, although the resulting picture may look rather rough. It's always a good idea to experiment so that you know what can and can't be done.
Change the Colors of the Flower.
When you have several copies in different sizes, click on the fill bucket tool, choose a color and click on parts of one of your flowers.

 If you're planning to have white flowers in an arrangement, fill them with color first, then flood out or erase the color with white after the arrangment is made.
The flowers in the collection on the left were already white when arranged. Those on the right were given a temporary color fill and were made white only after the arrangement had been put together.
Saving Your Work.
You'll eventually want to save some of the finished flowers without the huge work area you've been using.
You'll need to do this using the Copy To procedure.

Draw a selection rectangle around a part that you want to save. It may be one flower or a group.
Click on the Edit menu.
Click on Copy To
In the dialogue box, type a name and make sure that Save as type: reads gif. Click OK.
Select further parts of your picture and save them in the same way, varying the names.
It's quite useful to save a set of pictures as flower01, flower02 and so on.
Using Your Flowers
You now have a collection from which you can assemble a picture at any time.
So that the flowers are preserved for repeated use, you don't use File > Open.
You open a workspace, save it as a gif with an appropriate name, then retrieve the picture or pictures that you want to use by clicking the Edit menu and choosing Paste From.
You can do this repeatedly, pasting from as many pictures as you like.
Make an arrangement that pleases you, then use the Copy To procedure to save it.
Remember that if you've put a picture at the back and suddenly wish it were at the front, you have only to use Paste From again to get a fresh copy to paste on top.
Be certain that you have white on your right button before you do this, of course.
With further experimentation you'll make various kinds and colors of leaves, berries, twigs and vines. Always cut out and save things that particularly please you. Soon you'll be making bright corners for emails or printed letters—and they'll be your own unique work, rather than “Everybody's seen it ” clip art.
Formats for Saving Graphics
The instructions in this article refer to pictures made in Paint.
Pasted photographs are quite different and should not be saved in GIF format.
Generally, photographs need to be saved in the JPG format. Professional photographers use other formats, but that isn't of concern here. Professional photographers are unlikely to be working in MSPaint.
Any picture with hard, clean lines, such as very simple ones made in a painting program, are usually best saved as GIF.
If you zoom in on a photograph, you'll find it hard to detect the edges of things—to see where one object finishes and another begins. All edges are softened. Sometimes this is exactly what you want, but it can make small details become blurry. Diagrams or cartoons with speech balloons will keep much crisper lines and text if saved as gifs.
The bmp format saves both sorts of pictures accurately, but makes very large files.
Pictures in Emails
If you ever include pictures in emails, make sure that they are in either gif or jpg format. Obliging a friend to download huge bmp files isn't a good idea; it will cost them time and probably money. Any picture you plan to put on the web or send by email should be jpg, gif or png.
For tips about preparing a picture to send by email, see Sometimes JPG is the Wrong Choice Sending Photos in Email and Screenshots.
![]()
Once you've mastered some of these techniques, you'll probably want to try a better program—one that offers more choices. Links to some free stuff are listed on my Free Graphics Programs page.
For other graphics helps and tutorials on this site, a guide can be found here.
Questions or comments? I'd love to hear from you. My email address is here.
Return to top
Drop-Down Menu from Brothercake
Everything below this is a javascript menu. If you are using a reader,
please use the links here.