Learn to use the tools and make pictures with MS Paint for Windows 7
These instructions are for MSPaint in Windows 7.
As some tools behave very differently, you may prefer to read the instructions for MSPaint in Windows 98 or MSPaint in Windows XP or MS Paint for Windows Vista.
TABLE OF CONTENTS
Alternative free programs Anti-aliased Text Background color Brushes Circles Clipboard menu Closed curves Colors Color boxes Colors-edit Color-invert Color palette Color picker Copying a selection Crop Curves-closed Curves-repeated Custom Colors-save Curved lines Cutout save Display Distorted Selections Edit colors Eraser Fill with color Flip horizontally or vertically Floodfill Foreground color Freeform selection Freehand polygons Full screen Gridlines Home tab Image menu Invert Color Lines-curved Lines-straight Line thickness Magnifier Menu bar Paint button Painting with a selection Paste from Pencil Polygons-freehand Properties dialogue Quick Access Bar Quick Access Toolbar-adding ribbon items Quick Access Toolbar-Customise Quick Access Toolbar-Move Questions Resize Ribbon Rotate or flip Selection-copying Selection-freeform Selection menu Selection options Selection-rectangular Selection-transparent Saving a copy Save a cutout Save custom colors Saving your work Shapes Size tool Skew Squares Status bar Straight lines Text-blurry edges Text tool Thumbnail Title bar Tools menu Transparent selection View tab Zoom tool Zoom slider
The Paint Window
This is a typical view of the top of the Paint window.

At the very top is the Title Bar, just as in all programs, below it is a very simple Menu Bar and below that is the Ribbon.
The Title Bar
![]() At the left end of the Title Bar the first item shows a little paint palette. If clicked, this button opens a standard window menu, offering Restore, Move, Size, Minimise, Maximise and Close. You are unlikely to want to use this menu, since all of those things can be done in quicker ways.
At the left end of the Title Bar the first item shows a little paint palette. If clicked, this button opens a standard window menu, offering Restore, Move, Size, Minimise, Maximise and Close. You are unlikely to want to use this menu, since all of those things can be done in quicker ways.
The next four items make up the Quick Access Bar, offering buttons for Save, Undo, Redo and Customise.
How to move Quick Access Toolbar to below the Ribbon
![]()
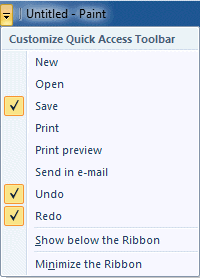 If you'd prefer to have Save, Undo and Redo below the ribbon, move your cursor over the left end of the title bar until the Customise icon lights up. Click and a menu will appear.
Near the bottom of the menu that appears, you'll see Show below the Ribbon. Click Show below the Ribbon.
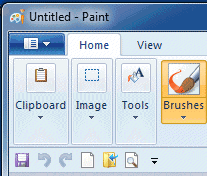 You'll also see other commands that you can add if you wish. I've chosen to add New—for a new Paint page, Open—to open a previously saved and closed picture, and Print Preview.
You can click any of these item a second time to undo changes you've made to the Quick Access Toolbar.
Adding Ribbon items to the Quick Access Toolbar
![]() Many other items can be added to the Quick Access Toolbar. On the Ribbon, right click on anything you'd like to add to the Quick Access Toolbar and a menu will appear. This includes things offered in sub-menus. I've added the Pencil tool and Paste Transparent.
Many other items can be added to the Quick Access Toolbar. On the Ribbon, right click on anything you'd like to add to the Quick Access Toolbar and a menu will appear. This includes things offered in sub-menus. I've added the Pencil tool and Paste Transparent.
To remove items you've added from the Ribbon, right click the unwanted icon and then click the Remove option.
Other things on the Title Bar
After the Quick Access items, you'll see the title of your picture followed by the name of the program—Paint, of course. If you haven't yet saved your picture, the name will be shown as "Untitled".
![]() At the right-hand end of the Title Bar are the three usual window buttons, Minimise, Maximise and Close. If your Paint Window is already maximised—taking up all of your screen—the middle button will be Restore, which makes the window the size you usually have it.
At the right-hand end of the Title Bar are the three usual window buttons, Minimise, Maximise and Close. If your Paint Window is already maximised—taking up all of your screen—the middle button will be Restore, which makes the window the size you usually have it.
The Menu Bar
![]()
![]() The Menu bar has three items on the left and a Help button at the far right.
The Menu bar has three items on the left and a Help button at the far right.
Paint Button
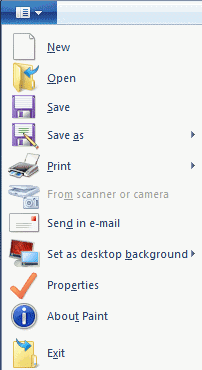
First on the left is the Paint Button, which opens a very comprehensive menu, similar to that shown here, plus a list of pictures you've recently saved. Most items are self-explanatory, but one—Save as— is very important if you ever want to save a cutout without losing the rest of your picture.
You might like to take a quick look at some of the other items and investigate their uses as well.
Properties dialogue
The Properties dialogue, for instance, will give you information about the picture on which you're currently working, and let you nominate whether you want to work in centimetres, inches or pixels. (So far, I haven't managed to make any of these measurements agree in a printed picture, but this may well be due to my lack of experience.)
There's an option that helps you to set your current picture as your desktop background. You can change this as often as you like.
.
Home Tab
For nearly everything you do, you'll want the Home tab to be at the front. The Home tab contains the Ribbon, from which tools and colors are selected. When you're making use of the View tab, you can flick back and forth between Home and View as often as you need to.
View Tab
 Zooming in and out is one of the features that Paint in Windows 7 has improved out of sight! Click on the View tab to bring it to the front and you'll find a whole set of useful options available. These can be used alone or in conjunction with the Zoom Tool on the Ribbon or the slider on the Status Bar.
Zoom in and Zoom out tools can be clicked repeatedly to get a closer or more distant view.
The 100% option is handy when you've finished working in a very zoomed in view. One click and you're back to normal.
On the Show or Hide part of this tab, you have the option of hiding the status bar. I wouldn't advise you to do that. The status bar can be useful.
Gridlines are convenient if you want to align shapes accurately.
Rulers? If you like. Turn them on and see what you think.
On the Display section, you can click for Full Screen View. You can also get a Full Screen View by hitting F11. In either case, come back to a normal view by pressing the Esc key.
Thumbnail is only available when you are zoomed in. It lets you see how changes you make are affecting your picture in normal view. So far, I'm finding that the thumbnail cannot always show work on the far right or the bottom of the page.
You can flick back and forth between the Home tab and the View tab as often as you like.
The Ribbon
All the tools, the color palette, and most commands are grouped together in the ribbon. The exceptions are Save, Undo and Redo, which are shown at the left end of the title bar, in the Quick Access Toolbar.
 If you choose to use a very small window, the ribbon will appear like this. Drop-down arrows below each item will give you access to everything in their menus.
If, however, you use a very large window, you will have many more menu items on display.

There is also an option to minimise the ribbon. If you choose this, the ribbon disappears entirely, but pops into view if you click on the Home tab.
The Clipboard Menu

 The clipboard menu offers three options—Cut, Copy and Paste. Only when a selection is active will the Cut and Copy icons show as being ready.
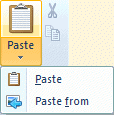 Paste is always active, because you may wish to Paste from a picture on your computer. Say you've previously drawn and saved a small flower and now wish to add it to your present drawing. You'd click the down arrow under Paste, click Paste from and navigate to the saved picture, click its name and click Open.
You'd be returned to your work space and see the added picture inside a selection rectangle, ready for you to drag to its permanent position.
The Image Menu—Select
![]()

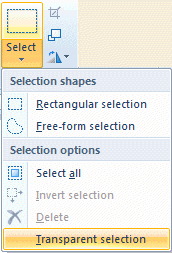 Depending on the size of your window, the Image Menu will look like one of these. When you click the down arrow just below the dotted rectangle, or just below the word Image, a menu will offer you further choices.
Before you can use the buttons on the right of this menu, you select the part of your drawing that you want to work with.
Transparent selection
 At the bottom of the Select menu you'll see Transparent selection. You'll want to use this often, so it's a good idea to add it to your Quick Access toolbar. To do this, right click on Transparent selection and then click on Add to Quick Access toolbar. On your Quick Access Toolbar, there'll be a checkbox in front of the words Transparent selection.
 ![]() While that box has a tick in it, selections will be transparent.
While that box has a tick in it, selections will be transparent.
To make your selections opaque, just click the checkbox to remove the tick.
Rectangular selection
Usually you'll make a rectangular selection. After clicking the rectangular selection tool, position the cross-hair cursor at the top left of the part you want to select, press your mouse button and drag down to its bottom right.
(Actually, you can start at any corner, so long as you finish at the corner diagonally opposite.)
A dashed rectangle will appear around your selection, with the move cursor ![]() replacing the cross-hair one. You can press this cursor down anywhere inside your selection and drag to move it, or drag while holding the Ctrl key to make a copy of it.
replacing the cross-hair one. You can press this cursor down anywhere inside your selection and drag to move it, or drag while holding the Ctrl key to make a copy of it.
Freeform selection
You may need to make a Freeform selection if the part of your drawing that you want to work with is crowded up closely with parts you don't want to include.
 After clicking Freeform selection, drag your mouse around the area you want, as though you were drawing a line around it. When you release the mouse button, a selection rectangle will appear and it may seem that unwanted parts of the drawing have been included, but if you move the selection you'll see that this is not so.
Copying a selection
 There is, of course, a Copy button on the ribbon, but this way is faster, particularly if you want to make multiple copies of a selection.
Draw a selection around the part you want to copy, using either the rectangular or the freeform selection tool.
Hover your cursor over the selection until the Move Cursor ![]() appears.
appears.
Hold the Ctrl key as you begin to drag a copy to its new location. Click. If you want to continue copying, press the Ctrl key again as you begin to drag the second time. Repeat as many times as needed.
Painting with a selection
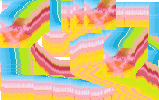
 Try this. Select a tiny piece from a picture, choosing something with more than one color. Hold down the Shift key while you drag it around to make an abstract pattern.
You can even try writing with a tiny selection, although you will need to zoom in and use the pencil to tidy up blobby bits where you started and finished.
Selection options
To the right of the selection icon you'll see three options, Crop, Resize and Rotate flip.
Crop
The top button, a diamond shape with a line through it, lets you crop your picture so that only the selected area remains. This has replaced the old Copy to option and is tricky if you want to save cutouts from a drawing.
If you click the Save icon after cropping to a selection, your large drawing page will be replaced with the cutout.
How to save a cutout
- Save the picture you're working on.
- Select the part you want to save as a cutout.
- Click the Crop button.
 Go to the Paint button and open the menu.
 Click Save as
Be very sure that you do click Save as and not Save.
- Type a name for the cutout and click Save.
You'll be returned to the Paint window with the cutout displayed in it. You'll see that the name on the Title bar is the name you used when saving the cutout.
- Click the Open icon on your Quick Access Toolbar or from the Paint Button menu.

- Open the picture with which you wish to continue working.
Do practise with this before you try it on something good. It took me quite a few tries before I felt anything like confident.
Resize and Skew
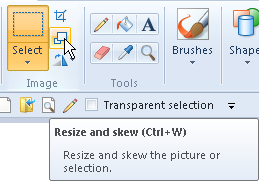
The second tiny button to the right of the large Select button will open the Resize and Skew dialogue.
.
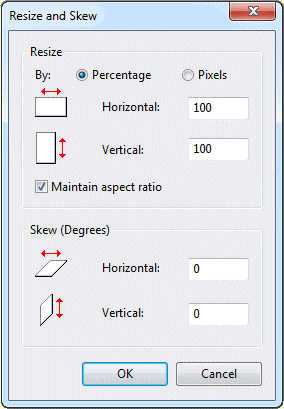
Resize
 You can quickly resize a selection by dragging any of the little blocks—or handles—on the selection rectangle. Just hover your cursor over the handle you want to pull or push until a double-ended arrow appears. Press down your mouse button and adjust the shape to your liking.
However, if you want the size adjustment to be precise, use the Resize dialogue, which will appear when you click the Resize icon. Only the top half of this dialogue is concerned with resizing.
Notice the small square marked Maintain aspect ratio. While this is ticked, whatever you type into the Horizontal slot will be repeated beside Vertical and your selection will stay exactly in proportion. Only remove the tick if you want the selection to be fatter or thinner than it is.
Skew
 The bottom part of the same dialogue box invites you to skew your selection. When using this option, make your selection include a lot of border area to avoid having part of the picture chopped off, as has happened here. If this does happen, click Undo
![]() and make a wider selection before trying again.
and make a wider selection before trying again.
 However, when I tried to skew a heart shape from the Shapes gallery, I had some extra color added, apparently from nowhere. How odd! Ah! Now I see. I had red set as Color 2. I've learned something! Always have your background color—most probably white—on Color 2 when skewing, moving or whatever.
.
 You'll need to experiment with the skew option. Quite small numbers have a marked effect. This selection has been skewed 30 degrees both horizontally and vertically. The other blue box was skewed 20 degrees horizontally.
Rotate or flip
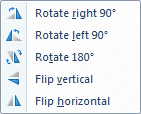 This menu lets you make mirror images of selections, either vertically or horizontally, and it also lets you rotate an item 90 degrees.
Making a mirror image is handy if you're trying to draw something that looks symmetrical. Just copy half of the picture, flip it and join it to itself. See Making a Picture the Same on Both Sides.
Invert Color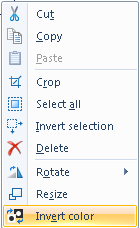
A different set of options is available if you right click on a selection you've made.
Items include: Cut, Copy, Paste, Crop, Select all, Invert selection Delete, Rotate and Resize, but the one that seems to be available on this menu and nowhere else is Invert color, the last item on the menu. This is very important if you want to make a black mask with white lettering to create a fancy fill for text.
The Tools Menu

Pencil
![]() The pencil tool can be used for free-hand drawing, or it can be used in a zoomed in view for pixel-by-pixel editing.
The pencil tool can be used for free-hand drawing, or it can be used in a zoomed in view for pixel-by-pixel editing.
When working with the pencil tool, press with the left mouse button to draw with Color 1 and with the right mouse button to draw with Color 2. Color 1 in previous versions of Paint was referred to as the Foreground color, while Color 2 was the Background color.
In Paint for Windows 7 the pencil's thickness can be changed in the Size tab to 1, 2, 3 or 4 pixels.
Fill with Color
![]() The Fill with color tool, or the Flood Fill tool if you like, is used to fill an area of a single color with a different color. Color 1 will be used if you press the left mouse button on the area to be filled. Color 2 will be used if you press with the right mouse button.
The Fill with color tool, or the Flood Fill tool if you like, is used to fill an area of a single color with a different color. Color 1 will be used if you press the left mouse button on the area to be filled. Color 2 will be used if you press with the right mouse button.

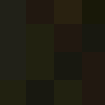
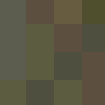 This tool won't work successfully if the part you are trying to color is textured or has different shades of one color. It won't work well on areas in a photograph. Even though the eye may see just one color, there are bound to be many.
Here I've snipped a "plain" brown area from a photo. The second picture shows how a small section of it looks when it's magnified. To make the third picture, I had Irfanview adjust the brightness of the magnified section. The Fill with Color tool can only recolor pixels that are exactly the same.
The Fill with Color tool always fills with a solid color—unless you are filling shapes that you've just made from the Shapes Gallery and have a textured fill chosen there.
The Text Tool
![]() The Text tool in Paint for Windows 7 is a great improvement on earlier versions.
The Text tool in Paint for Windows 7 is a great improvement on earlier versions.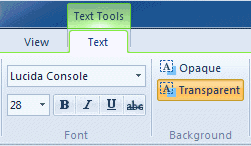 The one exception to this is that Paint 7 always anti-aliases text, so the idea of stacking red text on top of black to get a shadowed effect seems to be a thing of the past—unless you turn off Smooth screen fonts in the Performance section of Advanced System Settings.
You can, if you like, just go ahead and insert your text as you always have, but I'd recommend that you open a new document and play with this tool.
To begin inserting text, click on the text tool. Your cursor changes to an insertion bar.
With this cursor, drag to draw an oblong that you think will be about right to hold your text.
Now, until you've completed these steps, don't click anywhere outside that oblong.
The Text Toolbar appears.
Type your text.
Now drag the cursor over the text so that it becomes highlighted.
Click the down arrow at the end of the Font Name box, so that a list of fonts drops down.
Run your cursor—without pressing any mouse buttons—up and down the font list. As you do this, the appearance of the text you've typed will change appropriately.
When you like what you see, click on the name of that font. The font list will close.
You can repeat this process with the Font Size list.
You can also click the Background from Transparent to Opaque or vice versa, and change both Color 1 and Color 2. You can even run your cursor, while the Color 2 button is operative, over the palette, and see how different backgrounds look behind your text.
You can hover your cursor over any of the handles—little blocks—on the bounding box of the text, press your mouse button and resize the box you've drawn, and if you hit the enter key from the end of your text the box will expand downwards. You can also use the handles to move the text box across the page, pulling it wider on one side and pulling it in on the other.
Although there is no way to centre your text automatically, you can put your cursor to the left of the text and hit the space bar as many times as necessary to centre it.
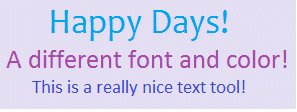 And that's not all. You can type more text, in a different color and a different font and size, right in the same text box! When you are making changes, only highlighted text will be affected.
Oh! And in this version of Paint, you can use the Text Tool while zoomed in! Use the slider on the status bar to change zoom levels, though. Clicking on the Magnifier pastes the text.
Only when you are completely satisfied should you click anywhere on the page outside of your text box. When you click away from the text box, the Text Toolbar disappears and the text becomes part of your picture. It can no longer be edited in any way.
The Eraser
![]() With the left button depressed, the eraser tool changes whatever it is dragged across to the background color—Color 2.
With the left button depressed, the eraser tool changes whatever it is dragged across to the background color—Color 2.
With the right button depressed, the eraser tool changes pixels of Color 1 to Color 2, but leaves everything else unaffected. You can use this to quickly and easily change an area of, say, red to one of, say, blue.
 I pressed the left mouse button while I dragged the Eraser across the first picture. Color 2, the background color, was white.
For the second picture, I set Color 1 to blue and Color 2 to white.
I pressed my right mouse button while I dragged across the picture.
For the third picture, I set Color 2 to pink and Color 1 to lime green. I pressed my right mouse button while I dragged across the picture.
There's no color tolerance in Paint; only pixels of exactly the same color are affected, so it's pretty useless on textured color.
The Color Picker
![]() The Color Picker Tool is used to sample and match any color in your picture.
The Color Picker Tool is used to sample and match any color in your picture.
It's especially useful when colors in the picture are different from those on the palette.
Say you're zoomed in, working with the Pencil tool on an area that has many shades of blue, and you want to use one of those shades. Click the Color Picker and click directly on the shade of blue that you want to use. The tool will immediately change back to the Pencil, loaded with the color you want.
The Magnifier
![]() The Magnifier Tool can be clicked over an area of which you want a closer view. Left clicks give a closer view. Right clicks zoom out. So much less clunky than in previous versions of Paint!
The Magnifier Tool can be clicked over an area of which you want a closer view. Left clicks give a closer view. Right clicks zoom out. So much less clunky than in previous versions of Paint!
Brushes
![]() Brushes let you paint in various widths and textures.
Brushes let you paint in various widths and textures.
Widths are controlled by the brushes and the Size Tool together, textures by the brushes.
Please remember that anything you plan to recolor needs to have plain, solid color to begin with. All but two of the brushes use different shades of the base color to produce a textured effect.
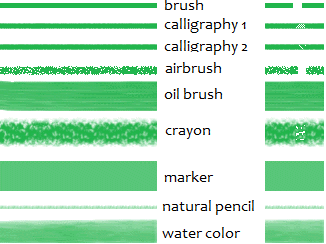 Here I've drawn a line with each of the offered brushes, using the same color and the same line width for each. I've labelled each line according to its tooltip in the gallery.
On the right I've dragged the color eraser from top to bottom through all the different brush lines. You can see that only two lines, those labelled "Brush" and "Airbrush", are able to be fully erased; that is, each of the others uses more than one shade of green.
It can be helpful to consider the brushes as three separate items: the normal Paintbrush, the Spray Can or Airbrush, and the rest as Special Effects Brushes. The normal Paintbrush is the default, so that helps.
.
 I found the calligraphy brushes interesting. I was able to write a letter fairly convincingly with Calligrahy Brush 1. I was a dead loss with Calligraphy Brush 2.
Once you have chosen a brush, you only need to click the main brush picture to use that same brush again.
Shapes
 A bit confusingly for users of previous versions of Paint, the Line Tool and the Curved Line Tool have been cunningly concealed in the Shapes Gallery, along with Rectangles, Rounded Rectangles Ellipses and Freehand Polygons. As well, though, there are a number of added shapes: arrows, speech balloons, various stars and others.
Basics for All Shapes
 Open the Shapes Gallery by clicking the down arrow under the Shapes picture and click the shape you want to draw. You have to have chosen a shape before you try to use the Outline or Fill buttons and before you choose a line thickness.
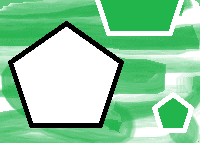
Please be aware that if you choose Solid Fill when your background color is set to white, the shape will be filled with white until it is pasted, and ditto with Solid Outline drawn with the right button. That is, if you move the shape onto a colored area while its bounding box is still active, the white fill will show.
However, if the shape is pasted onto a white area and later selected and moved onto a colored part of the picture, the white part will then be transparent.
.
Having chosen a shape, click the Outline button to the right of the Shapes picture and click on Solid Color or a texture of your choice.
Click the Fill button and click on No Fill, Solid Color or a texture of your choice.
Click the down arrow below the Size picture and click on a line thickness.
Press a mouse button and drag to draw the shape.
If you draw with your left mouse button, Color 1 will be used for the Outline.
If you draw with your right mouse button, Color 1 will be used for the Fill.
Once you've drawn a shape, but while the bounding box is still visible, you can change Color 1 and Color 2, you can change the line width, alter choices in the Outline and Fill lists, drag handles to change the size and proportions of the drawn shape or move it to a different place in your picture.
When you are fully satisfied, click well away from your newly drawn shape to cancel the bounding box and paste the shape into your picture.
.
Straight Lines
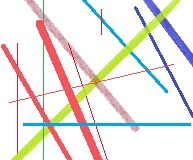 Straight lines are the first offering in the Shapes Gallery.
Open the gallery and click the Line button. Click the Outline button and click on Solid Color or a texture of your choice.
Click the Size drop-down and click a line thickness, then select colors. Lines drawn while the left mouse button is pressed will use Color 1, those drawn with the right button will use Color 2.
Draw your line. It will be perfectly straight.
If you hold down the Shift key while drawing a line, it will be precisely horizontal, precisely vertical, or precisely at 45 degrees.
Curved Lines
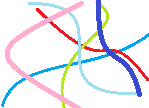 The Curved Lines tool isn't quite as easy to use as it once was. Closed curves don't come with just three clicks, and if you're familiar with my eight petalled flower from earlier versions, that doesn't work in Paint for Windows 7! I've written fresh directions, but on a separate page. Flower Bunch for Paint in Windows 7
Meanwhile, here are the basics of drawing curved lines.
Click the little arrow under the Shapes picture and click the ![]() Curved Line button.
Curved Line button.
Click the Outline button and choose Solid Color or a texture of your choice. Then click under the Size picture and choose a line thickness. Choose colors if you wish.
Draw a line.
![]() For a pointed curve, like this one, put your cursor somewhere near the finishing end of the line. With the mouse button pressed, move the cursor around slowly and watch the line following it. When you think the line is where you want it, release the mouse button.
For a pointed curve, like this one, put your cursor somewhere near the finishing end of the line. With the mouse button pressed, move the cursor around slowly and watch the line following it. When you think the line is where you want it, release the mouse button.
Now put your cursor somewhere close to the beginning of the line, press the mouse button and again move the cursor slowly around until you like what you see, then release the mouse button.
![]() To make a smooth curve, after you have drawn your line, put your cursor close to the beginning of the line.
To make a smooth curve, after you have drawn your line, put your cursor close to the beginning of the line.
With the mouse button pressed, move your cursor around slowly until you feel the curve is almost as you want it and release the mouse button.
Now press your mouse button down near the end where you finished the line. Move the cursor around until you are happy with the curve, then release the mouse button.
Occasionally it happens that the curve is exactly as you want it with your first click. In that case, don't move your mouse; just click again in the same place.
Closed Curves
 To draw a closed curve,first draw a triangle—to be erased later. Make the triangle short and fat or tall and skinny, depending on the finished shape you want. Be sure to use a color other than the color you'll use for your finished shape, so that you can erase it easily.
Having chosen the Curved Line tool, and set line thickness and color, put your cursor where you want the point of the shape.
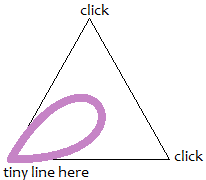 Press your mouse button and move the cursor the tiniest bit, just enough to convince the program that you've drawn a very short line. Release the mouse button and click once on each of the other points of the triangle.
Repeated Curves
Problems with the bounding box
When you're drawing several curved lines one after the other, you'll find it helpful to click the selection tool or the pencil when each curve is completed. When you do this it cancells the bounding box around the completed curve. Then go back to the Shapes tool and choose the curved line again.
Elipses, Rectangles, Circles and Squares
If you want to draw an exact shape—say a square or a circle—hold the Shift key while you draw and release the mouse button before you let go of the Shift key.
Freehand Polygons
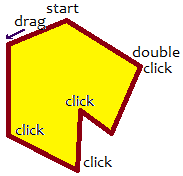 To draw a freehand polygon, click the Polygon button
 ![]() in the gallery. After setting Line, Fill and so on, hold a mouse button down and draw the first line of the polygon. Then release your mouse button and click where you want the next line to end. Keep clicking end points until you want the last line to finish the shape, then double click.
in the gallery. After setting Line, Fill and so on, hold a mouse button down and draw the first line of the polygon. Then release your mouse button and click where you want the next line to end. Keep clicking end points until you want the last line to finish the shape, then double click.
Line Thickness, The Size Tool
 This tool becomes active only after you have chosen either a Brush or a Shape, so choose your Brush or Shape and you'll then find you can click the down arrow under Size and choose a line thickness.
The line thicknesses offered vary according to the brush you've chosen.
Colors
The Color section of the ribbon has three parts: Boxes showing the active colors—Color 1 and Color2, the Color Palette and the Edit Colors button.
The Color Boxes

 Color 1 is the Foreground Color, and is always black when you open Paint or open a different Paint page.
Color 2 is the Background Color, and is always white when you open Paint or open a different Paint page.
To change a color, make sure that its Color box is in focus, as shown by the yellowy background. If it is not, simply click it and then, in the Palette, click on the color that you want.
When you have an active shape or some active text on your page, hovering your cursor over a color in the Color Palette will make the shape or text take on that color temporarily. You can click to apply the change if you like it.
The Color Palette
 The two top lines of the Color Palette show all the colors available whenever you are making a picture.
The line of blank squares at the bottom will show any colors you have edited during this session. Once Paint is closed, those colors will vanish away.
Edit Colors
![]() The Edit Colors button takes you into the Edit Colors dialogue. There you can click any color on an extended palette and click the Add to Custom Colors button.
The Edit Colors button takes you into the Edit Colors dialogue. There you can click any color on an extended palette and click the Add to Custom Colors button.
You can also, if you wish, alter the depth of the chosen color by clicking any point on a sliding "dark to light" scale on the right of the dialogue, before you click the Add to Custom Colors button.
When you click O.K. in this box, only one color will be added to the squares under the palette. To add further colors, you must return to the dialogue and add them one at a time.
As I said, the Custom Colors are kept only during one session. If you particularly want certain colours to use the next time you open Paint, make little swatches of them on an actual picture. You might like to then crop to the swatches, do a Save as—calling the cutout "Custom Colors", so that you can Paste from the saved swatches on a later occasion.
The Status Bar
![]()
The Status Bar sits at the very bottom of the Paint Window, where it offers information and can be used to help as you work. We'll look at it's features from left to right.
Cursor Position
![]() Gives your Cursor Position, which is helpful when you want to position something precisely.
Gives your Cursor Position, which is helpful when you want to position something precisely.
Selection Size
![]() Shows the size of a selection you're making, or of an object you're drawing.
Shows the size of a selection you're making, or of an object you're drawing.
Image Size
![]() Shows the size of your entire picture, even if it is very large and so not all visible in the window. If you haven't changed the units in the Properties dialogue this measurement will be in pixels, but you do have the option of changing to inches or centimetres.
Shows the size of your entire picture, even if it is very large and so not all visible in the window. If you haven't changed the units in the Properties dialogue this measurement will be in pixels, but you do have the option of changing to inches or centimetres.
Disk Size
![]() Once you've saved a picture, this will show its Size on Disk. In a very small window, this figure may not be shown.
Once you've saved a picture, this will show its Size on Disk. In a very small window, this figure may not be shown.
Zoom Slider
![]() The Zoom Slider is convenient if you're working in a zoomed-in view and want to zoom out. However, you can't zoom in on a particular spot, as you can with the Magnifier.
The Zoom Slider is convenient if you're working in a zoomed-in view and want to zoom out. However, you can't zoom in on a particular spot, as you can with the Magnifier.
Saving Your Work
It's a good idea to save your picture as soon as you begin, then click the Save button on the Quick Access Toolbar every few minutes. This saves loss of work if the program closes unexpectedly, as in a power failure. If in the end you don't much want to keep the picture, you can always delete it.
When you hit Save for the first time, you'll find yourself in a dialogue box where you're invited to type a name for the picture. Do so, and accept the default format, which is png—unless, of course, you have a particular reason for choosing some other format. Having typed a name, click the Save button and you'll be returned to your picture.
After that, when you click the Save button your work won't be interrupted.
Saving a Copy—Save as
Sometimes you may have made a really good picture, want to add something to it but worry that you might spoil it. The thing to do then is Save a Copy.
![]() Go to the Paint button and open the menu.
Go to the Paint button and open the menu.
![]() Click Save as
Click Save as
In the dialogue box, the existing name of the picture will be suggested. Just change it a little by adding, say, a "2" or the word "Copy", then click the Save button.
You will be returned to the Paint window with the copy ready for you to work on. Now you can make changes with confidence, knowing that if things do go wrong your original picture is safe and unchanged.
Selections Distorted When You Click Nearby
This is annoying and seems mostly to happen if you click close to the left of the bounding box of a selection or a freshly drawn shape.
Hit Ctrl+z or click the Undo button ![]() and start over again. It seems that the only way to avoid this is to move your cursor well away before you click to cancel the bounding box.
and start over again. It seems that the only way to avoid this is to move your cursor well away before you click to cancel the bounding box.
Anti-aliased Text
If you dislike the blurry edges that Paint puts on text, the only way to cure it seems to be to turn off Smooth edges of screen fonts.
Click the Start button and click on Control Panel.
At top right of the window you'll see View by Category. Click the down arrow and choose Large Icons. The view will change.
Scroll down the page until you see an icon labelled System.
Double click System, then click on Advanced System Settings.
The next page has three sections.
On the top section, Performance, click the Settings button and remove the tick from Smooth edges of screen fonts.
You might even consider turning off all the eye candy in one hit by putting a mark beside Adjust for best performance. That's a matter of personal preference, of course.
Or try a different program, perhaps
There are always good free programs.
You might like to look through my selection of Free Graphics Programs and choose one or two that you fancy. I like Helios Paint so much that I wrote a separate Helios tutorial. Getting Started with Helios Paint
Other Questions
That's all I can think of for now. If you have questions, or know a better way of doing something, please do let me know.
Questions or comments? I’d love to hear from you. My email address is here.
Return to top
Drop-Down Menu from Brothercake
Everything below this is a javascript menu. If you are using a reader,
please use the links here.