Drawing a Collection of Flowers
The Flower Bunch for Windows 7
To do this exercise easily, you'll need to have both Paint and your browser (IE, Firefox, whatever) open at the same time. Drag the two windows around, maybe resize one or the other, until you have a decent view of both. A click on either window will then bring it to the front for reading or work.
 These directions are for Paint in Windows 7, where drawing a closed curve is not quite as easy as it was in previous versions.
Previously, you only had to click the first point of a closed curve. In Windows 7 you need to press and drag—although only the tiniest bit. This does take some practice, so don't be dismayed if your first efforts aren't just right; my first tries looked pretty woeful!
Contents in the order in which they appear on this page
Bring a Copy of the Template into Paint Copy the Template Choose Your Color Begin First Petal Second Petal Remaining Petals Now Remove the Template Color the Flower Save a Copy Clear Your Workspace Transparent Background Make A Centre for the Flower Make Copies of the Flower Change the Size of the Flower Make lots! Make a Bouquet White Flowers Finish
Open a new page in Paint. Click the Save button and save the blank page as "flowers.png".
.
Bring a Copy of the Template into Paint
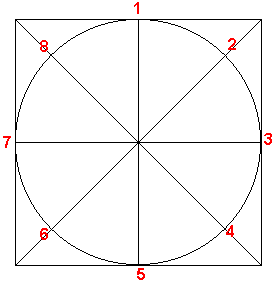 Right click on this template image and click Copy on the right click menu.
OR
Right click on the template image and choose Save as on the right click menu.
![]() OK. Go back to your Paint window. If you copied the template, click the Paste Icon.
OK. Go back to your Paint window. If you copied the template, click the Paste Icon.
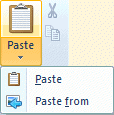 If you saved the template, go to the Clipboard menu, click the down arrow and click Paste from. Navigate to the saved image, click its name and click the Open button.
Copy the Template
In either case, you now have the template in the top left corner of your Paint window. It's surrounded by a marquee or bounding box.
Position your cursor anywhere inside the bounding box so that it changes to a Move Cursor ![]() .
.
Hold the Ctrl key down while you begin to drag a copy. You can release the Ctrl key once you're able to see that a copy has been made. Drag the copy to a free part of your window. This gives you one to practise on and one in reserve.
Choose Your Color
Make sure that the Color 1 (foreground) button is highlighted, then click on the mid-blue in the palette. If you'd prefer to use a different color, that's fine, so long as it is not red or black.
Begin
Click the down arrow under the Shapes icon and click the Curved Line ![]() .
.
Now, here comes the tricky bit.
First Petal
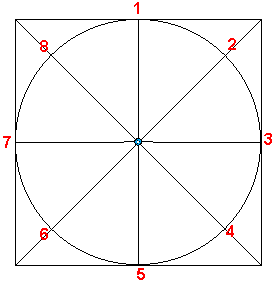
Position your cursor at the exact middle of the template. Press down and move the cursor just as much as in this picture. A tiny bit of blue will show in the eye of the cursor. The cursor itself will just look like a slight irregularity in the middle of the horizontal line.
.
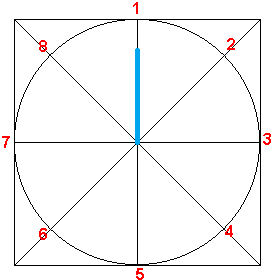
Release the mouse button.
Position your cursor exactly at the point where the line meets the circle at the red 1.
Click.
A blue line should appear, like this.
.
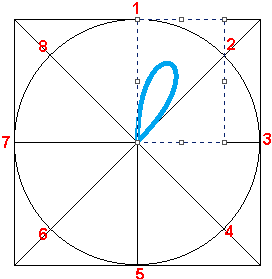
Now position your cursor right where a line crosses the circle near the red number 2.
Click.
The blue line will change to a petal shape, with a bounding box around it.
You need to cancel that bounding box before you can go on, so go up to the toolbox and click on the Pencil tool ![]() .
.
Click the Save icon, or press Ctrl+s.
.
Second Petal
Click the down arrow under the Shapes icon and again click the Curved Line ![]() .
.
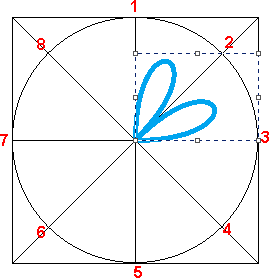
Position your cursor at the middle of the template as you did before, press and move ever so slightly in the direction of 2.
Release the mouse button and position your cursor where the line crosses the circle near 2, then click.
Move to where the line meets the circle near the red 3 and click again.
The second petal appears. Click the Pencil tool and Save.
.
Remaining Petals
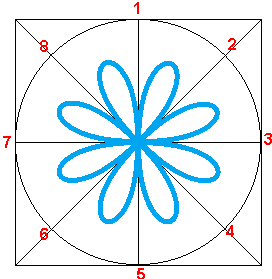
Proceed in this way right around the circle: Middle drag, click 3, click 4, click Pencil, Save, then Shapes, Curved Line, Middle, 4, 5 and so on.
I'm sorry that it seems tedious to have to go back to the Curved Line tool so many times, but I wasn't otherwise able to finish each petal in a consistent way.
Anyway, once each petal is pasted, if you need to click Undo or hit Ctrl+z, you'll be sure of losing only the one that went wrong.
Now Remove the Template
Make sure that you have white as your background color. If necessary, click the Color 2 box and then click on white.
Click the Colour 1 box and then click on black.
Click on the Eraser tool ![]() .
.
Pressing your right mouse button, drag over every black line or curve. All of the black should disappear. So long as you are using the right button, you can rub across the blue; it won't be affected.
Now use the eraser with the left button pressed to remove all the red numbers.
Click Save or hit Ctrl+s.
Color the Flower
With the Color 1 box in focus (highlighted) click a color you'd like your flower to be. For now, don't choose the color that you used to make the outline; choose a different color. In the end you'll probably decide to eliminate the diferently colored edges, but keep your options open.
Click on the Fill with Color tool ![]() .
.
Click inside one of the petals.
Click inside each petal until all are filled.
Save a Copy
![]() If you'd like to keep this page for later work with the template, go to the Paint button and open the menu.
If you'd like to keep this page for later work with the template, go to the Paint button and open the menu.
![]() Click Save as
Click Save as
In the dialogue box, the existing name of the picture, "flowers.png" will be suggested. Just change add a "2" so that it reads "flowers2.png", then click the Save button.
You will be returned to the Paint window.The work you've done thus far is safe and will not be changed.
Clear Your Workspace
If you still have a second copy of the template, click the Select button and draw a marquee around it. Hit the delete key.
Transparent Background
A bit later on you'll need to move things on top of others without great chunks of white coming along, so make sure that you have easy access to turning on Transparent Background.

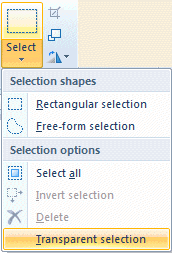 Go to the Image menu—I think of it as the Select menu—and click the down arrow so that the whole menu appears.
Right click on the bottom item, Transparent selection.
 When the menu on the left appears, click Add to Quick Access Toolbar.
.
![]() Thereafter the button for a transparent background will appear like this on the Quick Access Toolbar. To make your selections have a transparent background, tick the checkbox. When you do want an opaque background, remove the tick.
Thereafter the button for a transparent background will appear like this on the Quick Access Toolbar. To make your selections have a transparent background, tick the checkbox. When you do want an opaque background, remove the tick.
Make A Centre for The Flower
Choose foreground and background colors that are different from the colors already in the picture. Perhaps red and yellow.
Click under the Shapes picture and choose the ellipse, ![]() which is third from the left.
which is third from the left.
To the left of the Shapes picture, click the Fill button and choose Solid Fill. Don't choose any of the textured fills further down, or you won't be able to change the color later.
In an empty part of your drawing window, hold the Shift key while you draw a filled circle. Make several of these circles until you're happy with the size. Try drawing sometimes with the right button and sometimes with the left.
Click the button for Color 2 and click on white. White is now your background color.
Click on the rectangular selection tool.
Make sure there's a tick in front of Transparent Selection.
Draw a selection rectangle around the circle you want to use as the centre of your flower.
Drag the circle onto the centre of your flower.
When you're satisfied with the position, click an empty part of your drawing window to paste the centre.
Draw selection rectangles around the unwanted centres and press the Delete key. Save.
Make Copies of the Flower
![]() With white as Color 2 and with a tick in front of Transparent Selection, draw a selection rectangle around your flower. Press the Ctrl key, put your cursor on the flower and start dragging a copy. It's OK to release the Ctrl key as soon as you see that a copy has been made. Click to drop the copy, then press Ctrl again as you drag to make a further copy. Do this as many times as you like.
With white as Color 2 and with a tick in front of Transparent Selection, draw a selection rectangle around your flower. Press the Ctrl key, put your cursor on the flower and start dragging a copy. It's OK to release the Ctrl key as soon as you see that a copy has been made. Click to drop the copy, then press Ctrl again as you drag to make a further copy. Do this as many times as you like.
Now use the Fill with Color tool or the Color Eraser (erase with right button) to change colors in some of the copies. The Color Eraser is best for small areas; have the existing color as Color 1 and the new color as Color 2.
Do remember to change Color 2 back to white when you've finished with the Color Eraser. Seeing a big green square appear when you move something can be a bit shocking!
Change the Size of the Flower
Draw a Selection marquee around one of your flowers.
 Click the Resize and Skew button. (I've drawn a red line around it in this picture. That isn't really there.)
In the dialogue, change 100 to 50, make sure there's a tick beside Maintain Aspect Ratio, and click OK.
Select a different flower and use the same method to change it to 80%, 25% or something in between. Below 25% the edges get pretty ragged.
Make lots!
You can recolor flowers you've resized, of course, and make several copies of those you like best.
When you have all you want, try to arrange them neatly so that part of your page is clear for building your bouquet.
Make A Bouquet
Making sure that Color 2 is set to white, select one flower at a time and Ctrl drag them to make an arrangement you like.
If you find you've partly covered one that you wish were at the front, just Ctrl drag another copy of the same flower and put it exactly over the first one.
You can keep stacking flowers on top of the bunch until the cows come home—or until you're happy with your arrangement, anyway ![]() .
.
White Flowers
Oh, if you want white flowers in your arrangement, have a colored fill in them until after they're positioned, then flood them with white—otherwise, underlying flowers will show through.
Finish
Now you can either save the whole page, or select the bouquet and click Crop, then save, either as "flowers2.png", discarding the rest of the page, or click the Paint Button and choose Save as, naming the cutout "flower_bunch.png", "bouquet.png" or whatever.
Adaptations
Once you have the idea down pat, you can make your own adaptations—and that's one thing that may well prove easier in Paint 7 than in previous versions, because of the ready made shapes. With a little thought, you can build a template based on a five or six pointed star, for instance.
I may write some of these ideas up later, but it'll probably be a while!
Questions or comments? I’d love to hear from you. My email address is here.
Return to top
Drop-Down Menu from Brothercake
Everything below this is a javascript menu. If you are using a reader,
please use the links here.