Getting Started with Helios Paint
Copyright of the program Helios Paint belongs to D. J. Osborne.
Main Headings
Pencil Lines Paintbrush Eraser Spray Can Paint Can Selection Tools Text Shapes Colour & Effects Gradient Transform Colour Grabber Colours and Paints Title Bar Menu Bar Top Tool Bar: Zoom Controls Selected Area Controls Detailed Contents Back to Using MSPaint 7
The Helios Paint Window
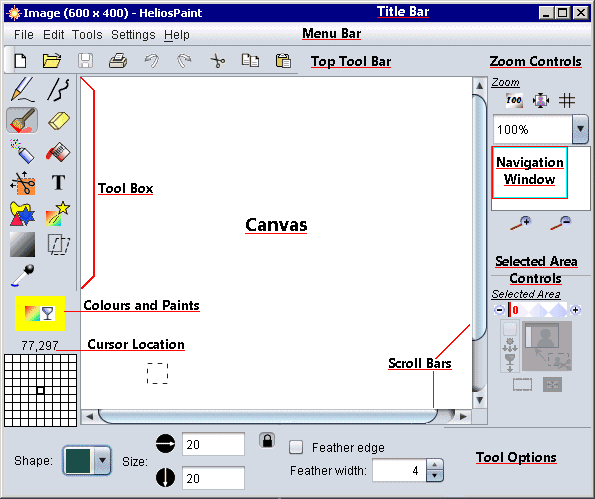
Here's the Helios Paint window with the names of the various parts underlined in red. Obviously, these labels don't appear in your actual window.
The big white area is your working Canvas.
Currently the Paintbrush is the tool in use, which you can tell by its button in the Toolbox appearing depressed. The dashed square near the bottom left of the canvas shows where the paintbrush is about to be used, and its position from the left and from the top shows above the Cursor Location window.
The colour in use is yellow, which you can tell from the background of the Colours and Paints button. Click this button when you want the Colours and Paints Palette on your screen. You can close the Colours and Paints Palette by clicking the close button ![]() in its top right-hand corner.
in its top right-hand corner.
The Thumbnail Navigation window shows that part of the canvas is below and to the right of the viewable area. You can bring that part of the canvas into the window either by dragging the Thumbnail Navigation Tool or by dragging the Scroll Bars.
The Selected Area Controls are dimmed, which tells us that no part of the canvas is currently selected.
Directly below the canvas is a panel of Options. These will be different according to the tool you are using.
 Pencil Tool:
The pencil tool colours one pixel at a time and might be compared to a hard, sharp pencil. You can draw freely, or hold the Ctrl key to force precisely horizontal or vertical lines. Use the pencil tool for fine pixel-by-pixel editing in a greatly zoomed-in view.
This is excellent for making icons, tiny figures, or features on a map and for adding or cleaning up tiny details. top
 Line Tool:
Creates freehand, straight and curved lines with a choice of Dash pattern, line Width and Arrow end.

Having clicked on the Line Tool in the toolbox, use the Line Controls to specify how you want the line to be drawn.
The spin controls at the end of the width button will increase or decrease the chosen thickness by very small increments or you can type in the thickness you want. The thinnest line is .25. The thickest is 100.
There are two arrow controls. The one on the left puts an arrow head at the beginning of the line as you draw. The one on the right puts an arrow head at the end of the drawn line. Scroll to the bottom of either list to find arrow end styles.
The Joint style affects how corners in the lines are painted.
The End style affects how the line ends are painted.
If you hold the Ctrl key you will draw lines that are precisely horizontal, precisely vertical, or exactly at 45 degrees.
When you have finished painting a line or a set of connected lines, click the ![]() Finish button or press Enter.
Finish button or press Enter.
If you want to draw a set of unconnected lines, press the ![]() Finish button or press Enter after each line.
Finish button or press Enter after each line.
To delete a point, select it and then click the ![]() button or press the Delete key.
button or press the Delete key.
 For curved lines, select the Automatic Curve button to automatically curve the line as you draw it. top
 Freehand Line
The Freehand line lets you scribble at will. There's no Finish button. You can click on another tool when you've finished the freehand line.
My editor found that if she is using one of these arrow ends ![]() (numbers 10 and 11 from the top of the list) with freehand lines the arrow is drawn backwards.
(numbers 10 and 11 from the top of the list) with freehand lines the arrow is drawn backwards.
CAUTION: If you make a mistake while drawing or editing lines, DO NOT hit the Undo button, as this will delete the whole thing. To delete a point, select that point and then click the [![]() ] button or press the [ Delete ] key.
] button or press the [ Delete ] key.
 Straight Lines
This tool will continue to draw a series of straight lines until the Finish button is clicked.
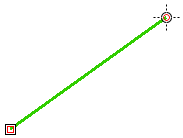 You do not have to drag to make straight lines. Click where you want the line to begin. A Control Point will appear. Click where you want the line to end. A straight line will be drawn between the two points, with a Control Point at each end.
.
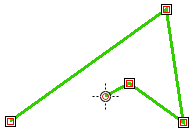 Further clicks will draw further lines, always coming from the end of the last line drawn.
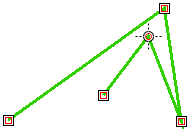 If you are unhappy with the position of any line, you can grab its Control Point and drag it to a new position.
.
Closing a Straight Line Shape
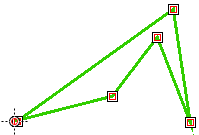
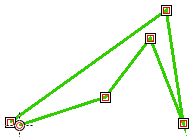 If you want to close a shape you're drawing, you cannot click directly on your starting point. Instead, make your final click very close to the starting point, then drag its Control Point to where you want it. top
.
Completing your straight line drawing
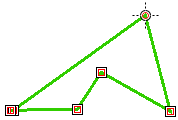
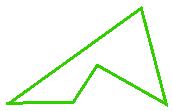 You can continue to drag control points until you are satisfied with the shape. Then—and only then—click the Finish button.
 ![]() Control points vanish and your drawing is complete. top
Control points vanish and your drawing is complete. top
.
CAUTION: If you make a mistake while drawing or editing lines, DO NOT hit the Undo button, as this will delete the whole thing. To delete a point, select that point and then click the [![]() ] button or press the [ Delete ] key.
] button or press the [ Delete ] key.
 Curved Lines

 For curved lines, select the Auto Curve button to automatically curve the line as you draw it. If you'd prefer to manupulate all the curves without this help, on the right you see how the Auto Curve button looks when it's off.

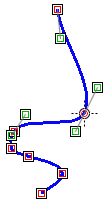 This curved line tool is pretty amazing. You can use the same method as for straight lines—click for the beginning of a line, click for next point and so on—and so draw any series of curves you want.
As you draw your curved line, red control points will appear at the end of each segment. With these you can change the length of segments, or move them up, down, left or right.
You will also see little green boxes near some control points. These are Handles with which you can alter the curve that's been drawn. Move a handle one way and the curve becomes sharper; move it a different way and the curve becomes smoother.
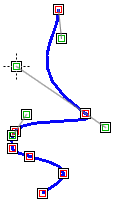 You won't see Handles beside every control point at one time, otherwise there could be a confusing clutter, but whenever you click on a control point its Handles will appear.
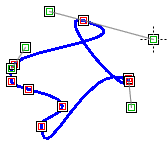
Changes will be effected as you pull a handle closer to or further away from a control point, as well as when you move it above or below the curve.
Do spend some time playing with the Curved Line Tool. Only experiment and exploration can fully demonstrate its use. top
.
A Simple Closed Curve
My example uses a horizontal line but it works as well with a line at any angle.
![]() To make a simple closed curve such as a flower petal or a leaf, you need only one curved line.
To make a simple closed curve such as a flower petal or a leaf, you need only one curved line.
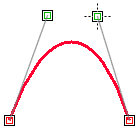 Drag the Handles up away from the line so that a curve forms.
Move the red control points closer together.
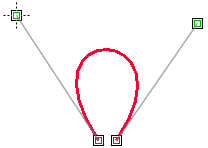
As you do this, you'll probably find that you need to further adjust the green handles.
Moving the handles out to the sides makes the curve fatter. Moving them up makes the curve taller.
Continue adjusting red control points and green handles until the shape is roughly as you want it.
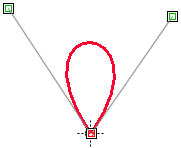 Move the end control point to right on top of the starting control point to close the shape.
Continue to move the green handles until the shape is exactly right, then click the Finish button. ![]() Control points vanish and your drawing is complete. top
Control points vanish and your drawing is complete. top
 Paintbrush Tool:
Paint as you would with a real paintbrush; drag the brush freely over the canvas.

To soften the edges of the brush, use a Feather width of 1 or more. To have a sharp edge, take the tick out of the Feather edge box. top
For choosing colours or textures with which to paint, please see Colours and Paints
 Eraser Tool:
The eraser tool, as its name suggests, erases.
Removes colour wherever you click or drag, using a resizable square, circle or diamond shaped eraser.
At full Erase strength, the eraser always erases to the background colour—usually white—no matter whether you erase with the left button or the right. Colour changes are effected by a different method, using a Selection Tool and the RGB filter.
Of course you can make simple colour changes to part of an image by using the Paint Bucket.
If the ![]() button is on, then the relative width and height of the eraser is kept the same. If you need to use an eraser that is wider than it is tall—or vice-versa—click the lock button to turn it off and type different numbers into width and height.
button is on, then the relative width and height of the eraser is kept the same. If you need to use an eraser that is wider than it is tall—or vice-versa—click the lock button to turn it off and type different numbers into width and height.
If you unlock this, and change one value, then relock it, the program with maintain whatever ratio you have set.
Softening a Colour
![]()
 If you set the Erase strength to something less than 255, you can use it to soften a colour rather than removing it completely.
The amount of colour removed can be adjusted by changing the Erase strength of the eraser.
To soften the edges of the eraser, use a Feather width of 1 or more.
 Do be cautious with using the eraser to soften colour, though. As you drag without clicking, each part is affected to the same degree, even if you go over the same place more than once. However, if you click again, strokes that overlap the previous ones will soften the colour further. This is useful if you want to give a realistic effect of varying colour depth in sky or foliage, for instance, but if you are after a uniform effect, remember not to click a second time.
If you want uniform softening of a large area, try Making Colours Lighter or Softer top
 Spray Can Tool:
With the Spray Can you really need to pay attention to whether the Global spray button is ticked or not and whether or not you have an active selection.
We'll go into Selections in more detail further down the page, but if you want to quickly make a selection to see what I mean, choose the Selection tool ![]() from the Toolbox, choose the scissors (first option) and draw a square on your canvas,
from the Toolbox, choose the scissors (first option) and draw a square on your canvas,
The Global Spray is prettier than can be managed by clicking and dragging the Local Spray, but if there's no selection active it will spray the whole canvas, including any existing work. Once this all-over spray is present, you'll have great difficulty in using many of the other tools.
Therefore, either have a selection active or else be sure to remove the tick from Global Spray.
With Global spray unticked, you can paint freehand with the Spray Can. A setting of 20% density seems most effective.
To colour in a Selection with a random texture, tick the Global spray option and click into the selection. If you wish, you can then click a different colour on the Swatches palette and spray again.
If you plan to use more than two colours in this way, a fairly low setting might work best for you. top
 Paint Can Tool:
This tool is far more sophisticated than the one you may know from MSPaint, so it's worth spending time experimenting to see just how the different options work together.
The Paint Can fills with a solid colour, a transparent colour or a texture, according to your choice.
![]() The Global button is useful where you have an active selection around an area containing a set of similarly coloured things—such as letters in a line of text—that are not actually touching each other. Click on any one of the set and all are affected. However, if you do not have an active selection, everything that colour on the whole canvas will be affected.
The Global button is useful where you have an active selection around an area containing a set of similarly coloured things—such as letters in a line of text—that are not actually touching each other. Click on any one of the set and all are affected. However, if you do not have an active selection, everything that colour on the whole canvas will be affected.
![]() The Fill by button is initially set to RGB, which we can roughly interpret as meaning "colour". This is likely to be your usual choice.
The Fill by button is initially set to RGB, which we can roughly interpret as meaning "colour". This is likely to be your usual choice.
 The slider is used to say how closely the chosen colour must be matched. Set on 0, as it is here, only pixels of exactly the colour clicked on will be affected.
As you drag the slider towards the right, the colour selection will become more and more tolerant. Colours very like the one you've clicked on will be added next, then those somewhat less similar and so on.
Move the slider a little, click on the colour you want to flood. If the effect is either too strong or too weak, click the Undo button ![]() , adjust the slider and try again.
, adjust the slider and try again.
The Repaint fill button, if ticked, only applies to different colours, textures or transparencies you choose for replacing the colour you click on. It doesn't respond to changes you make to the slider. top
Neighbour Rule
When using Local replace, you may wish to change the Neighbour Rule.
![]() This button says you only want to choose pixels that are beside, directly above or directly below the one you click on.
This button says you only want to choose pixels that are beside, directly above or directly below the one you click on.
![]() This one says that you also want to include pixels that are touching the corners of the clicked pixel.
This one says that you also want to include pixels that are touching the corners of the clicked pixel.
To change from one to the other, just click on the button itself. When you move your cursor away you'll see that the button has changed.
Choices other than RGB
A click on the down arrow on the Fill by button will show that there are other ways of choosing the parts you want to fill. For information on these, please consult the program's own Quick Guide from the Help menu. top
Selection Tools:
Making a Selection
Choose to make a selection by first clicking the Selection button ![]() in the Toolbox.
in the Toolbox.
There are four different tools with which you can make selections. The fourth one, Compare, is explained in the Quick Guide.
 Choose one of the buttons in the Options Panel that appears below the canvas.
Here, the Scissors tool has been selected.
Scissors
![]() The Scissors selection tool will make an exact selection using any one of the Cut Shapes. As soon as you've clicked the Scissors option, you'll see a drop-down list of available shapes.
You might choose a rectangle or an ellipse or one of the fancy shapes. If you want the shape to be regular—a square or circle or nicely proportioned—hold the Ctrl key while you draw the shape on the canvas.
The Scissors selection tool will make an exact selection using any one of the Cut Shapes. As soon as you've clicked the Scissors option, you'll see a drop-down list of available shapes.
You might choose a rectangle or an ellipse or one of the fancy shapes. If you want the shape to be regular—a square or circle or nicely proportioned—hold the Ctrl key while you draw the shape on the canvas.
If the selection you want to make is awkwardly shaped, scroll to the very top of the list and choose the Freehand shape. ![]()
For the Freehand shape, two special buttons are provided. The ![]() Back button undoes the last freehand line segment. Subsequent clicks go back further. The
Back button undoes the last freehand line segment. Subsequent clicks go back further. The ![]() button completes the cut and grabs the pixels. When your selection is complete, do make sure that you've clicked the Grab Area button, otherwise you'll go on adding lines that you may not want.
button completes the cut and grabs the pixels. When your selection is complete, do make sure that you've clicked the Grab Area button, otherwise you'll go on adding lines that you may not want.
While using the Freehand cut shape, hold down the Ctrl key if you want to draw straight vertical, horizontal or 45 degree lines. top
Care with Scissors Selections
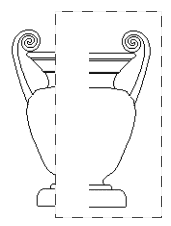
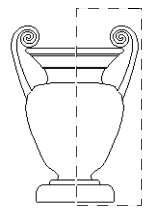 When selecting with a cut shape, bear in mind that any margin outside the thing you're wanting to select will be opaque.
Here, I copied the better half of a picture I'd drawn. Wanting to make a symmetrical picture, I flipped the copy and dragged it to join the original.
Oops! A big white margin would've ruined my effort. I cancelled the selection and tried again, getting the left edge of the selection right up against the lines of the drawing. Much better!
Really, I'd've done better to use the lasso to make my selection.
.
Lasso Selections
![]() This is a great tool for selecting something that's all the same or a similar colour throughout.
This is a great tool for selecting something that's all the same or a similar colour throughout.
![]() The initial options of the Lasso are like this.
The initial options of the Lasso are like this.
It's important that the little orange square on the right should have a white area in the middle, particularly if you're selecting something with holes, like a line of text.
There is a slider for including more shades in the selection.
When you use the Lasso Tool to select a hollow shape, the white interior is not part of the selection. While the selection is active, you cannot, for instance, change the colour of that part.
I found that the easiest way to deal with this was to cancel the selection, click on the Wand and select the white middle with that. You can then make changes to this new selection.
If, when using the Lasso, you do want your selection of an object to include its middle, click the Hollow button ![]() to change it to the Filled button
to change it to the Filled button ![]() .
.
![]() When you wish to select a circle drawn with a single line, either use the Lasso tool—I find that easiest—or use the Wand tool, but with the Neighbour Rule turned full on. When moving or copying a selection with holes in it, make sure that the cursor has become a little hand.
When you wish to select a circle drawn with a single line, either use the Lasso tool—I find that easiest—or use the Wand tool, but with the Neighbour Rule turned full on. When moving or copying a selection with holes in it, make sure that the cursor has become a little hand. ![]() While the cursor looks like an arrow, it will not move the selection—it will most likely cancel it if you click!
While the cursor looks like an arrow, it will not move the selection—it will most likely cancel it if you click!
Anyway, having checked your options, draw a rectangle—or other shape—outside of the thing you want to select. When you release the mouse button, the outline will spring in to embrace your target. top
Wand Selections
![]() The Wand selects by RGB Colour—or by Hue, Saturation, Brightness or Luminance, but we'll just stick with RGB colour for now. With the Wand you can make a selection within an existing selection.
The Wand selects by RGB Colour—or by Hue, Saturation, Brightness or Luminance, but we'll just stick with RGB colour for now. With the Wand you can make a selection within an existing selection.
Say you have a fairly filled-up canvas, with lots of different colours all over it, but you just want to Copy, Cut, Move or Change one particular colour—or an object that's one particular colour—in one part of the canvas.
Perhaps you want to apply some change to every bit of a certain green in that part of the canvas.
First, use the Scissors tool and a Cut Shape to select—and thus isolate—the part of the canvas in which you're interested.
Then click on the Wand, turn on the Global Select button, and click that green within the selection.
The selection shape changes. Every bit of that green that was in the selected area has been selected. The same green on other parts of the canvas is unaffected.
Having the Wand Select Shades of a Colour
To have the Wand choose variations—say greens that are a bit lighter or a bit darker than the one you click on, play with the Wand Colour Slider. ![]() The further you move it to the right, the greater will the Colour Tolerance of the wand become—i.e. it will select a wider range of shades. As you move it to the left, a smaller range of colours will be selected.
The further you move it to the right, the greater will the Colour Tolerance of the wand become—i.e. it will select a wider range of shades. As you move it to the left, a smaller range of colours will be selected.


 So, click on the part you want to select, then gently move the slider left or right until the selection is what you had in mind.
Here you can see how my selection grew as I moved the slider gently to the right. A small move makes quite a difference; my selections were made at 24, 70 and 153. top
Copying, Moving and Deleting Selections

When you have made or are about to make a selection, these three choices will be available. If you move the selection, or apply changes to it, Cut and Copy become unavailable.
Copy: If you want to make a Copy of the selection, Copy is the right choice.
Cut: If you want to Move the selection to a different position without leaving a copy, Cut is the right choice.
Delete: If you want to remove the selection altogether, use the Delete option.
Repeated Copies
If you want to make repeated copies of something, use the Copy and Paste icons on the Top Toolbar.
1. Make your selection.
2. Click the Copy icon on the Top Toolbar.
3. Cancel your selection.
4. Click the Paste icon on the Top Toolbar.
5. When the copy appears, drag it to where you want it, cancel the selection and click the Paste icon again. Repeat this procedure—Paste, Drag, Deselect—until you have as many copies as you want. top
The Option buttons and the Top Toolbar buttons do not interact. Something that you've cut or copied using the Options buttons will not be available from the clipboard.
Cancelling a Selection
Quite often you can cancel a selection just by clicking somewhere else on the canvas, but the formal way—and in some circumstances the only way—is to click the Selected button ![]() in the Selected Area Controls box.
in the Selected Area Controls box.
 Text Tool:
Click the Text button in the Toolbox and the Text options appear below the canvas.

Choose font, style, alignment and font size. Click on the canvas and start typing.
As soon as you type the first letter, a green Finish button ![]() will light up at the far right of the Text Toolbar. Until you click that button, your choices can be changed again and again. Each of your present choices for style and alignment shows an orange highlight. Those buttons not marked orange are not currently affecting the text.
will light up at the far right of the Text Toolbar. Until you click that button, your choices can be changed again and again. Each of your present choices for style and alignment shows an orange highlight. Those buttons not marked orange are not currently affecting the text.
 Here's a sample of some plain text. I had begun with the text aligned left, but changed my mind and clicked the button for Centre. The text re-aligned itself without fuss.
The invisible container for the text expands as you type, so hit the Enter key when you want to go to the next line.
![]() This button gives you the option of making Outlined Text. It is most effective at big font sizes. The number, which can be changed either by typing or by pressing one of the arrows, indicates the thickness of the outline. It is a calculated percentage, not a number of pixels.
This button gives you the option of making Outlined Text. It is most effective at big font sizes. The number, which can be changed either by typing or by pressing one of the arrows, indicates the thickness of the outline. It is a calculated percentage, not a number of pixels.
Since you can make as many changes as you like, experiment with this button to find the thickness that pleases you. top
Rotated Text
 You'll see that the Text Toolbar has a second tab, labelled Rotation. Click this and you'll see four preset choices: -90 (straight up) 0 (no rotation) 90 (straight down) and 180 (upside down). There is also a place where you can type in a rotation degree of your own choice. Type minus values to slope text up from left to right. Type positive values to slope your text down from left to right.
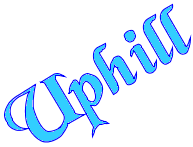 Here's what happened when I played with the Outlined button and Rotation.
I used a very big font size and rotated the text -30
After I'd clicked the green Finish button ![]() I clicked on the Paint Bucket, made sure that Local Replace was chosen and that the Neighbour Rule was set to Full
I clicked on the Paint Bucket, made sure that Local Replace was chosen and that the Neighbour Rule was set to Full ![]() , then clicked into each letter one at a time.
, then clicked into each letter one at a time.
Two pixels in the bottom serif of the p stayed white, so I zoomed in and used the Pencil to colour those. top
Making attractive headings in Shadowed Text and Outlined Text
Text in Different Fonts, Font-sizes, Colours and Alignments
When you've finished making, say, a heading in a large-size fancy font and want to change to something different for a paragraph or two, you must click the Finish button before starting the second lot of text. The two lots of text will be completely independent of each other.
The following tip has been copied from the program's Quick Guide, which can be found in the program's Help menu. The Quick guide will give you much more detailed information about using text.
Tip: When you use the standard cut and paste buttons to cut the text and paste it back in as an image,
the image of the text will become the Selected Area. This means it can be worked on as a Selected Area, e.g. flipped, skewed, sprayed on, perspective transformed, filtered, etc.
To do this, first type in some text, next click the [ ![]() cut ] button, then finally click the [
cut ] button, then finally click the [ ![]() paste ] button.
paste ] button.
 Shapes Tool:

When you click the Shapes button in the Toolbox, this Options bar appears below the canvas. You can choose to have the shape drawn as either an outline or a solid shape.
Should you want a solid shape with a contrasting outline, choose Line and later use the Paint Bucket to fill the shape.
Orientation depends on the direction in which you move your cursor. If you start at the bottom and drag upwards, the shape will be upside-down to the shape drawn if you start at the top and drag downwards.
There are choices, particularly if you are drawing a thick outline, for the way you want ends and corners of the shape to appear.
You can also choose to have your outline shape drawn with dots or dashes rather than a solid line. Don't make one of these choices if you plan to use the Paint bucket to fill the shape later!
There are 20 different shapes available from the drop-down list. Three of the shapes are special: Freehand, Any Polygon and Any Star. top
Freehand Shapes
Use the Freehand shape to draw as you wish, with any choices for Fill or Line, Dash, and Joint and End styles.
CAUTION: While making a Freehand shape, stay away from the Top Toolbar Undo button, which will delete the whole thing. Use the special Back button ![]() in the Freehand options to undo one mistake, or click it several times to go back several steps.
in the Freehand options to undo one mistake, or click it several times to go back several steps.
If your shape is to be curved, press your mouse button and draw as you would with a real pencil. Whenever you come to a place where you want one curve to end and a new one to begin, release the mouse button, then press it again and go on drawing.
Click the Paint button when you've finished. Until this button is clicked, you'll continue drawing the shape, even if you have finished.
If your shape is to be made of straight lines, click where you want to begin the shape, then click where you want the first line of your shape to end. You'll see a straight dashed line between the two places you clicked.
 When you click a third point, the line will be replaced by a triangle. Each time you click, another side will be added to your shape.
If you make a mistake, click the Back button to remove the last line you made.
When you are satisfied with the shape, click Paint.
You can, of course, make shapes that have both curves and straight lines. You can also hold the Ctrl key to constrain a straight line to horizontal, vertical, or 45 degrees. top
Any Polygon, Any Star

 When you choose either "Any polygon" or "Any star", an extra box appears beside the Rotation box. Into this you type the number of sides or points that you want the shape to have. top
Shapes: Settings Persist
If your last shape—even from a previous session—had either Rotation or Rounding set, these settings will remain for any further shapes.
You cannot change these settings once you've begun to draw the shape.
To change either or both of these settings, click the Undo button on the Top Tool Bar, adjust the rotation and rounding settings and draw the shape again.
 Colour & Effects Tool:
Changes the main image or selected area using a range of colour and effect filters.
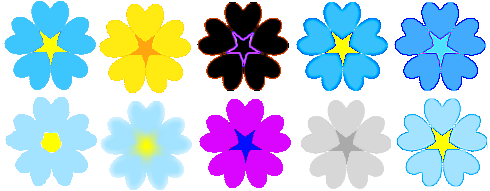
To get an idea of the wide range of effects you can achieve by using various filters, here's a little exercise. top
Try Filters at Random
![]() On your canvas, make a small, simple image, using two or more colours. You could perhaps use a combination of a couple of Shapes from the shapes list.
On your canvas, make a small, simple image, using two or more colours. You could perhaps use a combination of a couple of Shapes from the shapes list.
If you're interested, here are directions for making this particular flower.
![]() Click the Selection button in the Toolbox.
Click the Selection button in the Toolbox.
Choose the Lasso ![]() and set it for a Filled selection
and set it for a Filled selection ![]() .Set Cut Copy Delete to Cut.
.Set Cut Copy Delete to Cut.
Draw a selection around your small image.
Click the Copy button ![]() on the Top Toolbar.
on the Top Toolbar.
Click the Selected button ![]() to cancel your selection.
to cancel your selection.
Click the Paste button ![]() on the Top Toolbar.
on the Top Toolbar.
A copy of your image will appear in the top left corner of your canvas.
Drag the copy down and to the right. You'll be pasting lots copies of your image, so make them pack up neatly. Do not cancel the selection.
![]() Click the Colours and Effects button in the Toolbox.
Click the Colours and Effects button in the Toolbox.
The Colours and Effects options appear below your canvas.
 Choose something from the drop-down list. The options for each are a little different, so just guess at what you're supposed to do—adjust a slider or sliders, change a bullet, often simply click Apply. Here's what I did, groping completely in the dark, with the Unsharp mask.
You can apply more than one filter to your selection. Some seem to have little effect on some images, some have quite dramatic effects.
When you have something you like or find interesting, click the Selected button ![]() to cancel your selection.
to cancel your selection.
Now go to the Top Toolbar, click Paste, drag the new copy of your image down and try something different.
A full list of Colour and Effects Tools and their uses is included in the program's Quick Guide, which you can open from the Help menu.
Here are rather more detailed directions for using each of two very useful filters, one for changing a colour, and one for making it lighter or softer. top
Changing Colours Using RGB Filter
Changing colours in part of a picture will be very different if you're used to the colour eraser in MSPaint. Colour changes can be effected by using a Selection Tool and the RGB filter. You'll quickly realise just how much more useful—and versatile—is this way of changing colours.
a: Selecting the part to be changed
Hit the Select button ![]() in the toolbox.
in the toolbox.
 Choose the selection tool that best meets your needs.
The Scissors selection lets you use a shape. When you click the Scissors, a list of shapes will appear.
If you want to draw a shape Freehand, go to the very top of the list. Use the Freehand Selection Tool ![]() if you want to change something in an area where everything looks the same.
if you want to change something in an area where everything looks the same.
The Lasso selection tool lets you draw around the part in which you're interested. Use it where the part you want to change is different from bits close to or touching it.
The Wand selection tool selects things of the same or similar colour.
![]() When you use the Wand, notice that there's a choice for Local or Global selection. When you choose Global, everything in the whole image that is the colour of the part you click on will be selected—unless, of course, you are selecting within an existing selection. When you choose Local, only the part you click on will be selected, whether you are working inside a selection or without one.
When you use the Wand, notice that there's a choice for Local or Global selection. When you choose Global, everything in the whole image that is the colour of the part you click on will be selected—unless, of course, you are selecting within an existing selection. When you choose Local, only the part you click on will be selected, whether you are working inside a selection or without one.
To have it choose variations—say greens that are a bit lighter or a bit darker than the one you click on, play with the Wand Colour Slider. ![]() The further you move it to the right, the greater will the Colour Tolerance of the wand become—i.e. it will select a wider range of shades. As you move it to the left, a smaller range of colours will be selected.
The further you move it to the right, the greater will the Colour Tolerance of the wand become—i.e. it will select a wider range of shades. As you move it to the left, a smaller range of colours will be selected.


 So, click on the part you want to select, then gently move the slider left or right until the selection is what you had in mind.
Here you can see how my selection grew as I moved the slider gently to the right. A small move makes quite a difference; my selections were made at 24, 70 and 153. top
.
b: Changing the Colour
With the selection still active, hit the Colours and Effects button ![]()
The Colours and Effects options will appear below your canvas.

The button on the left should read RGB and look as it does in this picture. If it does not, click the drop down arrow and slide to the top of the list. Click on RGB.
Play with the sliders.
Each of the three sliders controls the amount of one colour in the selection. These colours are Red, Green and Blue. Yellow is a combination of Red and Green.
Move the bar on one slider. Move it left or right, then release the mouse key and notice the change in colour of your selection.
If you move all three sliders all the way to the right your selection will become completely white. If you go all the way to the left, it'll become utterly black.
Try various combinations until you get a feeling for it. Here are a couple of my own experimental results. Notice that for the second try I moved only the blue. What a difference it made!


.
In both pictures you'll notice a tiny bit of green at the top. My tolerance wasn't set quite high enough to catch it, and so it was not selected and has not been changed.
Do remember to cancel your selection by clicking the ![]() button when you've quite finished. top
button when you've quite finished. top
Softening a Colour
Select the area or object whose colour you want to soften.
Hit the Colours and Effects button ![]() in the Toolbox.
in the Toolbox.
The Colours and Effects menu will appear below your canvas.
![]() Open the Filter drop-down and choose HSL, which is third from the top.
Open the Filter drop-down and choose HSL, which is third from the top.
.
There are three strips. Look at the bottom one, which is labelled Luminance. As you drag it to the right, the selected part brightens. You'll find that if you drag it all the way to the right the selected part disappears entirely. Drag back and forth, releasing the mouse button after each drag to see the effect.


.
While you're in the HSL filter, you might like to try the effects of moving the slider on the Hue strip as well.


And just so you don't run away with  the idea that those little black selection marks are part of the picture, I've cancelled the selection and used the Paint Bucket to recolour the yellow centre of the last flower. top
 Gradient Tool:

 Changes colour, brightness and transparency using gradients.
This tool creates beautiful colour effects. As with the Spray Can, if it is applied to the whole canvas it can make further work difficult, so it's probably wise to experiment with small selections.
I'm not yet confident with the Gradient tool, but it's too nice to overlook, so I'll quote directly from the Helios Paint Quick Guide.
Selecting the tool will open the colour gradient editing window. With this you can brighten, darken, reduce or add colour to regions of the main image or selected area using Linear, Round, Rectangular or Fit to Selection Shape gradient patterns.
The colour can be adjusted by Red, Green, Blue or Cyan, Magenta, Yellow or Hue, Saturation, Brightness. Colours can be superimposed on the image Relative to existing colours or ignoring existing colours (Absolute).
If an area of the image is selected (the ![]() button is on), then only the selected area will be changed.
button is on), then only the selected area will be changed.
When using a selected area with the Fit to Selection Shape gradient, the colour changes will explode out to the shape of your selected area.
 Transform Tool:
Transforms the main image or selected area with resize, flip, rotate, skew, perspective.
Before you use the Transform Tool, make a selection.
.
 Make sure that Cut is checked in the selection options.
You can't change to the Cut option once you've chosen Transform.
I'm stressing this because I left it on Copy before I gave a block of text perspective. The effect was great, except that I still had the original underneath the transformed text. Sad!
Of course you may want to keep the original for comparison, but in that case, make a copy before you begin.
Make your selection, make sure you've checked Cut, then hit the Transform button ![]() in the Toolbox. top
in the Toolbox. top
OK. Here are the different things you can do with Transform.
Changing the Size of a Selection
One thing for which you can quickly use the Transform tool is to change the size of a shape you've drawn.
If you want to change the overall size, type a new number into the width box. The height box will adjust itself proportionately.
If you want to change the Proportions of your selection, click the little Lock button ![]() so that you can type a different number into the height box.
so that you can type a different number into the height box.
Click the Do It button ![]()
Hit the Select button ![]() then click on the Pencil Tool. (This is because, to give you the opportunity to change the size of the whole image, selection marks remain around the canvas until you hit another tool.)
then click on the Pencil Tool. (This is because, to give you the opportunity to change the size of the whole image, selection marks remain around the canvas until you hit another tool.)
Flipping Your Selection
 If you want a mirror image, or if you want to turn a selection upside down, use the Flip tab.
Say you're trying to draw a wine glass, a face, or something else that needs to be symmetrical.
Drag a copy of the part you want to mirror (or reflect) to a free space on your canvas.
Select the copy and make sure that you've checked Cut. Make sure, if you're using a rectangular scissors selection, that the selection is right up against the side that you'll later want to join.
Hit the Transform button ![]() in the Toolbox, then click the Flip tab.
in the Toolbox, then click the Flip tab.
The transformation takes place immediately. You can drag the flipped copy into position. Cancel your selection when you've finished.
Rotating Your Selection
 Select the thing you want to rotate—or drag a copy and select the copy.
.
 Make sure that the Cut Copy Delete button is set to Cut. It is possible to drag the rotated selection away while it's still selected, but simpler to have the original cut automatically.
Hit the Transform button ![]() in the Toolbox and click on the Rotate tab.
in the Toolbox and click on the Rotate tab.
There are three preset rotations from which you may choose: -90 (straight up) 90 (straight down) and 180 (upside down). There is also a place where you can type in a rotation of your own choice.
Mark the rotation you want applied to your selection and click the Rotate button ![]() .
.
If, however, you're not happy with the degree of rotation, you can adjust it. Type a new number into the place where you put your own choice and then click the Rotate button again.
The adjustments you make will be to the rotated shape. Say you'd typed 15, but when the selection rotated on your canvas you realise you should've typed -15. That's OK. Type -30 and rotate again. You can even type a very small number—5 or even 1—and hit the Rotate button repeatedly until you get the effect you want.
Of course, you could alternatively hit the Undo button on the Top Toolbar as many times as necessary to return your selection to its original state.
When you are happy with the rotation, you can move, copy or make changes to your selection before you cancel it by clicking the Selected button ![]() . top
. top
Skewing Your Selection
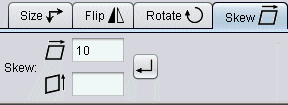 Skewing is just as quick and easy as Rotation.
Having selected what you want to skew, click the Transform button and then the Skew tab.
Type a number into either the horizontal or vertical box—or type numbers into both if you like, then click the Do it button ![]() .
.
 Minus numbers skew to the left or down, positive numbers skew to the right or up.
As with rotation, you can change the numbers and hit the ![]() again, remembering that new values will be added to or subtracted from those already used.
again, remembering that new values will be added to or subtracted from those already used.
Perspective

The Perspective tab looks daunting. All those numbers! OK. It really isn't as bad as all that. You don't have to touch the numbers at all. I guess they're for advanced users, which I certainly am not.
 Select the thing to which you want to apply perspective.
Make sure that the Cut Copy Delete button is set to Cut.
Hit the Transform button in the Toolbox, then click on the Perspective tab. top
 Big square handles appear around your selection.
.
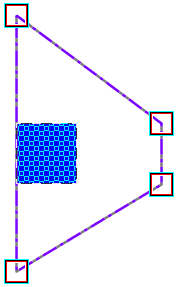
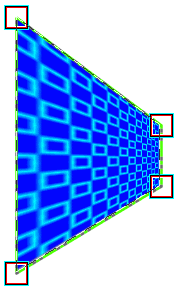 Hold down the Ctrl key if you want to move the handles only in straight lines. Drag the handles to the positions you want.
Hit the Do it button ![]()
Your selection will expand to fill the new space. Awesome!
If you're not satisfied, you can move the handles again and again hit the Do it button. Continue until you like what you see.
While the selection is active, you can move it to a different place on the canvas. You can then recolour it, if you wish, or apply various filters, such as the Unsharp Mask.
If you want to export it as a cutout, cancel your selection and then select it freshly before choosing Export Selection from the Edit menu.
When you are fully satisfied, click the ![]() to cancel your selection.
to cancel your selection.
.
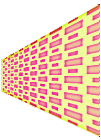 You can, of course, select it again to make further changes later.
If you haven't made any extra changes, you may see dotted lines and handles around your whole canvas. In that case, click the Pencil Tool button in the Toolbox and they'll vanish away.
I couldn't resist doing lots of fiddling with mine!
 Colour Grabber Tool:
Grabs a colour wherever you click and makes it the chosen colour.
![]() To preview a Pixel Colour, hover the mouse pointer over the pixel on the main paint canvas.
To preview a Pixel Colour, hover the mouse pointer over the pixel on the main paint canvas.
The little guide window below the toolbox will let you see exactly which pixel you're hovering over. Click on that pixel to select the colour at that location.
The colour is then copied to the ![]() Colours and Paints button on the left panel.
Colours and Paints button on the left panel.
The colour can then be used in another tool (e.g. pencil) or edited first by clicking on the ![]() Colour and Paints button.
Colour and Paints button.
When you've grabbed the colour that you want to use, be sure to click on another tool before you try to go on editing your picture. The colour grabber does not automatically change back to the last tool you were using. This is good, because if you click on the wrong pixel—as you can immediately tell by looking at the background to the Colours and Paints button ![]() —you can try again. top
—you can try again. top
 Colours and Paints
The Colours and Paints button is right under the Toolbox. Its background shows the colour in use—in this case, black
If the Colours and Paints palette is not on your screen, clicking this button will open it.  The palette can be closed again by clicking the Close button
 ![]() in its top right-hand corner.
in its top right-hand corner.
The Colours and Paints palette offers a choice of either Normal Colours or Textures.
Normal Colour
The Normal Colours palette shows swatches of many colours, with tooltips that give their composition in RGB (Red Green Blue).  The purest colours are: red 255, 0, 0; green 0, 255, 0; blue 0, 0, 255; and yellow 255, 255, 0.
Click any colour in the Swatches palette to choose it.
To the right of the main palette is another palette labelled Recent. This will record each colour that you choose, and you can use it to pick up exactly a colour you've already used.
The larger Recent Paints Palette also shows these, but it really comes into play when you've been using Textures and/or using the Colour Grabber .
When you close Helios Paint, the Recent palette is cleared.
Textures
In Helios Paint, textures can be used with the Paintbrush, the Paint Bucket, the Text Tool, as the Line or Fill for Shapes, and with the Line Tool. Obviously, the texture will show up better on thick lines than on thin ones, and on very large text rather than small paragraph text.
Each pattern will join up correctly, no matter from where you start painting.
Of course that's a different matter if you later make a texture-filled selection and move it!
Helios Paint comes with one inbuilt texture. There are a couple of ways you can add textures yourself.
Add Your Own Textures
If you're searching for textures, you'll find plenty through the tile finder. To save from there, or from any other website that gives permission:
1. Right click on the chosen background tile or texture and click Copy Image.
2. In Helios Paint, click the Texture Paint radio button.
3. Click the Paste button in the Texture Paint dialogue box. The Texture Paint preview window will fill with the texture.
4. Click the Save button, type a name and click Save.
Here are some to practice on. ![]()
![]()
![]()
![]()
![]()
![]() top
top
.
Make Textures as You Go
To use part of your current picture as a texture, first select it with the Scissors tool and the Rectangle shape. Quite a small selection will often work very nicely.
![]() If you cannot see the Colours and Paints palette, click the Colours and Paints button
If you cannot see the Colours and Paints palette, click the Colours and Paints button ![]() below the Toolbox.
below the Toolbox.
At the top of the Colours and Paints palette, click on Texture Paint.
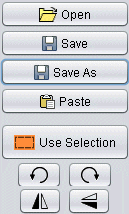
 In the Texture Paint dialogue click on Use Selection.
You may, of course, choose any of the options further down: Rotate Left, Rotate Right, Flip Horizontally (mirror) or Flip Vertically, before you save or click Use.
To have that selection available forever, then click on Save.
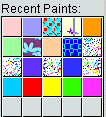 All textures that you use during a session will be available from the larger Recent Paints box to the far right of the main palette. At the end of the session the box is cleared.
Where you've been using a Saved or existing texture, it will be available next time you open Helios.
Where you've simply checked Use Selection and not clicked the Save button, that texture will have been discarded and the Texture window will show the default texture.
Transparent Paint
 If you want to paint with a transparent colour or texture, click the transparency tab after you've made your choice. As you move the slider, the transparent colour will be shown in a grid of the original colour.
As you paint with a transparent colour, paint will be uniform even when strokes overlap, until you click. If you click and paint over previous strokes, colour will build up wherever strokes overlap, just as it would if you were painting with water colour.
It's important to remember that the transparency value will apply to all future colours until you change it.
A transparency value used with a texture will apply to the work you are doing, but the original saved texture will not be changed.
Title Bar:
The name and size of your image and the size of your current selection is shown on the Title Bar.
Menu Bar:
The Menu Bar at the top of the window offers File, Edit, Tools, Settings and Help.
The Edit Menu
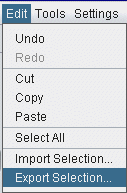
The Edit menu has two items special to Helios Paint: Import Selection and Export Selection.
Import Selection is rather like Paste from in some other programs. It lets you bring a previously saved image into the one you're presently working on. Export Selection lets you save a selection as an individual file.
How to Save a Selection or Cutout
 Quite often you will use much of your canvas for trying things out and the picture you want to save will occupy only a small part of the whole canvas.
A really nice feature of Helios Paint is that you can select that small finished picture, save it, and then go on working on your original canvas.
In MSPaint, the nearest approach to this was Copy to, and in Paint7 Crop.
In Helios Paint, you can save the image without any background, so it can be pasted straight into another picture.
If you want to save just part of your picture, select the part.
If you want to save just the image, with no background, use the Lasso Selection Tool. Remember to set the Hollow ![]() or Filled
or Filled ![]() button to exclude or include a different colour in the middle of the image.
button to exclude or include a different colour in the middle of the image.
Open the Edit menu and click the bottom item, Export Selection.
In the Save box, type a name for your cutout.

Click the drop down arrow on the Files of Type box.
Choose either Portable Network Graphics Format - Transparent (png)
or Graphics Interchange Format - Transparent (gif).
Now click the Save button and you'll be returned to your original picture with the selection still active. If you wish, click the Cut icon ![]() on the top toolbar to remove the cutout from your current image.
on the top toolbar to remove the cutout from your current image.
Adding a Saved Selection or Cutout to a Picture
 You may have an image to which you'd like to add something extra, such as some text, a speech balloon, a legend or a few stars.
Open your main picture and immediately save it with a new name. I find that simply adding 01, 02, etc. works well.
Go to the Edit Menu and click Import Selection.
Navigate to your previously saved transparent cutout, click its name and click Open.
The cutout will appear as a selection on your main image. Drag it into position and then deselect. top
The Settings Menu
Antialiasing
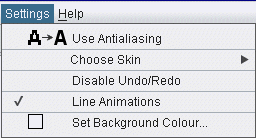
The settings menu lets you turn Antialiasing off or on as needed.
Antialiasing smooths edges by fading the edges of an object with variations of the main colour, and sometimes this is not what you want.
With a tick, antialiasing is on. Without a tick, it's off. To change from one setting to the other, just open the settings menu and click the top item.
Line Animations
"Line Animations" refers to the "marching ants" that indicate an active selection. When you make a Freehand selection, you know it's not complete until you've clicked the Grab Area button, and because the dashed outline is still. I wouldn't turn it off!
Disable Undo, Redo?
You can disable Undo and Redo. Ouch! That just might be necessary if you have absolutely no memory to spare, but I'd hate to work without the choice. Helios Paint lets you undo lots of steps, which can be very convenient at times.
Top Tool Bar:
The Top Tool Bar at the top of the window offers standard Windows buttons including New, Open, Save, Print, Undo, Redo, Cut, Copy and Paste.
When you want multiple copies of a selection, you might find it simpler to use the Toolbar Copy button and then click the Paste button for each copy. top
Zoom Controls:
Zoom in, Zoom out, Get a Closer View
To the right of the window there are controls for setting the zoom level. Buttons include:
![]() Zoom to normal size (100%): Changes the zoom level to normal (1:1 or 100%).
Zoom to normal size (100%): Changes the zoom level to normal (1:1 or 100%).
![]() Zoom to fit: Zooms to fit the whole image in the current window.
Zoom to fit: Zooms to fit the whole image in the current window.
![]() Show grid at zoom 200% or more: Displays a grid if the zoom level is 200% or more.
Show grid at zoom 200% or more: Displays a grid if the zoom level is 200% or more.
![]() Zoom in: Zoom in on the paint canvas in very small steps.
Zoom in: Zoom in on the paint canvas in very small steps.
If you maintain pressure on this button the page will zoom towards you quite quickly. If you're zooming in a long way, you may like to stop and reposition the zoomed area every now and then.
![]() Zoom out: Zoom out of paint canvas in very small steps.
Zoom out: Zoom out of paint canvas in very small steps.
If you maintain pressure on this button the page will zoom away from you quite quickly.
If you go to the Full Screen View available from the Tools Menu, press the Esc key to return to normal view.
Position Your View when Zoomed In
As you zoom in, the area you want to work on may drift out of the view window. You can use the scroll bars to reposition the zoomed area, or you can move to it easily with the
Thumbnail Navigation Window
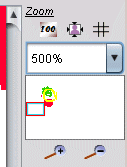
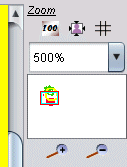 For a very close view, use the drop-down arrow to choose a zoom level, then use the little navigation window within the thumbnail to position your view.
Put your cursor on the navigation window until it becomes a hand, then drag it to the part of the picture on which you want to work. The view in the main window will move accordingly.
For views over 1000% you may not be able to see the navigation window. No matter. Just move your cursor slowly around in the thumbnail until it becomes a hand. top
Selected Area Controls:

 The Selected Area Controls light up when you make a selection.
The little orange Selected button ![]() can be clicked to cancel a selection.
can be clicked to cancel a selection.
The Reverse button ![]() changes the selection to "Everything except the part presently selected".
changes the selection to "Everything except the part presently selected".
The slider at the top, right under the words "Selected Area", lets you change the transparency of a Copied or Moved selection. It won't affect the original part of which you made the selection.
If you click the picture in the box, the selection will become the whole image. That new image will be the size of the selection.
If there is no tick in the tiny box to the right of the picture, only the active selection will show in the new image. If there is a tick, parts of the image that are directly beneath the selection will show through.
Making a Copy of a Selection Transparent
Use the Transparency Slider in the Selected Area box at the right of the canvas to change how 'see through' the Selected Area is as it floats above the main paint canvas. This can be adjusted easily.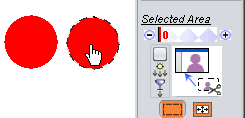
Say you've selected this red circle and plan to put the copy partly on top of it, but you want the original to stay visible.
To begin with, both red circles are the same as each other.
.
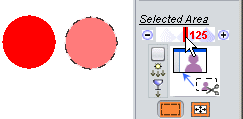 If you drag the slider in the Selected Area box to the right, the selection becomes transparent.
.
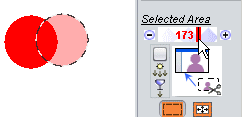 If, when you put the selection on top of the original, you aren't happy with the degree of transparency, you can move the slider further to the right, thus increasing its transparency, or to the left, making the transparency less.
.
Change the Colour of a Transparent Selection
 While the selection is still active, you can, if you wish, click on the Paint Can
 ![]() , choose a different colour, and click again on your selection. The colour of the selection will change, but the degree of transparency will remain the same. It's much easier to do a colour change while the copied selection is still active.
, choose a different colour, and click again on your selection. The colour of the selection will change, but the degree of transparency will remain the same. It's much easier to do a colour change while the copied selection is still active.
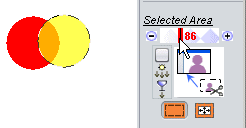
And, if you'd prefer a different degree of transparency with the new colour, you can move the slider yet again!
When you are fully satisfied, click the Selected button ![]() to cancel your selection.
to cancel your selection.
The previously selected area is now part of the whole picture and can't be quickly and easily separated from it.
The last used transparency will apply to all future selections until you change the slider. top
Contents by Subject
Adding a Cutout to a Picture Antialiasing: turn off or on Any Polygon, Any Star Cancelling a Selection Colour Grabber: Colours: change the colour of a transparent selection Colours: changing with filters Colours: having the wand select shades Colours: select by Colours: transparent Colours: changing using rgb filter Colours: changing with paint can Colours: making lighter or softer with filters Colours: normal Colours: softening with eraser Colours & Effects Tool: Colours and Paints: Copies: repeated Copying, Moving and Deleting Curve: closed Curved Line Cutout: save Eraser Filters Flipping Freehand Shapes Gradient: Lasso Selections Lines: Lines: curved Lines: freehand Lines: straight Lines: straight: closing Mirroring Navigation Window Neighbour Rule Normal Colour Paint Can: Paintbrush: Pencil: Perspective Position Your View when Zoomed In Repeated Copies Rotate: any angle Save a Selection or Cutout Selection: adding to a picture Selection Tools: Scissors selections Scissors Selections care with Selected Area Controls: Selecting the part to be changed Selection: cancelling Selection: making Selection: save Selections: copying, moving and deleting Selections: cut shape Selections: lasso Selections: scissors Selections: wand Shapes Tool: Shapes: custom Shapes: settings persist Size of selection: changing Skewing Spray Can: Straight Line: completing Text: Text in different fonts, font sizes, colours and alignments Text rotated Textures Textures: add your own Textures: make as you go Thumbnail Navigation Window: Transform: Transparent: making a copy of a selection transparent Transparent Paint Wand Selections Zoom Controls: Zoom in, Zoom out, Get a Closer View Zoomed in: position your view
Questions or comments? I'd love to hear from you. My email address is here.