Make Fancy Text with Helios Paint
Make a Flower with Helios Paint Back to Making Fancy Headings in MS Paint
Back to Text Tool in Getting Started with Helios Paint
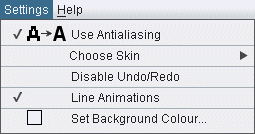 For text to look smoothly finished, it's best to have antialiasing on. In Paint you may have found this caused problems, but different programs use different methods, and the antialiasing in Helios works beautifully.
Open the Settings menu and make sure there is a tick beside Use Antialiasing.
 Because the text we'll be making is big headings, I found it better to use a large canvas.
Open the Tools menu, click on Set Canvas Size, and in the dialogue box that appears type 800 for width and 600 for height.
You can of course change this to a smaller size when you begin a new file or when you next open Helios Paint.
Shadowed Text
Choose Text Options
Choose Shadow Colour
Type the Shadow
Choose a Different Colour and Type the Top Text
Position the Top Text
Changes You Can Make
Change Spacing of Letters
Perspective
Extruded Text
Outlined Text
Fill the Outlined Text
Shadowed Text
This could not be easier!

Click the Text tool in the Toolbox. The Text Options will appear below your canvas. Whatever options you choose, you can change any or all of them while you are typing your text and until you click the Finish button ![]() .
.
Choose Text Options

Click the Font dropdown and choose the font you'd like to use.
Type in a Font size. Just guess for now; if necessary you can change it when you see how your text looks.
If you wish to, click the Bold button.
The Spacing button refers to line spacing within a paragraph.
Choose Shadow Colour
![]() Click the Colours and Paints button to bring up the Colours and Paints Palette.
Click the Colours and Paints button to bring up the Colours and Paints Palette.
Click on the colour or texture that you want to use for the shadow. For a plain colour, you choose from the Normal Colour palette. To use a texture instead, click the Texture Paint tab and open a texture.
Type the Shadow
Click on the canvas and type your text. You'll see the little hand cursor ![]() , indicating that you can move the text box around the canvas if you need to.
, indicating that you can move the text box around the canvas if you need to.
Look carefully at the result and change anything you want to. When you're completely happy, click the Finish button ![]() .
.
Choose a Different Colour and Type the Top Text
The top text needs to be a duplicate of the shadow in everything but colour, so don't change any options. The only thing you should change now is the colour.
Click on a different colour or texture for the top text.
Click on the canvas and type exactly the same text that you typed for the shadow. Don't be concerned if your text area is partly over the previous text. You can move it whenever you like—until you've clicked the Finish button.
Position the Top Text
When you have the top text ready, press with the little hand and move the text onto the shadow.
When the position is as you want it, click the Finish button ![]() . top
. top
Changes You Can Make
Once you've hit the Finish button the text you typed is no longer editable text. It's now an image or part of an image and can be manipulated in whatever ways you choose.
Change Spacing of Letters
The way that computers and typewriters space letters can sometimes look awkward compared with hand lettering. For instance, the space between the T and the e above looks very wide.
 If you'd like to fix this, click on the Selection tool
 ![]() in the Toolbox.
in the Toolbox.
In the options, choose the Lasso ![]() and the Freehand cut shape
and the Freehand cut shape ![]() which is right at the top of the dropdown list.
which is right at the top of the dropdown list.
Draw outside the letters that you want to move and click the Grab Area button ![]() . The selection marks will spring in to embrace the selected letters.
. The selection marks will spring in to embrace the selected letters.
Hold the Ctrl key to ensure horizontal movement while you move the selected letters. top
Perspective
 Hit the Selection button
 ![]() in the Toolbox.
in the Toolbox.
Choose the Lasso tool ![]() and the Rectangle cut shape.
and the Rectangle cut shape.
Draw a marquee outside the text.
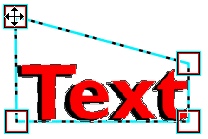 Click the Transform button
 ![]() in the Toolbox. When the options appear, click the Perspective tab.
in the Toolbox. When the options appear, click the Perspective tab.
Your text will be surrounded by a marquee with control points at each corner. Drag the control points until the marquee has the shape you want the text to have, then click the Do it button ![]() .
.
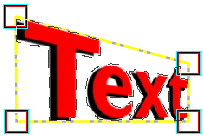 Your text now fills the altered marquee. If necessary, adjust again and again click the Do it button.
When you like what you see, click the Selected button ![]() . Then click the Pencil tool in the Toolbox to cancel the marquee that now surrounds the canvas. top
. Then click the Pencil tool in the Toolbox to cancel the marquee that now surrounds the canvas. top
.
Extruded Text
 This is harder to achieve and will take some patience. Posibly a little practice, too!
You'll need to use four colours and you'll need to work in a zoomed-in view.
Begin with a normal view. Click the Text tool in the Toolbox and in the palette click on the darkest colour you plan to use.
Type your text and click Finish.
Zoom way in—maybe 400%—so that you have a very close view of just the beginning of your text.
Click the second colour, type the text again, and move it onto the previous lot. You won't be able to see the whole thing, but don't worry; where one letter goes the others must follow.
 Gently drag the new text so that it hides all but one pixel on the left and one pixel on the top. The picture here is of the bottom left corner on the crossbar of my T.
Click Finish.
Now, still zoomed in, click your third colour and type your text a third time.
Drag it into position, just one pixel down and one pixel over as you did before. Click Finish.
Repeat one more time, using the fourth colour.  Here's how the corner of my crossbar looked when I'd finished.
Zoom out and see how it looks. Oh, and do save your work! top
Outlined Text
 Helios Paint has an option for outlined text.
Outlined text can be filled with a plain colour or with a texture and can look very attractive.
Begin by clicking the Text tool in the Toolbox. The text options will appear below the canvas. Here are the options that I used to make my outlined text.
First, click the outline button to highlight it. ![]() Then type in a number for the thickness of the outline. After experimenting, I thought 50 would do nicely. You can, of course, change the thickness again and again until you click the Finish button.
Then type in a number for the thickness of the outline. After experimenting, I thought 50 would do nicely. You can, of course, change the thickness again and again until you click the Finish button.

Click a colour in the Colour Palette. Type your text. Make any changes to the options and click Finish ![]() . top
. top

.
Fill the Outlined Text
Click the Paint can tool ![]() in the Toolbox
in the Toolbox
Set it to Local Replace. 
If you are going to fill with a normal colour, choose one from the Normal Colour palette.
If you want to use a texture, choose Texture Paint and open the texture you want to use.
If you have no textures saved, there are a few available from the Getting Started page. Right click the following link and say Open in New Tab. Then you can save a texture and close the other page to continue here. Add Textures

Click into the white inside of the first letter. If it seems that the fill was not complete; that there's a whitish margin between the fill and the outline of the letter, click the Undo button in the Top Toolbar, then move the slider in the Paint Can options a little way to the right and try again. You might also click the Neighbour Rule button ![]() to tell it to colour pixels that touch only at corners. This is much more often a problem with curly fonts or fonts that have serifs. With this font, the fill was perfect first go.
to tell it to colour pixels that touch only at corners. This is much more often a problem with curly fonts or fonts that have serifs. With this font, the fill was perfect first go.
Click into the remaining white parts of the text until it's all filled. top

.
Back to Getting Started with Helios Paint Back to Fancy Headings in MS PAint
Questions or comments? I'd love to hear from you. My email address is here.