Paint a hub cover for a wheel
 Other Pictures, Problems and Procedures
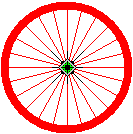
You've made a wheel. You've made 24 spokes and attached the 24 spokes to the wheel. Now add some fancy touches to the hub of the wheel and it's close to perfect.
The main purpose of this is to disguise a messy centre, especially when spokes have been thickened after the wheel was put together. It can still be used as a finishing touch on a neat-looking wheel, of course.
Paste the wheel
Open workspace.bmp or workspace.gif.
Go to the Edit menu and click Paste From.
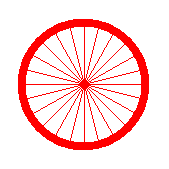
Navigate to bicycle_wheel2.bmp or bicycle_wheel2.gif and click Open.
 The wheel will appear in the top left corner of your Paint window. Drag it just a little bit down and to the right so that you can easily select around it if you want to.
Click the transparency option.
Look at the centre
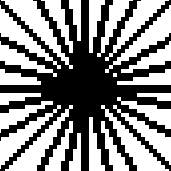

The collected pixels at the middle of the wheel may look a bit off-centre, or, if the spokes are two or three pixels thick, they'll look blobby.
You can fix this by covering it with a decorative hub.
Copy the centre
![]() The Rectangular Selection tool should be already active. If it isn't, click it now.
The Rectangular Selection tool should be already active. If it isn't, click it now.
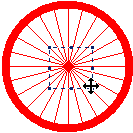 Make a selection in the middle of the wheel, including all the blobby part. It doesn't need to be even, but should be well outside the messy part.
![]() Press the Ctrl key as you begin to drag a copy of the blobby area into a free space. top
Press the Ctrl key as you begin to drag a copy of the blobby area into a free space. top
.
Zoom right in

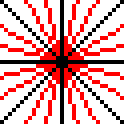 Zoom right in to 8x, so that you can see individual pixels.
With the Line tool set on 1 pixel—the top option, and a color different from the color of the piece, mark the horizontal and vertical lines. The Shift key will help you to keep these lines straight.
You might also like to mark the diagonals. Again, the Shift key will help.
These will be your guidelines when you paste the hub back into the wheel.
Be creative
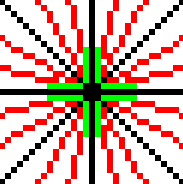
![]() Use the Pencil tool. While you're building up your pattern, it's easiest if you use a color—any color you like except for the colors already in the picture—to make a pattern that covers all of the blobby part.
Use the Pencil tool. While you're building up your pattern, it's easiest if you use a color—any color you like except for the colors already in the picture—to make a pattern that covers all of the blobby part.
You need to cover every bit of it. If there are any parts you'd like to have white, color them yellow or some other light color.
When the blobby area is all covered, click the Rectangle tool and draw a protective rectangle around your work. 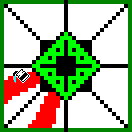 It doesn't need to be even.
Click the Flood Fill tool and the color of the wiggly spokes to clear them away with a left click, right click. Click white onto the protective border too. Now everything in the little picture is nicely arranged around the centre. top
Checking for balance
If you've been making a really complex pattern and get the feeling that it's different on one side, there's an easy way to check and put it to rights at the same time.
1. Any parts you've masked with a color to make white later on, make them white now, so that your small picture is just black and white.
Use the Rectangular Selection tool to drag a copy of your small picture.
Go to the Image menu, choose Flip/Rotate, and then Flip Horizontal.
2. Drag the flipped copy back onto the original small picture, carefully matching the horizontal and vertical lines.
It'll now definitely be the same on both sides, but the top and bottom may still be different.
Cancel the selection by clicking away, then select this combined picture.
Drag a copy away and go Image > Flip/Rotate > Flip Vertical.
3. Drag this flipped copy onto the original, click away, and you can be certain that all four sides are exactly the same.
4. Put the masking color back into the white part of the pattern.

In this picture the mistake is obvious and you could fix it with the pencil. More subtle differences can be frustrating and need this method. top
Paste the hub onto the wheel
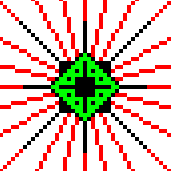 Make sure that the transparency option is highlighted, and that your background color is white.
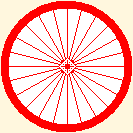
 Use the Rectangular Selection tool to draw a marquee around the hub you've just made.
Drag it into position on the wheel, carefully matching the guidelines.
Fix the colors
![]() Still zoomed in, use a right button click of the Flood Fill tool to make the masking color white.
Still zoomed in, use a right button click of the Flood Fill tool to make the masking color white.
![]() In the color palette, click your right button on the main color of your wheel and your left button on the color in the hub.
In the color palette, click your right button on the main color of your wheel and your left button on the color in the hub.
![]() Click on the Eraser tool, press your right button while you rub over the hub and guidelines.
Click on the Eraser tool, press your right button while you rub over the hub and guidelines.
When that's done, immediately click your right button on white in the color palette.
Cut out and save the finished wheel
 Click on the Rectangular Selection tool.
Draw a marquee around your finished wheel.
Go to the Edit menu and choose Copy To.
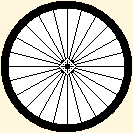
Save the cutout as wheel3.bmp or a more specific name such as wheel_with_hub.bmp (gif if you're using Vista, of course). top
Clean your workspace
After you've copied and saved the picture, have a quick look around your workspace to make sure there's nothing else you want to copy and save. If there is something, copy and save it now, using the same Copy To procedure.
Then
Make sure that you have white as your background color.
Go to the Edit menu and click Select All.
Hit the Delete key.
Go to the File menu and click Save.
Close Paint.
.
Other Pictures, Problems and Procedures
Questions or comments? I'd love to hear from you, especially if you have helpful suggestions regarding any one of this set of pages. They were begun in response to some reader questions and I've arrived at solutions through trial and error. As I went over the exercises and tried to follow my own instructions, I several times saw a quicker or easier way to do something and it's likely that readers may still see some better solutions.
My email address is here.
Return to top
Drop-Down Menu from Brothercake
Everything below this is a javascript menu. If you are using a reader,
please use the links here.