Paint 24 spokes for a wheel
 Other Pictures, Problems and Procedures
More spokes for your bicycle wheel
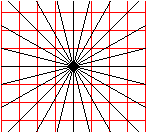
If you've successfully made a picture of a bicycle wheel, but are unhappy with its having just eight spokes, here's a process that'll give you twenty-four. It isn't hard, but it does take precision; you'll need to put things in exactly the right place.
An easier way, without using a grid, but resulting in slightly less even spacing, is how to make 24 spokes using a Wingding symbol.
Open workspace.bmp or workspace.gif. If you haven't made that yet, please read Your workspace file. The infomation there is important, and will make all the difference to easy working. You only need to set up the workspace once and you're all set.
The grid
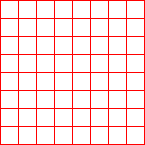 You need a grid built from 64 squares—that is, an 8 by 8 grid.
Either paste one that you've made previously, or build it now. It only takes a few minutes. The easy directions for making a grid are here.
Choose transparent copying
 While the Selecton tool is active—either because you just did a Paste From or because you're building a grid—make sure that the lower option—transparent copying—is chosen.
Make copies as you go
In Paint, if you paste one thing on top of another and then click Undo, it often happens that both things simply disappear. Because of this, it's wise to make copies of both things before you do your pasting.
Mark the grid
Zoom right in to 8x. This is the fiddliest part of the whole operation, I promise. Worst comes first!
Click on the Pencil tool and have blue as your foreground color, white as background.
Make a blue mark
![]()
![]() Go to the second square on the left.
Go to the second square on the left.
As accurately as you can, make a mark one third of the way to the next vertical line. You can do that by estimation, or, if you'd rather take the trouble, you can count pixels.
If you want to count pixels, have red as your foreground color and use your right button to knock out every second pixel. If you hit the wrong one, use your left button to make it red again.
Make a short straight line up from the one third point. You can do this with either the Pencil or the Line tool: whichever you prefer. top
Make a green mark
Change your foreground color to green.
![]()
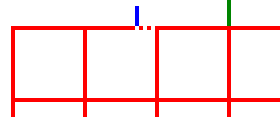 No need for counting pixels this time. Just locate the second line from the middle and make a short green line directly above it.
.
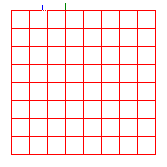 Zoom back to normal.
You now have a grid with two little spikes sticking up.
Make a safe copy
Before you do anything else, use the Rectangular Selection tool to draw a marquee around this shape, including the marks, and Ctrl drag a copy to the bottom or far right of your workspace.
Quite often, if you make a mistake while pasting one shape over another and press Ctrl+z or go Edit > Undo, both pieces disappear entirely. You don't want to start all over again!
Also, check to make certain that the Transparency option is highlighted.
Flip and rotate
Forgetting about the safe copy, again make a selection of your picture and drag it well to the right. You now have two pictures side by side with a fair-sized gap between them. top
Flip horizontal
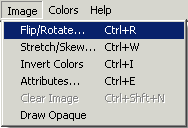 While the selection is still active—you can see little dashes all around it—click Image on the menu bar and choose Flip/Rotate.
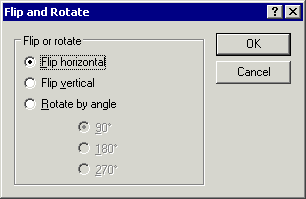 The dialogue box will already be set to Flip Horizontal, so click OK. The copied picture still has marks on the top, but they're right of centre.
.
Drag one on top of the other
You'll probably find zoom 2x is most comfortable for the next steps.
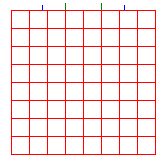 With the selection still active, drag the flipped picture on top of the original.
Move it around until the red grid looks like just one piece of work—no thick lines or double lines.
When it's where you want it, release the mouse button and click away.
It should look like this—almost the same as it was, but with four little marks at the top.
If it doesn't work out and you have to undo and lose the lot, remember your safe copy. Go down and select it, tap Ctrl as you begin to drag, and bring the copy of the safe copy back to where you're working. top
Flip vertical
Now it's more of the same, or very nearly.
Make sure that the last selection is no longer active—no little dashes.
Select the new picture, press the Ctrl key as you begin to drag, and drag a copy over to the right.
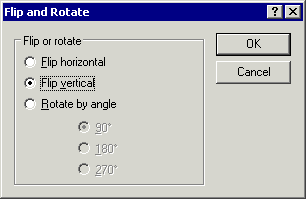 While the selection is active, go to the Image menu and choose Flip/Rotate.
Change the option in the dialogue box so that it says Flip Vertical.
Click OK.
The little marks are no longer at the top. They're now at the bottom of the flipped picture.
Drag the copy onto the picture at the left
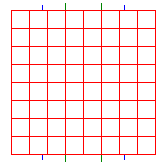 Drag the newly flipped copy back onto the picture at the left.
Take your time and get everything lined up so that only one set of lines can be seen, the only difference being that there are little whiskers sticking out at both top and bottom.
Release the mouse button and click away. The File > Save item is a good thing to click on. ![]() top
top
.
Rotate through ninety degrees
You're nearly done with the copy/flip/paste business. Once more and it's done.
Select the new picture and press Ctrl as you begin to drag it to the right.
Make sure you have a decent-sized selection—you need to have both sets of marks included, and at least the same amount of space on each side.
Get it well away from the one that is now the original.
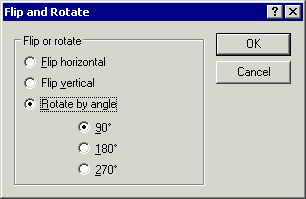 Now, with the selection still active, go again to the Image menu and choose Flip/Rotate.
This time, put a mark beside Rotate by angle and also beside 90° (Gee! You can even rotate by 180°. Cool!)
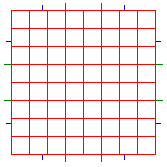
Why do it that way?
I find getting that one third mark a bother and would prefer to do it once rather than eight times. If your first two marks are in the right places, then all sixteen will be. top
Draw in the spokes
All that's needed here is care with positioning your cursor.
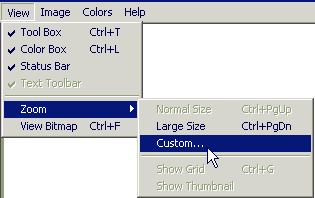
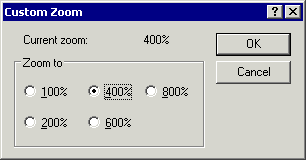
I did this at the hidden (in XP) zoom level of 400%.
Click the Line tool and see that it's set to the top option, one pixel.
Click on the color you want to use. I've used black, but if you know for certain that you want these spokes for a black wheel, choose another strong color, but not one that you've used already.
Yes, it is harder to see the very fine line, but it makes it much easier to be accurate. Think of a sharp 3H pencil in contrast to a bluntish 3B.
If your wheel already has thick spokes, you can thicken these later, just before you paste the wheel onto them.
.
Start with the blue marks
It doesn't matter in what order you draw the lines in, but this way is fairly organised and you can see the pattern quite soon.
Each line is a joining of opposites; if it starts at the top left, it finishes at bottom right.
Every line must pass through the centre of the grid. top
The first two lines—blue to blue
Don't hurry. Take your time and be accurate.
One
Position your cursor on the top line, exactly under the left blue line. The top vertical arm of the cursor should be right on the blue line and the horizontal arms of the cursor should be right on the top red line.
Drag down to the blue mark on the bottom right of the grid.
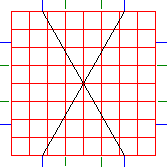 Again, take your time to get the cursor in exactly the right place.
Click.
Two
The same again, but begin on the top right blue marker and go down to the bottom left one.
See how nicely they cross dead centre?
The blue marks on the sides
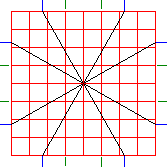 From the blue marker above the middle on the left, down to the blue marker below the middle on the right.
And from the blue marker below the middle on the left to the blue marker above the middle on the right.
The green marks
Now that you can see how it works, go ahead and join the green marks in the same way.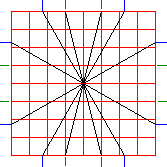
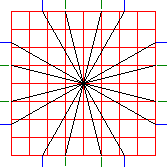 The centre is now very clearly defined, so it'll be obvious to you if a line is not passing through it as it should. top
.
Diagonals, vertical and horizontal
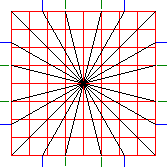 These are easiest of all. For the first diagonal, get your cursor exactly onto the top left corner of the grid and hold the Shift key while you drag to bottom right. Paint will keep the line at exactly 45°.
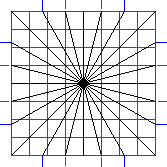 Just trace the existing middle lines for the horizontal and vertical lines. If you begin in the right place—exactly on the edge of the grid where it meets the line you're interested in—you can hold the Shift key while you drag and the line will be perfectly straight.
Lose the grid
Click on the Rectangular Selection tool.
The transparency option should still be set.
![]() It doesn't matter what color you have on your left button, but click your right button on red.
It doesn't matter what color you have on your left button, but click your right button on red.
Draw a marquee around your picture and drag it over to the right.
Eek! There's a big red rectangle on your page!
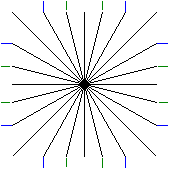 Click away from the picture you just moved to cancel the selection. If the selection is still active when you change your background color, the red lines will come back.
Now click your right button on white, click on the Flood Fill tool and click your right button over the red rectangle. top
Remove the markers
 Click on the Eraser tool and choose the option for the biggest eraser.
Erase the blue and green markers.
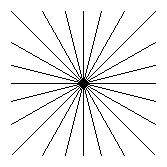
Save a copy
This, of course, is the aim of the whole operation—to save a set of spokes that you can use whenever you draw a wheel.
Click on the Rectangular Selection tool and draw a marquee around your finished picture.
Go to the Edit menu and choose Copy To.
In the Save dialogue, type a meaningful name—24spokes.bmp in 98 or XP or 24spokes.gif in Vista.
Clean your workspace
After you've copied and saved the picture, have a quick look around your workspace to make sure there's nothing else you want to copy and save. If there is something, copy and save it now, using the same Copy To procedure.
Then
Make sure that you have white as your background color.
Go to the Edit menu and click Select All.
Hit the Delete key.
Go to the File menu and click Save.
Close Paint.
Using these spokes
If you need help in incorporating these spokes into a wheel you have drawn, or if you want suggestions for making an attractive hub to cover the messy centre, directions are in attaching spokes to an existing wheel.
Other sizes
The spread of these spokes should be sufficient for most small drawings. However, if you do want something larger, experiment. I tried with a grid made up of 64 33pixel squares (to work comfortably with which I needed my workspace to be 700 pixels wide) and I put the blue marker at ten pixels from the right edge of the second square from the left. I was happy with the result, so the rule seems to be "about a third, or just a bit less".
Needless to say, I have not dared to print the diagram and put a protractor on it. My only aim is to have it look right in a simple picture.
Other Pictures, Problems and Procedures
Questions or comments? I'd love to hear from you, especially if you have helpful suggestions regarding any one of this set of pages. They were begun in response to some reader questions and I've arrived at solutions through trial and error. As I went over the exercises and tried to follow my own instructions, I several times saw a quicker or easier way to do something and it's likely that readers may still see some better solutions.
My email address is here.
Return to top
Drop-Down Menu from Brothercake
Everything below this is a javascript menu. If you are using a reader,
please use the links here.