Spotty Background

Return to list of Examples Return to Making Fancy Text Masks Step by Step
Draw a Square

 Zoom in to 6x or 4x, click on one of the colours you've chosen, click the Rectangle tool and hold the Shift key while you draw a small hollow square. Mine was 22x22.
(I begin with hollow shapes because in Paint solid circles aren't drawn as evenly as hollow ones. See the difference in the black and red shapes below?)

Copy the Square
![]() Now click on the Rectangular Selection tool
Now click on the Rectangular Selection tool ![]() and turn on transparent cutouts by highlighting the lower of the two icons that appear below the toolbox when you click the Selection button.
and turn on transparent cutouts by highlighting the lower of the two icons that appear below the toolbox when you click the Selection button.
Directions for transparency in Paint for Windows 7 are here.
Draw a marquee around the square and press the Ctrl key as you begin to drag a copy just a little to the right.
Draw a Circle in One Square
 Click on your second colour choice and click the Ellipse tool. Beginning at the top left corner of one square, draw a circle to fill—or almost fill—one square. Keep your eye on it as you draw and make sure you get a nice even circle.
Whether or not the circle exactly fills the square depends on the dimensions of the square—whether the sides are an odd or even number of pixels. In this instance, it doesn't matter either way. top
Colour the Shapes
Click the Flood Fill tool and colour the circle to match its outline.
Change to the other colour and fill the squares—four clicks for the one with the circle, just one for the plain square.
Join the Two Squares

 Make sure that Transparency is on and that your background colour is white.
Click the Rectangular Selection tool, draw a marquee around the plain square and drag it across to exactly join the one with the circle. Do this carefully, making sure that there's neither an overlap nor a gap.
Now draw a marquee around the joined squares, press the Ctrl key and drag a copy down below the original.
Flip the Copy
Click away and then draw a fresh marquee around the copy you just made.
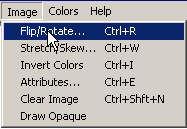 Go to the Image menu and choose Flip/Rotate. Click OK in the next box.
 In Windows 7, just click the Flip button on the Image menu. top
.
Join the Two Parts of Your Pattern
Drag the newly flipped image up to exactly join the original.
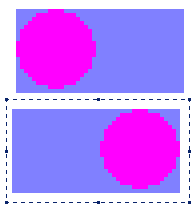

.
You should now be able to zoom back to 2x or even normal view—whichever works better for you.
Select, Copy, Join
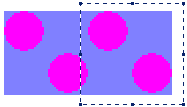 Select the new square you've made—it has two spots—Ctrl drag it to the right and join it.
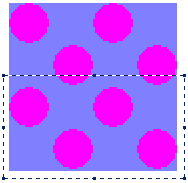 Then select the whole new shape and Ctrl drag it down and join.
From here on it's just a matter of Select, Ctrl drag, join, as many times as necessary to make a background a bit wider and deeper than the text for which you're going to use it.
 Do watch carefully as you make each join. If this happens (picture on right) it'll throw your whole pattern out of kilter.
You can now use your spotty background to fill a heading, using the directions for Masks Step by Step.
Transparency in Windows 7 —Image Menu—Select
![]()

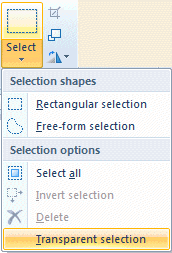 Depending on the size of your window, the Image Menu will look like one of these. When you click the down arrow just below the dotted rectangle, or just below the word Image, a menu will offer you further choices.
Before you can use the buttons on the right of this menu, you select the part of your drawing that you want to work with.
Transparent selection
 At the bottom of the Select menu you'll see Transparent selection. You'll want to use this often, so it's a good idea to add it to your Quick Access toolbar. To do this, right click on Transparent selection and then click on Add to Quick Access toolbar.
On your Quick Access Toolbar, there'll be a checkbox in front of the words Transparent selection. ![]() While that box has a tick in it, selections will be transparent.
While that box has a tick in it, selections will be transparent.
To make your selections opaque, just click the checkbox to remove the tick.
Return to Copy the Square.
Return to list of Examples Return to Making Fancy Text
Questions or comments? I'd love to hear from you. My email address is here.