Outlining Heading Text
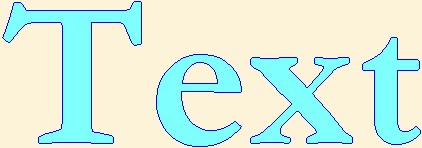
Giving text an outline takes time and care, but the instructions make it sound worse than it is. Much easier done than said, truly.
Go back to List of Examples
Five Copies
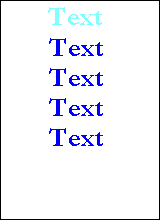 You need five exact copies of the same piece of text; one in the main colour or pattern that will be the foreground of the text, and four in the colour you use for the outline.
When using this method of outlining text at its most basic, you'd type the text once, stop, draw a new text box, change colours and type it again four times.
It's more likely, however, that you'll be adding an outline to some decorative text—text which you've respaced set on a curve, or to which you've added a background fill.
If you simply used a background fill, then you can just type the outline colour four times, using the same font and size as you used for the filled text.
Any Changes Must Be Consistent
However, if you've changed the spacing or set the letters on a curve, the outlining text will have to be copied from the changed text.
If you're both re-arranging and filling, make one copy of the re-arranged text before you go ahead with the background fill. Save that copy separately, perhaps by doing a Copy to or a Crop > Save as. Then you can paste it back when you're ready to do your outlining.
For a first try, I'd recommend that you use plain, freshly typed text. top
Width of Outline
Decide how thick you want your outline to be. One pixel is straightforward and easy. Two pixels is pretty good; the outline will show up more clearly. Anything greater than three will be a bit troublesome; you'll probably need to begin by increasing the space between letters.

 With a thicker outline, corners and points will look blocky. You'll need to zoom in and use the pencil to add a few pixels of the outline colour in those places to make things look smoother.
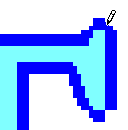
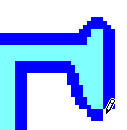
If the heading you're making has a lot of letters, this can be tedious.
This extra work is not necessary when the outline thickness is just one pixel. Outlining is complete and doesn't need any tidying up.
For this exercise, we'll make an outline of just one pixel in thickness.
Zoom in, Zoom out, Zoom in
![]() You'll need to zoom in and out many times. Begin by clicking the Zoom tool, clicking 8x, and then zooming out again.
You'll need to zoom in and out many times. Begin by clicking the Zoom tool, clicking 8x, and then zooming out again.
Having thus set the zoom to 8x, you'll just need to click the Zoom tool and then click over the place where you want to work.
![]() You may be more comfortable while zoomed in if you maximise your Paint window by clicking the Maximise button in the top right-hand corner of the Paint window. This is a matter of personal preference. top
You may be more comfortable while zoomed in if you maximise your Paint window by clicking the Maximise button in the top right-hand corner of the Paint window. This is a matter of personal preference. top
You Can't See Everything
When you are working at such a high zoom level, you can't possibly see your whole heading—and it doesn't matter one bit. If you focus on the first letter and position that correctly, the rest of the word or words will also be correctly positioned.
Select Your Foreground Text

 In normal view, click the Rectangular Selection tool.
Highlight the Transparent Selection icon under the toolbox.
In Paint for Windows 7, click the down arrow under Select in the Image menu and choose Transparent selection from the bottom of the menu.
Draw a marquee around the foreground text and click Copy on the Edit menu.
Zoom in and Paste
 Click the Zoom tool and click over the beginning of the first copy of your heading text.
Click Edit > Paste or press Ctrl+v.
The coloured or decorated heading will appear. Drag it so that it completely obscures the text that's in the outline colour.
Now drag it gently to the right until you can see one pixel of outline colour on the left.
Now drag it gently down until one pixel of the outline at the top.
Zoom out and Save. top
Copy the Image You Just Made
 In normal view, you'll see that you now have an image of text with a fine outline on the left. Click the Rectangular Selection tool and draw a marquee around all of the new image.
 Click Edit > Copy, then click the Zoom tool and click over a new lot of plain text.
Click Edit > Paste or press Ctrl+v.
This time, arrange the text so that one pixel of outline colour shows on the right.
No outline colour should show at the top or at the bottom.
Zoom out and Save
Copy This New Image
In normal view, your new image should look similar to this.

Again, click the Rectangular Selection tool.
 Draw a marquee around your new image and click Edit > Copy.
Click the Zoom tool and click over a fresh piece of plain text.
Click Edit > Paste or press Ctrl+v.
Arrange the copied image so that one pixel of outline shows at the top. Before pasting, drag it up and down a bit to make sure it's centred. top
Zoom out and Save
And One Last Time
Here's your image at normal view, with a fine outline at left, rightt and top. Only the bottom remains to be outlined, so do that now.

Draw a marquee around the almost outlined piece of text and click Edit > Copy.
Click the Zoom tool and click over the remaining piece of plain text.
Click Edit > Paste or press Ctrl+v.
Position the almost outlined text so that one pixel shows at the bottom. The part you can see should appear to be completely outlined.
Zoom out and Save
Why Four Similar Operations?
 I have tried to get the same result by doing left and top in one go, then bottom and right. I found that this left me with odd gaps that needed to be pencilled in.
With outline thicknesses of two or more pixels, some pencil work does make for a more finished appearance, but the placement of extra pixels seems easier when the outline is even all the way around. top
Why Bother?
To see one case where outlining is useful, see how it helps when there's white included in a background fill pattern
Go back to List of Examples
Questions or comments? I'd love to hear from you. My email address is here.