Easy Small Patterns for Filling Heading Text

Return to list of Examples Return to Making Fancy Text Masks Step by Step


 Something You Need to Know—an Error That Paint Makes
And Remember—Three Simple Rules
Soft Colours: a Tip Transparency in Windows 7
Basic Procedure
Below are the steps you'd take for any pattern based on two small squares. Once you have the general idea, you can quite easily use the same steps for the variations suggested at the bottom of the page.
Draw a Square
Click the Line tool and choose the middle line thickness, which makes a line of three pixels.
 Zoom in to 6x or 4x, click on a colour, click the Rectangle tool and choose the top option, outline with no fill.
Hold the Shift key while you draw a hollow square.
![]() When you have a coloured square with a hole about 3 pixels square in the middle (the Status bar reads 10x10) release the mouse button.
When you have a coloured square with a hole about 3 pixels square in the middle (the Status bar reads 10x10) release the mouse button.
Copy the Square
![]() Now click on the Rectangular Selection tool
Now click on the Rectangular Selection tool ![]() and turn on transparent cutouts by highlighting the lower of the two icons that appear below the toolbox when you click the Selection button.
and turn on transparent cutouts by highlighting the lower of the two icons that appear below the toolbox when you click the Selection button.
Directions for transparency in Paint for Windows 7 are here.
Make sure that your background colour is white
![]() Draw a marquee around the square and press the Ctrl key as you begin to drag a copy just a little to the right.
Draw a marquee around the square and press the Ctrl key as you begin to drag a copy just a little to the right.
Colour the Two Squares
![]() Click the Flood Fill tool and colour the middle of one square with the colour you've been using.
Click the Flood Fill tool and colour the middle of one square with the colour you've been using.
Choose a different colour and colour the white middle of the other square. Don't leave it white, because white causes problems when you're cutting out a heading with a mask. top
Join the Two Squares
![]() Make sure that Transparency is on and that your background colour is white.
Make sure that Transparency is on and that your background colour is white.
Click the Rectangular Selection tool, draw a marquee around the plain square and drag it across to exactly join the one with the shape. Do this carefully, making sure that there's neither an overlap nor a gap.
Copy
 Now draw a marquee around the joined squares, press the Ctrl key and drag a copy down below the original.
Flip the Copy
Click away and then draw a fresh marquee around the copy you just made.
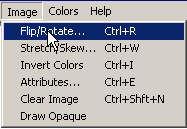 Go to the Image menu and choose Flip/Rotate. Click OK in the next box.
 In Windows 7, just click the Flip button on the Image menu. top

.
Join the Two Parts of Your Pattern
 Drag the newly flipped image up to exactly join the original.
.
You should now be able to zoom back to 2x or even normal view—whichever works better for you.
Select, Copy, Join
Select the new square you've made, Ctrl drag it to the right and join it.
 Then select the whole new shape and Ctrl drag it down and join.
From here on it's just a matter of Select, Ctrl drag, join, as many times as necessary to make a background a bit wider and deeper than the text for which you're going to use it.
Do watch carefully as you make each join. Make sure that bottoms or sides are exactly in line before you click away to paste.

You can now use this background to fill a heading, using the directions for Masks Step by Step, or you can follow the same steps we've just taken to make one of these more interesting backgrounds. top
Variations
These are a few suggestions. As you work through some of them, introduce your own ideas and make something you really like.
Here, I won't go though the whole procedure; I'll just show the first square or squares and the end result. top
These patterns are made by zooming in close and editing, mostly with the pencil. That's easy; each click of the pencil changes the colour of one pixel and you won't have any trouble.
If you choose the thickest line and then draw a square, the centre is marked with a block of white.
In all cases, the small swatch is normal size and the working pictures are at 8x zoom.
Something You Need to Know
However, sometimes it's important to be working on a square whose sides are an odd number of pixels—9x9, 11x11, maybe 21x21.
A problem arises because Paint—in 98, XP and Vista—shows wrong measurements in the status bar when you're drawing a shape. If your square is 9x9, the status bar reads 10x10. Just remember to subtract 1 from the number given in the status bar and you'll know where you are. When you make a selection, the status bar numbers are correct.
And Remember ...
Always have Transparency turned on.
Always have white as your background colour.
Don't use white or black as part of your pattern. (because they're both involved when you're using a mask to cut out your heading.)
Soft Colours: a Tip
You can edit any colour to be the colour that you want to use. Say you want a bright pink figure on a very soft pink background. You may feel that you'll have to edit a pink on the palette, but that's not so. Edit instead a colour that's nothing like the colour you want to use—a brown, say, or a green.
Double click the unwanted colour in the palette. When the colour box appears, click a similar colour to the one you want, then click Custom Colours. Click up and down the scale and/or move the little cross about until the colour in the box labelled Color Solid is what you want. Click OK and you're in business.See Choose the Colour You Really Want top
Big Crosses
 Thickest line. Square 16x16 (status bar says 17x17). With pencil, extend lines from centre to all four edges of square. Use Flood Fill to colour centre and arms of cross.
The starting square can be any size, odd or even.

Continue from Select, Copy, Join.
List of Variations Basic Procedure Top
Tiny Crosses

Middle line thickness. Square 8x8. With pencil, extend lines from centre to all four edges. Use pencil to colour centre.
The starting square can be any size, odd or even.

Now just carry on from Select, Copy, Join.
Reversed Squares
 Thickest line. Square 17x17. Use Flood Fill tool to colour centre of first square. Use same colour for main part of second square, then use first colour for centre of second square.
The starting square can be any size, odd or even. It worked well with a square 6x6, using the second-from-the-top line thickness.


Continue from Select, Copy, Join.
List of Variations Basic Procedure Top
Diamonds
 Thickest line. Square 11x11 (status bar says 12x12). With pencil, draw up, down and across from centre, then draw a slightly shorter line beside the central line, and so on. Do the same on the other side.
Only works with odd-numbered squares.

Continue from Select, Copy, Join or try making some additions.


 Look what happens if you add something to the middle of the blank square—and/or if you put a single pixel of colour into each corner of both squares.

Continue from Select, Copy, Join.
List of Variations Basic Procedure Top
Tiny Stars


.
Thickest line. Square 11x11. With Pencil, color centre, colour two pixels above, below and on each side of centre. Leave a gap and click one more pixel to continue each arm of cross. Click two diagonal pixels in each quarter as shown.
Only works with odd-numbered squares.

Larger Stars
 Thickest line. Square 15x15. Click main colour into corners of central square, then go around again to keep the centre centred.
Fill centre with second colour and add pixels to form rays.
Only works with odd-numbered squares. top

Go back to Select, Copy, Join or try adding to the blank square and to the corners of both.
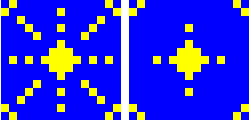
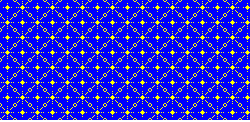

Continue from Select, Copy, Join.
List of Variations Basic Procedure Top
Diagonals 1
 Solid square 15x15, thinnest line. Draw a diagonal line from top left to bottom right and another from top right to bottom left. Click a few pixels to decorate centre.
Works with odd or even sided squares, although diagonals cross differently.

If we use the same design in each of the two squares—or, rather, settle for just one square—we get a smaller version of the same pattern.
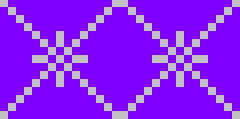
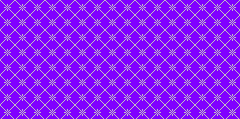

Continue from Select, Copy, Join.
List of Variations Basic Procedure Top
Diagonals 2
 Solid square 16x16. Thinnest line. Draw a diagonal line from top left to bottom right and another from top right to bottom left.
Click one pixel of colour beside and below or beside and above pixel in corner.
Make the central square bigger. top

You could leave it at that, carrying on from Select, Copy, Join, or you might try it again, but this time adding colour to the blank square and extra bits to the original pattern.
You have a fair idea now of where the edges meet, so see if you can draw halves of simple shapes to match up.
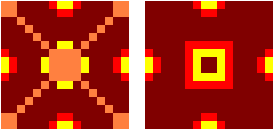
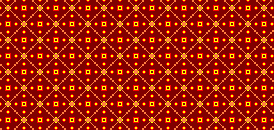
Continue from Select, Copy, Join.
List of Variations Basic Procedure Top
Hearts
A Little Bit Harder—but Not Too Hard

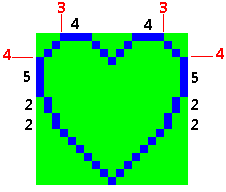 The heart shape does have to be drawn by hand, but it isn't complicated.
Begin by drawing a solid square 19x19. (Remember that the status bar will show 20x20.) Select and copy the square.
At this stage, don't consider the final colour. You can change the colour once the shape is made, but what you want now is high contrast: black and silver, brown and yellow, whatever. Don't use white, because that'd be lost against the background of the page.
Draw the Heart Shape
Zoom in to 8x to make the diagram. Click on the pencil and click on the contrasting colour.
On this diagram, the red numbers tell you how far something is from the nearest corner. The black numbers tell how long the line is in pixels.
I find it easiest to begin by drawing the side lines—the two 5 pixel lines that are right on the outside edges of the square.
Colour the Heart and Join on the Plain Square


When you've drawn the diagram, click on the Flood Fill tool and fill the shape with the colour you used to draw it.
Select the copy of the square—the one you made before starting the diagram—and join it to the square with the heart in it.
Copy Flip and Join
Select the joined squares and press the Ctrl key as you begin to drag. Drag the copy a bit below the original.
Click the Image menu and click Flip/Rotate.
Click OK.
Drag the flipped copy up to join the original.
You now have a larger picture with two hearts.
Fix the Colours
Click the Flood Fill tool and the colour you want to use for the background.
Click in the middle of the pattern and then into the three little parts that were blocked off from the fill.
Choose a different colour and flood the two heart shapes.
 Choose the Colour You Really Want
If you want to use a colour that isn't in the palette, double click any colour in the palette.
In the next box, click the nearest colour to the one you want, then click the button labelled Custom Colors.
 There's a heap of stuff in the next box, but you only need to consider two parts.
The column on the far right shows all the shades of a colour from black up to white.

Click up and down that column until the box labelled Color|Solid shows the shade that you want, then click OK. That shade will be available until you either close Paint or open a different image. See Soft Colours: a Tip
When you use a very soft colour, you will need to put a strong shadow or outline behind it to give it definition.

Make a Piece to Fit Your Text
Now that you've completed the pattern, you'll probably be able to work at 4x or even 2x zoom.
(To get a 4x zoom, you click the View menu, then Zoom, then Custom and mark 400%.)
Now just carry on from Select, Copy, Join.
List of Variations Basic Procedure Top
Transparency in Windows 7 —Image Menu—Select
![]()

 Depending on the size of your window, the Image Menu will look like one of these. When you click the down arrow just below the dotted rectangle, or just below the word Image, a menu will offer you further choices.
Before you can use the buttons on the right of this menu, you select the part of your drawing that you want to work with. top
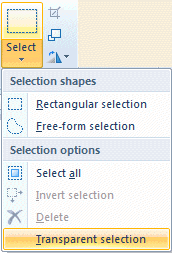
Transparent selection
 At the bottom of the Select menu you'll see Transparent selection. You'll want to use this often, so it's a good idea to add it to your Quick Access toolbar. To do this, right click on Transparent selection and then click on Add to Quick Access toolbar.
On your Quick Access Toolbar, there'll be a checkbox in front of the words Transparent selection. ![]() While that box has a tick in it, selections will be transparent.
While that box has a tick in it, selections will be transparent.
To make your selections opaque, just click the checkbox to remove the tick.
Return to Copy the Square.
Return to list of Examples Return to Making Fancy Text
Questions or comments? I'd love to hear from you. My email address is here.