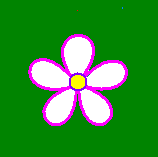
Paint a Five-petalled Flower
 Other Pictures, Problems and Procedures

.
 OK. If you've come this far, it's unlikely that you need to be reminded to save frequently, or how to arrange a browser window side by side with a Paint page. We'll get straight into it.
If you're using Paint in Windows 7, there's no need to build the star as explained here. There's a five pointed star in the Shapes menu. Draw it with no fill and the finest line thickness. So skip down to Add a border.
Open workspace.bmp or workspace.gif.
Fetch or build a grid
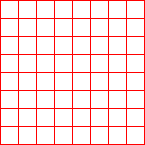
 You need a grid of 64 squares. That's 8x8. The surprisingly easy directions for an 8 by 8 grid are here.
If you've made and saved a grid for a five-pointed star, Paste From that.
With the Paint window open, go to the Edit menu and click Paste From.
Navigate to your saved star5_template.gif or star5_template.bmp and click Open.
The grid will appear in the top left-hand corner of your Paint window.
I like to drag it a little way down and to the right. Makes it a bit easier to work with.
If you haven't made and saved it earlier, here's how to set it up. top
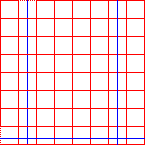
Add three blue lines
 Having pasted grid64 into your workspace, click on the Zoom tool, place it over the grid, and click.
 This should give you a 2x view so that you can see the lines much more clearly.
Click on the Line tool and choose the top option, a one pixel line.
Choose strong blue from the color palette.

Just using your eyes and judgement, put your cursor half-way along the second square from the left.
Draw a line right down that column. Hold the Shift key to keep the line straight.
Do exactly the same thing from the middle of the second column on the right.
Now draw a horizontal line—again holding the Shift key—one third of the way up the bottom row. top
.
Optional stuff
If you want to be precise ...
I do think that eyes are good enough to find the half way points, but if you want to be absolutely precise, here's how you go about it.
In this example, each of my small squares—including the top and left red lines but not the bottom or right—is 18 pixels down and 18 across, but the principles are the same for any line.
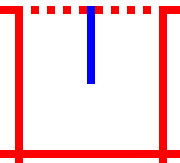 To find the middle of a short line
Zoom in to 8x.
With the right button of the Pencil tool, knock out every second pixel.
Count them.
Mark the the middle pixel.
Finding one third
 I didn't feel quite confident here, so I marked what I thought were the lines for one third and two thirds, then used the Rectangular Selection tool to measure the height of the white spaces.
As it was, the spaces, from the top, had heights of 6, 4 and 5 pixels.
I moved the upper marker up one pixel, got measurements of 5, 5 and 5, so knew that my markers were now showing thirds.
I didn't need the upper marker, so removed it and used the remaining one to help me draw my line. top
Paste from star5_outline
If you have already made and saved star5_outline (bmp or gif), go to the Edit menu, click Paste From, click on star5_outline and click Open.
otherwise
Draw the star outline
Of course, you could right click on the completed star diagram, choose Copy and then paste the diagram into Paint.![]() Still, if you make your own template, you'll have it on hand all the time.
Still, if you make your own template, you'll have it on hand all the time.
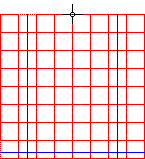 Put your cursor on the top line of the grid, right above the top of the middle vertical line.
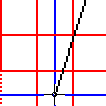
Draw a line down to where the two blue lines cross near the bottom.
From there, draw another line up to where the right edge of the square meets the third line down from the top.
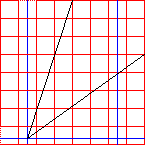
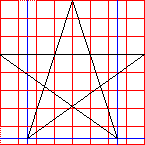 Draw another line from right to left along that horizontal line, then down to the crossing of the blue lines on the right.
The last line goes from the crossing of the blue lines back to your starting point at middle top.
Don't try for the black line; finish exactly where you began, on the top red line right above the middle vertical line. top
Add a border ...
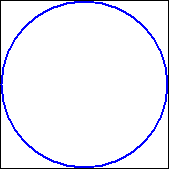 Off to the right of your picture, draw a square a bit larger than the red grid. My grid is 145 square, made up of 64 19x19 small squares. I'm drawing my larger square 169 pixels square. (That's 170 on the status line.) So, 25 to 30 pixels larger than your grid.
In Windows 7, just try to draw a circle a bit bigger than your star.
... and a circle
Click on strong blue in the color palette.
Click on the Line tool and choose a two pixel line—second option from top.
Click on the Ellipse tool and choose the top option, outline with no fill.
Starting at the top left corner of the new square, draw a blue circle inside it.
Put the two together
 Click on the Rectangular Selection tool.
Make sure that the bottom option—transparent copy—is active.
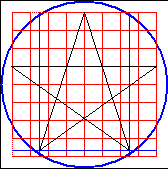 Draw a selection marquee around the red grid that has the star outline in it.
Briefly press Ctrl as you begin to drag it towards the new square-circle arrangement.
Position the grid and star over the new square so that the two bottom points of the star are just touching the blue circle.
Alternatively, you could centre the star inside the circle. I haven't found much visible difference between flowers made in the two ways, Whatever, if you decide on centring, just do it by eye; precision really isn't needed. top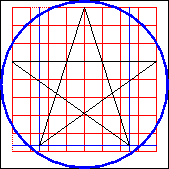
Draw in the guidelines for the flower
There's no longer a need for pixel perfect accuracy. You're going to draw flower petals, and nature rarely bothers with a protractor.
Stay with the same line width—2 pixels—and click on grey (gray if you prefer![]() ).
).
.
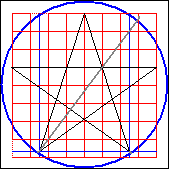
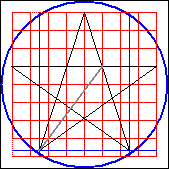
Position your cursor at a point of the star. Draw a straight line finishing at the blue circle. Make sure that it passes through an inner corner of the star shape.
Repeat this from each point of the star.
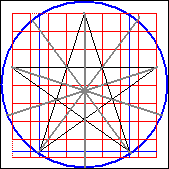 You should finish up with five grey lines touching the blue circle.
Number the line ends
The text tool won't work at any zoomed view, so zoom out to normal view.
![]() Click on the Text tool.
Click on the Text tool.
 Draw a Text Area in an empty place in the window.
Type the numbers from 1 to 5, with spaces between each—1 2 3 4 5
Don't fuss about fonts. These numbers are a guide for you. They won't be part of your finished work.
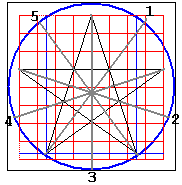
Using the Rectangular Selection tool, pick up each number individually and place it as shown in the diagram.
Notice that the points of the star are not numbered. For a five petalled flower we are only interested in the five lines we drew out to the circle. top
Draw the petals
 At last there's some point in all this preparation.
Click on the Curved Line tool.
Choose the middle option—three pixels.
Click on bright pink in the color palette. Don't worry if you'd prefer a different color. You can change colors easily later. Right now, the most important thing is that you don't use any of the colors that have been used in the construction lines.
Oops! If you're using Vista, you don't have that particular pink. Just choose something a bit like it, or copy and paste the color sampler and pick the pink from there.![]()
Click in this order
In Paint for Windows 7, you can't start a closed curve with a click. Instead, press down at the centre and drag just a pixel or two, so that color shows in the eye of the cursor. Then you can release the mouse button and proceed with the two clicks to complete the petal.
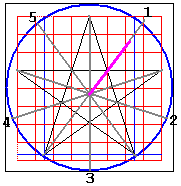 Click at the centre. Nothing much happens.
Click on the blue circle where it meets line 1. A pink line appears.
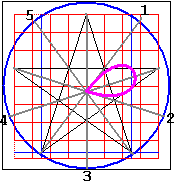 Click on the circle where it meets line 2.
There's your first petal.
I said I won't prompt you to save. I won't, but gee I want to!
Click on any other tool, then click on the curved line tool again. I always do this at the completion of a curved line. I'm scared that I'll lose count and mess up.
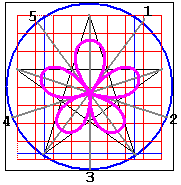 So, the next set of clicks is centre, 2, 3, another tool.
centre, 3, 4, another tool.
centre, 4, 5, another tool.
centre, 5, 1, another tool and you've finished your flower. top
Clear away construction lines
 Click on the Rectangle tool.
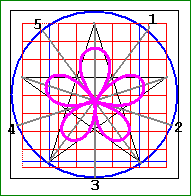 Click on dark green.
Draw a protective border around your work.
Left then right with the Flood Fill tool
![]() Click on the Flood Fill tool.
Click on the Flood Fill tool.
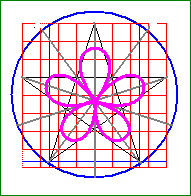 Choose black and click between the protective border and the black border, first with your left button and then with your right. Do that once more.
The black is replaced with white and the black border has gone, along with some of the numbers.
Choose strong blue and click the left button, then the right button, between the protective border and the red grid.
Much of the blue circle disappears.
Choose red, left then right.
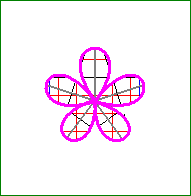 Then, each time doing a left click followed by a right click: blue, grey, red and black.
And there's still the inside of each petal to be cleared. It is a bit tedious, but you're nearly there!
Use grey for your first left-right click inside each petal,then red and then black. Just two of the petals need a last click with blue-then-white.
One right button click on the green border and your flower is clean. top

Copy, color and add a centre
Make sure that you have white as your background color again.
With the Rectangular Selection too, draw a marquee around the flower, press Ctrl and drag a copy to a clear space. Press Ctrl again and drag another copy. Make as many copies as you like.
Use the Flood Fill tool to give each flower a different color.

Put centres into some of them
![]()
![]()
 Using the Ellipse tool and holding the Shift key, draw a circle about 25x25. You can give it a thick contrasting outline or just use one solid color. Make several centres and Ctrl drag them to some—or all—of your flowers. top
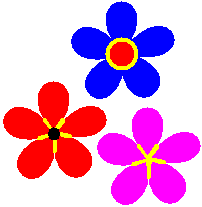
Of course you can make fill and border the same color if you want to.
You might also like to zoom in and use the Pencil tool to add any touches you fancy.
.
Assemble a posy
Use the Rectangular Selection tool to copy (Ctrl drag) individual flowers.
Assemble them one on top of the other until you like your arrangement.
White flowers
If you want one or more white flowers in the arrangement, have the white flower colored until the arrangement is complete. Then, when all flowers are in position, use the Flood Fill tool to change the petals of that flower to white.
If you drop a white flower onto a background of other flowers, the colors behind will show through, as you can see in the third picture.



Save copies
The Copy To procedure
Click on the Rectangular Selection tool.
Draw a marquee around a finished flower or a finished posy.
Go to the Edit menu and choose Copy To.
Save the cutout as flower.bmp or a more specific name—flower_pink.bmp or posy01.bmp perhaps (flower.gif if you're using Vista, of course).
Oh. My reason for saying flower_pink rather than pink_flower is so that all your flower pictures will stay together in a folder that's sorted alphabetically.
You might also neatly line up half a dozen variations and save them as flower_collection.bmp.
Alternatively, you could choose to gather all the finished pieces together, select the whole lot and copy them to a single file. top
Clear your workspace
After you've copied and saved each flower picture, have a careful look around your workspace to make sure there's nothing else you want to copy and save. If there is something, copy and save it now, using the same Copy To procedure.
Then
Make sure that you have white as your background color.
Go to the Edit menu and click Select All.
Hit the Delete key.
Go to the File menu and click Save.
Close Paint.
Other Pictures, Problems and Procedures
Questions or comments? I'd love to hear from you, especially if you have helpful suggestions regarding any one of this set of pages. They were begun in response to some reader questions and I've arrived at solutions through trial and error. As I went over the exercises and tried to follow my own instructions, I several times saw a quicker or easier way to do something and it's likely that readers may still see some better solutions.
My email address is here.
Return to top
Drop-Down Menu from Brothercake
Everything below this is a javascript menu. If you are using a reader,
please use the links here.