A clock face
Other Pictures, Problems and Procedures
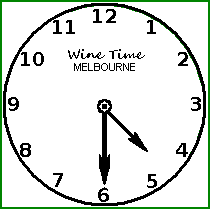 I've never been able to draw a clock face with the numbers in the right positions, so I was very happy to come up with this idea.
My effort is pretty basic, but if you follow the instructions for the outline, I'm sure you'll be able to refine the idea.
.
Oh dear! There's a much easier way to do this.
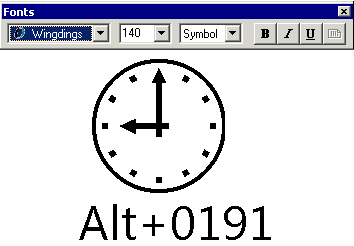
To get this:
Click the text button and draw a big text area.
Change the font to Wingdings.
Highlight the size number and type in a big number.
Click into your text area, and, with Number Lock on (as it usually is) hold down the Alt key and type 0191 on the number pad (not the numbers along the top row).
- Release the Alt key and the clockface will appear.
There are clock faces under all the Wingding characters from 0183 through to 0194.
I'll rewrite this page as soon as I can, but meanwhile, just put this clock into the dead centre of a bigger circle and proceed from there.
If you would like to work in Paint while you follow these instructions, do remember that you can resize your browserA Browser is the program you use to visit sites on the Internet. Internet Explorer (IE) may be the browser that you use, but there are many others, such as Firefox, Opera, Google Chrome, K-Meleon and Blackbird.
You can have as many browsers as you like, and run more than one at the same time. window. Just hover your cursor over a side edge of the browser window until a double-headed arrow appears, press your left mouse button and drag left or right until the window is a suitable size.
You can then grab the browser window by the title bar and drag it to the position that you want it in. You can do this with almost any window on your computer.
Open workspace.bmp or workspace.gif. If you haven't made that yet, please read Preparing a workspace for making cutouts in Windows Paint. The infomation there is important, and will make all the difference to easy working. You only need to set up the workspace once and you're all set.
Start with a grid
Click Edit on the Menu Bar, and click Paste From.
Navigate to grid16, which you saved earlier. Double click its name (or click once and click Open).
If you have not yet made it, the directions for grid16 are here.
The grid will appear in the top left corner of the Paint window.
From the color palette, choose a dark green.
Zoom in.
Draw a circle
Click the Ellipse tool.
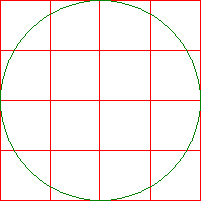 Position your cursor exactly over the the top left corner of the grid and drag to the bottom right corner, making a circle to exactly fill the grid.
Make sure that the circle meets the square in exactly the same way on all four sides. To achieve this, your ccursor will have to finish one pixel below and one pixel to the right of the red corner. top
.
Draw "spokes"
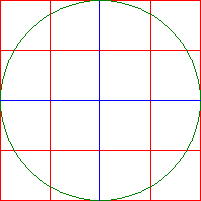 You are still zoomed in.
Click the Line tool.
Click on strong blue in the color palette.
Now draw a line from top to bottom. You can hold the Shift key to help you make it straight.
Similarly, draw a line from left to right.
For the subsequent lines, the Shift key won't help. However, you'll find that your lines will be straight and will pass through the centre, because each one starts and ends where the circle intersects with a red line.
.
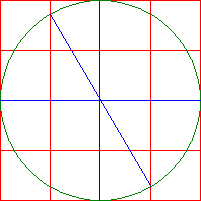 For the first sloping line, put your cursor on the edge of the circle exactly where it intersects with the line left of the middle. The vertical arms of the cursor should be right on the red line. Draw a slanting line down to the point where the lower part of the circle meets the red line just right of the middle. The vertical arms of your cursor should be right on the red line when you finish.
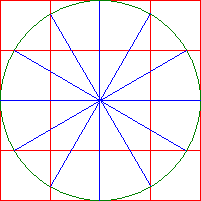 Go down to the second red line on the left and again draw a sloping line to the right, making it finish where the circle meets the red line just below the middle.
Continue in this way until the circle is criss-crossed with straight blue lines as you see it on the right. top
Save a copy of this template
At this point, it's a good idea to save a copy for later use. Draw a rectangular selection around the outside of the red square, click Edit on the menu bar and choose Copy To. Type a name, 12spokes, in the dialogue box that appears, make sure the file type is either 256 color bmp in 98 and XP or gif in Vista and click Save.
Having done that, and while the selection is still active—you can see a dashed line around it—press the Ctrl key and drag a copy off to the side somewhere.
Thicken the outline
![]() Click on the Line tool and then on the middle option—3 pixels.
Click on the Line tool and then on the middle option—3 pixels.
 Change to the Ellipse tool.
Choose the top option, outlined shape with no fill.
Click on black. You can change the color later, after the guidelines have been cleared away and your clockface is complete.
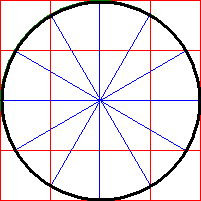
Put your cursor exactly on the top left corner of the grid and drag a thick circle to cover the thin dark green circle. top
Type the numbers
Arrange your window so that you have some clear space on one side of the clock shape.
Change the color on your left button to dark green. By using a different color, you make it easy to use the flood tool to quickly remove a number whose position you're not happy with. You can change the color of the numbers later.
![]() Click on the Text tool.
Click on the Text tool.
Nothing happens. This is disconcerting. It's the computer being intuitive, I suppose. Soldier on. Without clicking on anything else, put your cursor into an unused part of your window and drag down and to the right as though you were making a rectangular selection.

Ah! The Text Toolbar appears, and you notice that your "selection" contains an insertion point, and is, in fact, a Text Area.
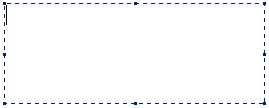
Type the numbers from 1 to 12 with a space between each. Don't put a space between the 1 and 0 of 10, though; regard 10, 11 and 12 as single numbers.
So, 1 2 3 4 5 6 7 8 9 10 11 12.
Now go to the Text Toolbar, use the dropdown beside the font and the dropdown beside the size. As you click on different fonts and different sizes, the numbers you typed will change accordingly. Play with those until you like what you see. You might also like to turn the Bold button B on and off.
When you are satisfied, click anywhere outside of the Text Area and the numbers will become permanent. top
Position the numbers
Change to the Rectangular Selection tool.
Make sure that the transparency option is highlighted.
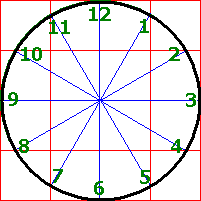
One at a time, select numbers and press Ctrl as you begin to drag a copy of each one to the clock face and drop them where you feel they should go. The red lines are a help with 10, 2, 8 and 4.
I found it easiest to begin with 12, 6, 3 and 9.
When all the numbers are in place, ![]() have a good look at them. If you feel that the position of one is a bit off, change to the Flood Fill tool, make sure that your background color is set to white, and eliminate the offending number with a right click. Click the Rectangular Selection tool and get a fresh copy of that number. top
have a good look at them. If you feel that the position of one is a bit off, change to the Flood Fill tool, make sure that your background color is set to white, and eliminate the offending number with a right click. Click the Rectangular Selection tool and get a fresh copy of that number. top
Clear away the template lines
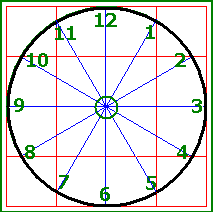 Click on the Line tool and set it to two pixels—the second option from the top.
Pick up dark green from the color palette.
Click on the Ellipse tool.
Draw a small circle around the centre of the clock, where all the lines cross. It doesn't need to be dead centre—it's just a protective border. It should be big enough to let you see the vertical and horizontal lines clearly.
Click on the Rectangle tool and choose the top option: outline with no fill.
Draw a square a few pixels outside of the red grid.
Click on the Flood Fill tool.
Choose red fom the color palette. Have white as your background color.
Put the Flood Fill cursor anywhere between the thick circle and the outer green square.
Left click, then right click. Repeat once.
Click on strong blue.
Move the cursor inside the big circle and do the same thing—left click, right click. Repeat. It should take about six left then right clicks to remove all the blue.
Put red onto your left button, move your Flood Fill cursor back inside the big circle and left click, right click once more. top
Clean up the centre
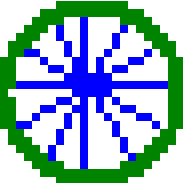 The only messy bit remaining is the centre. You need to clean it up, and you also need to mark the exact centre of the clock.
It's easiest to do this zoomed in to 8x.
If you have trouble finding where you are when you've zoomed in to 8x, please right click and choose Open in New Tab for hints on controlling the zoom tool.

Using the Pencil tool and your right button, clear away the blue marks closest to the centre cross.
Don't be bothered that the cross is not in the middle of the small green circle. It is in the middle of the large black circle of the clock. The green circle is just a temporary protective barrier.
.
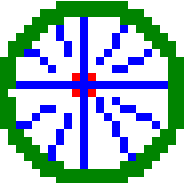 With the Pencil tool, make four red dots around the centre cross. (You could do this with black instead of red. It's just a bit hard to see.)
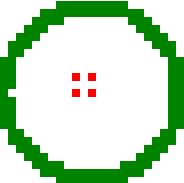
Change your color to strong blue, and click on the Flood tool.
Click with your left button, then your right and repeat until all blue has been replaced with white. top
.
 Now use the Pencil tool and black to change the four black dots into a solid block of 9 black pixels.
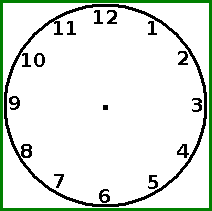 With the Flood tool and your right button, click on the green circle to make it disappear.
With black still the foreground color, click each of the numbers on the clockface.
Make the hands
Don't work on the face of the clock. Find a free space off to the side or underneath and make the clock hands there. Only when you are sure they are the way you want thm should you copy them and paste them onto the clock itself.
I used a black line with a thickness of five pixels—the bottom option. I held the shift key while I drew a vertical line. I changed my line thickness to three pixels and held the shift key while I drew a line at 45°. The shift key would also help in making a horizontal line. top
Measure the length needed
To find out the measurement of the space between the centre of the clock and the numbers, click the rectangular selection tool.
Make a selection of the bit you want to measure.
Watch the right-hand end of the status bar.
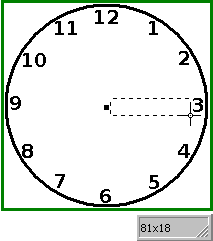
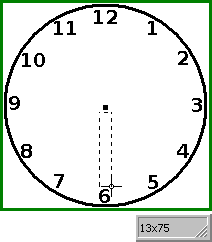
In the first picture I was measuring the width from the centre to the number 3. The status bar read 81x18. I know that width comes first, so the distance there was about 81 pixels.
In the second picture I was measuring the length of the space from the centre down to number 6. The status bar read 13x75. I know that height comes second, so the distance there was about 75 pixels. top
Size the hands accordingly
Choose the smaller measurement—in my case 75—as the maximum length for the long hand.
Zoom in to 8x and use the pencil tool to fancy up the ends of the hands.
Make a middle for the clock
Select the centre of the clock and Ctrl drag a copy reasonably close to the hands you've made.
 Draw a little circle-square shape around this centre, leaving some white space. My centre was 16x16, so I made a note to take 8 away from the 75 length of the long hand, making that number 67.
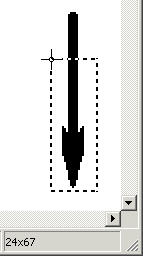 Change your zoom to 2x and click the Rectangular Selection tool.
Starting at the bottom, so as to keep the fancied-up end, select an oblong with the height you've worked out (mine was 67) around the long hand.
Join the long hand to the middle
 Drag the selected piece across and join it to the centre that you've made.
I was a bit unsure about the next step, so I ran a selection around this piece and Ctrl dragged a copy over to the side.
Join the short hand to the middle
I had no way of measuring the short hand, but having the long hand nearby helped me to judge.
When I dragged my selection of the short hand away, it had a point at the upper end. I thought this might make it hard to make a neat join, so I used the Pencil tool to remove a few black pixels.
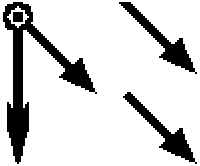
Drag this new short hand and join it to the centre.
The hands are now ready to be placed on the clock. top
Put the hands onto the clock
Get the hands into exactly the right position
With the Rectangular Selection tool, select the hands and centre that you've just assembled and drag them to the clock.
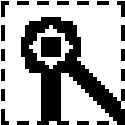
There's a black mark in the middle of the clock, as well as one in the piece you are adding. Line those up exactly, so that you see one tiny black square with white all around it, inside the circle-square thing, as in this picture.
.
Should you see something like any of the pictures below, move the piece slightly until the white shows all around the black block in the centre.
Add some text
![]() Click on the Text tool.
Click on the Text tool.
Put your cursor into an unused part of your window and drag down and to the right as though you were making a rectangular selection.

Make up a clock company name and type it into the text area. Choose an interesting font and try different sizes.

When it looks about right, click away from the text area and click on the Rectangular Selection tool.
Select the text you've typed and try it out by dragging it over the clock face. Don't click unless it's just right. Take note of whether it's too big or too small, then drag it back to the free space.
Now that you have a better idea of the size you want, click the Text tool again, drag a new text area, and retype your clock company name.
Click away from that text area and draw another one. Type the name of a city or country. Use a different font or a different font-size.
Click the Rectangular Selection tool, select the company name and arrange it above the city or country name.
Select this block of text and drag it onto the clock face. When it's positioned as you want it, click away.
Your clock is complete, and a lot better than I could manage with a pencil and paper, much rubbing out and trying again. top

Save your clock
With the Rectangular Selection tool, select the finished clock.
Go to the Edit menu, choose Copy To, and type a name for your clock: clock or clock01 if you plan to make a few different clocks.
Clean your workspace
After you've copied and saved the picture, have a quick look around your workspace to make sure there's nothing else you want to copy and save. If there is something, copy and save it now, using the same Copy To procedure.
Then
Make sure that you have white as your background color.
Go to the Edit menu and click Select All.
Hit the Delete key.
Go to the File menu and click Save.
Close Paint.
Other Pictures, Problems and Procedures
Questions or comments? I'd love to hear from you, especially if you have helpful suggestions regarding any one of this set of pages. They were begun in response to some reader questions and I've arrived at solutions through trial and error. As I went over the exercises and tried to follow my own instructions, I several times saw a quicker or easier way to do something and it's likely that readers may still see some better solutions.
My email address is here.
Return to top
Drop-Down Menu from Brothercake
Everything below this is a javascript menu. If you are using a reader,
please use the links here.
