Five Pointed Star Using a Grid
 Other Pictures, Problems and Procedures
These diretions are complex and take a lot of time and concentration. You might well prefer to try the quick and easy five pointed star.
A regular five pointed star isn't quite as simple to make as a six pointed one. You'll need to use a larger grid and add a few extra lines to it.
 Having made one, though, you can use it over and over again, pasting it into different pictures and recoloring as you wish.
You'll also find that the uncolored template can be doubled in size with satisfactory results.
.
If you would like to work in Paint while you follow these directions, do remember that you can resize your browserA Browser is the program you use to visit sites on the Internet. Internet Explorer (IE) may be the browser that you use, but there are many others, such as Firefox, Opera, Google Chrome, K-Meleon and Blackbird.
You can have as many browsers as you like, and run more than one at the same time. window. If the window is maximised—taking up the whole screen—you'll first need to click the restore button (the middle one of these) ![]() , then just hover your cursor over a side edge of the browser window until a double-headed arrow appears, press your left mouse button and drag left or right until the window is a suitable size.
, then just hover your cursor over a side edge of the browser window until a double-headed arrow appears, press your left mouse button and drag left or right until the window is a suitable size.
You can then grab the browser window by the title bar and drag it to the position that you want it in. You can do this with almost any window on your computer.
Popup help from CSSplay where you'll find other amazing demos
Start by opening Paint
Open workspace.bmp or workspace.gif. If you haven't made that yet, please read Your workspace file. The infomation there is important, and will make all the difference to easy working. You only need to set up the workspace once and you're all set.
You'll need an 8x8 grid.
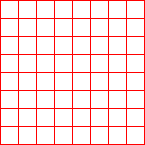 Five-pointed stars are much trickier than six-pointed. You'll need an 8 by 8 grid, to which you'll need to add a couple of lines. You'll need the one with eight squares across and eight squares down. If you've already made and saved grid64, go to the Edit menu in Paint, choose Paste From, and navigate to grid64.bmp or grid64.gif. Click its name and then click Open.
If you haven't made it yet, the very easy directions for making a grid are here.
The grid will appear in the top left-hand corner of your Paint window.
If you wish, drag it a little down and to the right. I find it hard to select things that are right in that corner.
 While the selection is still active—has little dashes around it, click the Transparency option at the bottom of the toolbox. top
Add three blue lines
 Click on the Zoom tool, place it over the grid, and click.
This should give you a 2x view so that you can see the lines much more clearly.
 Click on the Line tool and choose the top option, a one pixel line.
Choose strong blue from the color palette.
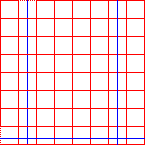
Just using your eyes and judgement, draw a line right down the second column on the left. Hold the Shift key to keep the line straight.
Do exactly the same thing from the middle of the second column on the right.
Now draw a horizontal line—again holding the Shift key—one third of the way up the bottom row.
.
If you want to be precise ...
I do think that eyes are good enough to find the half way points, but if you want to be absolutely precise, here's how you go about it. Each of my small squares—including the top and left red lines—is 18 pixels down and 18 across. top
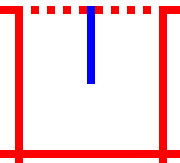 To find the middle of a short line
Zoom in to 8x.
With the right button of the Pencil tool, knock out every second pixel.
Count them.
Mark the middle pixel.
Finding one third
 I didn't feel quite confident here, so I marked what I thought were the lines for one third and two thirds, then used the Rectangular Selection tool to measure the height of the white spaces.
As it was, the spaces, from the top, had heights of 6, 4 and 5 pixels.
I moved the upper marker up one pixel, got measurements of 5, 5 and 5, so knew that my markers were now showing thirds.
I didn't need the upper marker, so removed it and used the remaining one to help me draw my line. top
Save this template
This same template will help with five petalled flowers, so save a copy now.
![]() Click on the Rectangular Selection tool and draw a marquee around your work so far.
Click on the Rectangular Selection tool and draw a marquee around your work so far.
Go to Edit on the Menu Bar and choose Copy To.
Type star5_template. Make sure that the filetype—Save as type—is 256 color bmp in XP and 98 or gif in Vista, and click Save.
You'll be returned to your Paint window. top
Make guidelines for the star
Zoom in to a 2x view. This makes it much easier to position your cursor accurately, and that's important.
Positioning the cursor
 At normal view, the cursor sitting on crossed lines looks like this.
 Zoomed in to 2x, you have a fighting chance of seeing where the cursor is sitting. It makes the part of a line that it's sitting on look blurred, or white or quite different in some way or other.
If you can see all of the line that's meant to be under the cursor, as in either of these drawings, 
 the cursor is not exactly on the line. (Just to avoud confusion—I cheated with these drawings. The cursor does not look bigger when you zoom in. The lines of your work do look bigger, though.)
The first guideline
Click on the Line tool and make sure that the thinnest line—the top option—is chosen.
Choose black from the color palette.
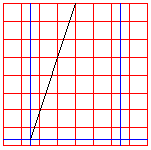
 Position your cursor on the top red line, exactly where the middle red line touches it.
Hold your left mouse button down while you draw a line down to the place where two blue lines cross near the bottom. Release the mouse button.
![]()
.
The second guideline

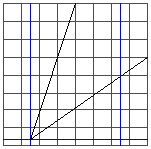 With the cursor still where those two blue lines cross, press the mouse button again. Draw a line up to the edge of the grid where it meets the right-hand end of the red line above the middle. Release the mouse button. top
The third guideline
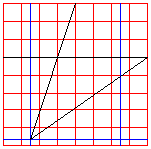
With the cursor in the same position, press the mouse button and hold the Shift key while you draw a line straight across to the left edge of the grid. (That's the only line with which the Shift key will help.) Release the mouse button.
The fourth guideline
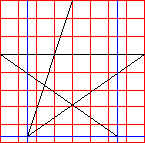 From the left-hand end of the black line you've just drawn, draw down to the intersection of the two blue lines on the right.
.
The fifth and last
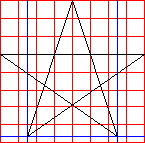 There is only one line to be drawn now: from that bottom blue intersection back to the top. At the top, ignore the black line completely. Position your cursor over the top of the grid exactly where the middle red vertical line joins it, just as you did at the beginning.
Your guidelines are now complete. top
Save the star outline
There are several ways you can finish, so at this point it'd be wise to save a copy for later use.
![]() Click on the Rectangular Selection tool and draw a marquee around your work so far.
Click on the Rectangular Selection tool and draw a marquee around your work so far.
Go to Edit on the Menu Bar and choose Copy To.
Type star5_outline. Make sure that the filetype—Save as type—is 256 color bmp (98 and XP) or gif (Vista) and click Save.
You'll be returned to your Paint window.
Draw the star
This shape can be finished using the Polygon tool, but I'm not sure that simply tracing it doesn't do just as good a job. You can decide which method you prefer.
 Using the line tool
Click on the Line tool and choose a line thickness of 3 pixels or more.
From the palette, choose a color that hasn't been used in the template.
.
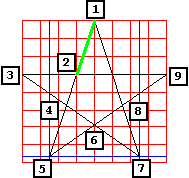
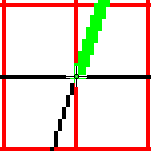 Starting where you see the figure 1 in this diagram, draw a line down to the position of the figure 2.
It's really important to finish in exactly the right spot, right where the guidelines cross.
Release the mouse button briefly, then start another line in the same place, finishing at position 3.
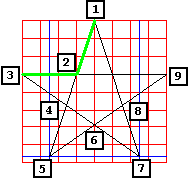
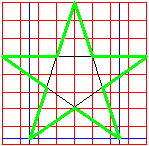 and so on, until you have an outlined picture of a five-pointed star. top
.
Finish the star with the Flood Fill tool
![]() Click on the Flood Fill tool.
Click on the Flood Fill tool.
Begin with red as your foreground color and white as background. ![]()
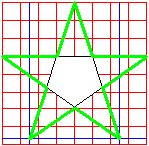
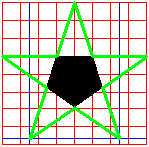 Click into the centre of the star to flood with red, then right click in the same place to replace the red with white.
Change to black and repeat. You'll have to change colors and flood the inside of the star several times—with red, then blue, then red again.
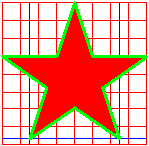
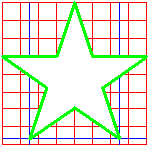 When the star is solid red with a contrasting outline, you can draw a border around it and remove the construction lines, or, if you want just the outline, use one more right click to remove the red before cleaning up.
.
How to make an outlined star using the Polygon tool
 Click on the color that you would like to use. Don't use any of the colors of the construction lines, though.
Make sure that you have white as your background color.
![]() If you'd like a heavy outline, click the line tool and click the line thickness option you want. I chose 3 pixels, the third option.
If you'd like a heavy outline, click the line tool and click the line thickness option you want. I chose 3 pixels, the third option.
 Click the Polygon tool, and choose the middle option, which means solid shape with an outline.
(If you were to choose the top option, outline with no fill, the guidelines behind would show through.)
When drawing a polygon, you need only drag along the first line until you come to a corner. After that, it's only necessary to click each point to which you want the line to be drawn.
 So, keep your left button pressed while you drag a line from the top point to the first inner corner of the star (marked 2 in the diagram). Release the mouse button. then click on the next point (marked 3 in the diagram). top
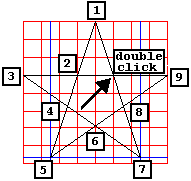
Continue like this, clicking on an inner corner, then a point, then the next inner corner and so on until you're almost back to your starting point.
When you get to the last inner corner—when there is just one line to be drawn—double click.
And there's your star! Clean away all the working lines and you're finished.
Clean away construction lines

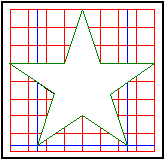 Click on the Rectangle tool and choose the top option, outline with no fill. The line thickness here doesn't matter, since you're only going to make a barrier to protect the rest of your window from flood fill.
Choose black from the color palette.
Draw a black square a little outside the red grid.
.
If a color remains after flooding
If, when you flood with a particular color and flood again with white, you find that the picture is unchanged—that that color has not been removed—then somehow that color has been changed in your picture. This can happen, especially when a picture is in Paint's gif format.![]()
This happened to me in a cutout that I'd saved and later pasted into a new picture. The strong blue I'd used had been replaced with a lighter blue.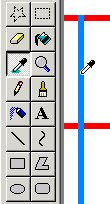
Get the color you want to use
Zoom in to 6x. It's terribly hard to click on a particular pixel in normal or even 2x view.
Choose the Color Picker tool.![]()
Click on the color that you wish to remove.
![]() You will see that the color palette responds; the color you clicked will appear as one of the colors in use.
You will see that the color palette responds; the color you clicked will appear as one of the colors in use.
Paint will immediately swap back to a different tool. Check to see that you have the Flood tool before continuing. top
Remove lines by flooding
Similar steps to these will often be useful for removing several colors quickly.
A border around the area you're about to flood stops the whole window from filling with color and protects other pictures which may sometimes be out of sight.
![]()
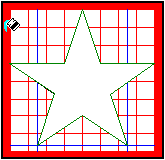 Click on the Flood Fill tool.
![]() Choose red from the color palette.
Choose red from the color palette.
Make sure that you have white as your background color.
Position the Flood Fill cursor just inside the black border.
Click with your left button, then with your right button.
.
Click on blue in the color palette, or use the color picker to get it from your picture.
Click with your left button to flood with blue, then with your right button to replace the blue with white.
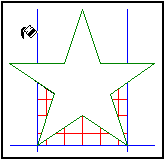
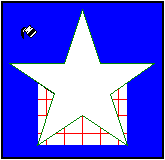
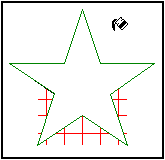
Again, pick up red and click with your left button.
Pick up black from the color palette and click with your left button. This will remove the protective border, and will also get rid of any traces of your black guidelines.
Click with your right button and you are left with your outlined star on a clean white background. top
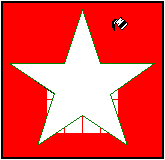


.
Save the outlined star
![]() Click on the Rectangular Selection tool and draw a marquee around your work so far.
Click on the Rectangular Selection tool and draw a marquee around your work so far.
Go to Edit on the Menu Bar and choose Copy To.
Type star5_blank. Make sure that the filetype—Save as type—is 256 color bmp (98 and XP) or gif (Vista) and click Save.
You'll be returned to your Paint window.
A colored star with a contrasting border
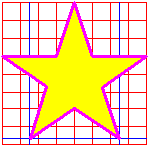 If you want a colored star with an outline in a contrasting color, follow the directions for the outlined star, using the thinnest line when drawing your outline.
![]() Before you begin to draw the actual polygon, however, choose a line thickness of three or more.
Before you begin to draw the actual polygon, however, choose a line thickness of three or more.
When your star is complete—except that it is white—click on the color you want it to be, click on the Flood Fill tool and click inside the outline. top
.
Save the bordered star
![]() Click on the Rectangular Selection tool and draw a marquee around your work so far.
Click on the Rectangular Selection tool and draw a marquee around your work so far.
Go to Edit on the Menu Bar and choose Copy To.
Type star5_bordered. Make sure that the filetype—Save as type—is 256 color bmp (98 and XP) or gif (Vista) and click Save.
You'll be returned to your Paint window.
How to make a solid star
 Click on the color that you would like your finished star to be. Don't use any of the colors of the construction lines, though. (Should you want, say, a red star, you can change it later with the flood fill tool or the color eraser.) I chose lime green.
 Click the Polygon tool, and choose the bottom option, which means solid shape with no outline.
When drawing a polygon, you need only drag along the first line until you come to a corner. After that, it's only necessary to click each point to which you want the line to be drawn.
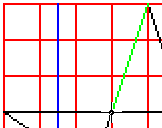 So, keep your left button pressed while you drag a line from the top point to the first inner corner of the star (marked 2 in the diagram). Release the mouse button. then click on the next point (marked 3 in the diagram).

Continue like this, clicking on an inner corner, then a point, then the next inner corner and so on until you're almost back to your starting point.
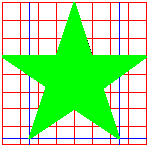 When you get to the last inner corner—when there is just one line to be drawn—double click.
Your outlined star is now complete. Clean away all the working lines (as shown here) and you're finished. top
.
Save the solid star
![]() Click on the Rectangular Selection tool and draw a marquee around your work so far.
Click on the Rectangular Selection tool and draw a marquee around your work so far.
Go to Edit on the Menu Bar and choose Copy To.
Type star5_solid. Make sure that the filetype—Save as type—is 256 color bmp (98 and XP) or gif (Vista) and click Save.
You'll be returned to your Paint window.
Clean your workspace
After you've copied and saved the picture, have a quick look around your workspace to make sure there's nothing else you want to copy and save. If there is something, copy and save it now, using the same Copy To procedure.
Then
Make sure that you have white as your background color.
Go to the Edit menu and click Select All.
Hit the Delete key.
Go to the File menu and click Save.
Close Paint.
Using your stars
![]()
 When you have a picture open in Paint and want to add one of the stars you made and saved, first make sure that your Rectangular Selection tool is set for Transparent pasting, and that your background color is white.
Go to the Edit menu and click Paste From.
Find the star picture that you want and click on it.
Click Open.
You'll be returned to your Paint window with the chosen picture in the top left corner.
Put your cursor inside the marquee—the dashed rectangle surrounding the small picture— and drag it into the poition you want it in.
If you want to change the color/s of the star, do this before you save the whole picture.
If the main picture is a jpg (like a photo) try to leave pasting the star until almost the last save, as each jpg save blurs edges a little, and many saves make this effect more obvious.
Other Pictures, Problems and Procedures
Questions or comments? I'd love to hear from you, especially if you have helpful suggestions regarding any one of this set of pages. They were begun in response to some reader questions and I've arrived at solutions through trial and error. As I went over the exercises and tried to follow my own instructions, I several times saw a quicker or easier way to do something and it's likely that readers may still see some better solutions.
My email address is here.
Return to top
Drop-Down Menu from Brothercake
Everything below this is a javascript menu. If you are using a reader,
please use the links here.