The Task Bar
Contents of this page
The Quick Launch Bar Browsers Frequently Used Programs Divider and Moveable Bar Making More Room on the Task Bar Adding Icons to the Quick Launch area Removing Icons from the Quick Launch area. The Notification Area Turning off Unwanted Processes The Startup Folder If the Speaker Volume Control Icon is Missing The Task Bar Proper Hiding or Revealing the Task Bar If you use Microsoft Plus!
The sections of the Taskbar are, from left to right, the Start Button, the Quick Launch Bar, the Task Bar proper and the Sys Tray or Notification Area.
The Start Button helps you to find and open various windows and programs.
The Quick Launch Bar gives single click access to the programs that you use most often. It also gives you immediate access to the desktop.
The main part of the Task Bar shows and gives access to programs that are running because you've started them during the current session.
The Notification Area shows programs that are running right now, including some of the programs that began to run immediately Windows was loaded.
The Quick Launch Bar
![]() The icons shown on this example of the Quick Launch bar are of my choosing, and probably not at all a representative sample. Each computer user will have their own selection here. Directions for adding your own icons are a little further down. top
The icons shown on this example of the Quick Launch bar are of my choosing, and probably not at all a representative sample. Each computer user will have their own selection here. Directions for adding your own icons are a little further down. top
![]() This icon, usual, but not present in my own Quick Launch area, represents the desktop.
This icon, usual, but not present in my own Quick Launch area, represents the desktop.
One click on the desktop icon will minimise all open windows and make the desktop accessible. It's the computer version of quickly picking up all of the large papers from a a real desktop so that you can get at small items hidden underneath. The "small items" will usually be shortcuts to programs or documents.
If you do not have a "Show Desktop" icon, just right click on an empty part of the taskbar. Show the Desktop will be included in a pop-up menu.
![]() With this icon I launch MailWasher, an extremely useful program for filtering email. Mailwasher marks for deletion any email that it suspects of being spam. It has options for entering a list of those whose letters are always to be accepted.
With this icon I launch MailWasher, an extremely useful program for filtering email. Mailwasher marks for deletion any email that it suspects of being spam. It has options for entering a list of those whose letters are always to be accepted.
![]() I open MailWasher before I open Outlook Express. After I've checked the list of emails waiting and marked any that I believe to be spam or worse, Mailwasher opens Outlook Express and I download only those letters that are really for me.
I open MailWasher before I open Outlook Express. After I've checked the list of emails waiting and marked any that I believe to be spam or worse, Mailwasher opens Outlook Express and I download only those letters that are really for me.
![]() NoteTab is the text editor I use for writing web pages and stationery. top
NoteTab is the text editor I use for writing web pages and stationery. top
Browsers
![]()
![]()
![]()
![]()
![]() There are any number of browsers available for download. Sometimes I'll come across a page that looks funny in a particular browser—maybe some of the text is on top of other text, for instance—and I can quickly copy the address, open another browser, paste the address and see if it's easier to read.
There are any number of browsers available for download. Sometimes I'll come across a page that looks funny in a particular browser—maybe some of the text is on top of other text, for instance—and I can quickly copy the address, open another browser, paste the address and see if it's easier to read.
Anyone who writes web pages needs to be able to see how their work looks in various browsers, so having a collection at hand is of great value.
If you want to try out a different browser, you do not have to uninstall the one you're using now. Plenty of people have more than one. Do go carefully through the options of any browser before you send it onto the web. Even if it takes half an hour to check complicated settings, you want to make sure that websites can't download or install things without your permission
Frequently Used Programs
![]()
![]()
![]()
![]() The Quick Launch area is a useful place to park a shortcut to any program you use often; it won't be hidden behind open windows. Because it's so easy to add or remove a shortcut from Quick Launch, it's fine to add one that you'll only be using for a few days. Just delete it when you don't need it any more.
The Quick Launch area is a useful place to park a shortcut to any program you use often; it won't be hidden behind open windows. Because it's so easy to add or remove a shortcut from Quick Launch, it's fine to add one that you'll only be using for a few days. Just delete it when you don't need it any more.
Apart from a clutch of simple graphics programs, I have the Moffsoft Free Calculator because I find the Windows calculator too hard to see—and I can save and print calculations if I want to.
I always have my Lotus Organiser—very old but still doing what I need—available for quickly jotting in appointments. top
Divider and Moveable Bar
![]() At the end of the Quick Launch area there's the appearance of a groove and then a tiny raised bar. The raised bar is used to make the Quick Launch area longer or shorter, according to how many icons you want to see. Simply hover over the Bar until the cursor becomes a double headed arrow, then press firmly with the left mouse button and the appearance of the cursor will change again. Drag the bar to the left or right, according to your needs.
At the end of the Quick Launch area there's the appearance of a groove and then a tiny raised bar. The raised bar is used to make the Quick Launch area longer or shorter, according to how many icons you want to see. Simply hover over the Bar until the cursor becomes a double headed arrow, then press firmly with the left mouse button and the appearance of the cursor will change again. Drag the bar to the left or right, according to your needs.
![]() If you drag the divider so far to the left that some icons are covered, they won't be lost. A pair of little chevrons will appear to remind you that there are hidden icons. When you click on the chevrons, the hidden icons will pop up on a little menu.
If you drag the divider so far to the left that some icons are covered, they won't be lost. A pair of little chevrons will appear to remind you that there are hidden icons. When you click on the chevrons, the hidden icons will pop up on a little menu.
Making More Room on the Task Bar
You can, if you wish, make the task bar twice as high. Hover your cursor over the top edge, and, when it changes to a double-headed arrow, drag upwards. When a line appears above the task bar, let go and you'll have a double task bar. To change it back to the way it was, just hover at the new top edge and drag downwards.
You can't do this if Lock the Taskbar is enabled.
Adding icons to the Quick Launch area
Remember, if you drag from a shortcut, always choose "Copy here", so as to avoid making a shortcut to a shortcut. If, on the other hand, you drag from a real exe file, choose "Create shortcut here". The icons in the My Computer window should be treated as exe files.
Adding icons to the Quick Launch area is as easy as putting shortcuts onto your desktop.
Right drag from an exe file or from an existing shortcut until the dragged image is on the Quick Launch area, then let go. A menu will pop up asking if you want to "Move here", "Create Shortcut here" or "Copy here". Choose whichever is appropriate—"Copy" for a shortcut, "Create Shortcut" for an exe.
You can readily tell the difference between an exe file and a shortcut; so long as you haven't used TweakUi or any other program to change their appearance, your shortcuts have a small black arrow in a white box in the bottom left-hand corner. top
Removing icons from the Quick Launch area.
If there's an unwanted icon in the Quick Launch area, drag it off with either mouse button and drag it to the recycle bin.
Alternatively, you can right click the unwanted icon and choose delete from the pop-out menu.
The Notification Area
![]()
![]() At the right hand end of the Task Bar is the Notification Area, varying in appearance according to your operating system. It shows your memory-resident antivirus program and your firewall, as well as the speaker volume control symbol, too, unless you've removed it. Which other icons appear depends on your individual set-up.It may show some utilities that you find particularly useful. A friend who needs to make frequent overseas telephone calls has an international clock, while one of my "always running" programs is the free version of Word Web, with which I can quickly check the spelling of a word while I'm using any program.
At the right hand end of the Task Bar is the Notification Area, varying in appearance according to your operating system. It shows your memory-resident antivirus program and your firewall, as well as the speaker volume control symbol, too, unless you've removed it. Which other icons appear depends on your individual set-up.It may show some utilities that you find particularly useful. A friend who needs to make frequent overseas telephone calls has an international clock, while one of my "always running" programs is the free version of Word Web, with which I can quickly check the spelling of a word while I'm using any program.
![]() Occasionally a little shield-shaped icon will appear there, reminding you that your operating system is ready to be updated. Hover your cursor over it and you'll see what action you need to take. Choose Express in the dialogue and then go on with what you were doing. After a little time you may be asked to restart your computer. Save your work and accept the restart as soon as you can, to avoid being nagged—oops! reminded—every minute or so.
Occasionally a little shield-shaped icon will appear there, reminding you that your operating system is ready to be updated. Hover your cursor over it and you'll see what action you need to take. Choose Express in the dialogue and then go on with what you were doing. After a little time you may be asked to restart your computer. Save your work and accept the restart as soon as you can, to avoid being nagged—oops! reminded—every minute or so.
![]() Should a red shield appear, it's a warning that one or more of your security programs isn't functioning properly. Follow the suggested steps.
Should a red shield appear, it's a warning that one or more of your security programs isn't functioning properly. Follow the suggested steps.
The current time is shown. If you hover over the clock—or in Windows 7, give it a single click—, the whole of the date will be shown.
If you want to change from a 12 hour clock to a 24 hour clock—or the other way about—go to Control Panel and open Regional and Language. On the Regional Options tab, click the Customise button, then the Time tab. In the Time format place, use an upper case H if you want a 24 hour clock in the notification area. top
The ones you don't want
It may also show any number of uninvited guests. Many programs assume, on installation, that you'll be wanting instant access to them every moment that you're using your computer—and that you have no objection to their using your resources, thus making your machine sluggish and slow. Real time chat programs put themselves here. So do various fax programs, graphics programs, even games.
Turning off Unwanted Processes
Before you do this, make sure that you know where to find these programs and how to turn them back on if you change your mind.
Right click on the offending icon. A menu will pop up. In most instances the menu includes "Exit", which you click to turn the program off for this session. To stop something loading at start-up, look for "Settings", "Preferences".or something similar in its right-click menu.
Don't ever turn off your antivirus program or your firewall.
The Startup Folder
Some unwanted start-ups may be easily found in the Start-up folder.
- First, right click the Start button and say "Open". Double click "Programs".
- Double click "StartUp". If you see unwanted items in there, drag them out.
- I have a folder called "Start Extras" which I made by right clicking in the "Programs" folder and saying "New > Folder". I renamed it "Start Extras". I drag the unwanted things into there in case I change my mind. top
If the Speaker Volume Control Icon is Missing
95-98
In 95 and 98 operating sysems the little yellow speaker volume control is found by clicking
Start > Settings > Contol Panel > Multimedia
On the Audio tab there's a box marked Show volume control on the taskbar which you can check or leave unchecked.
XP
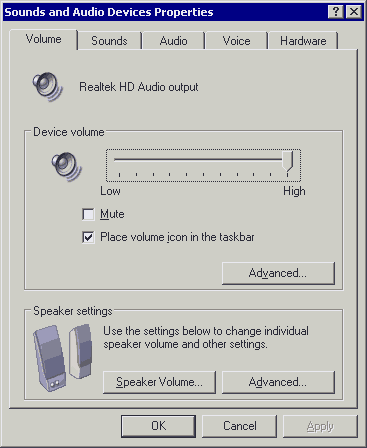

In XP, go to Control Panel and open Sounds and Audio Devices.
Click the Volume tab.
Look for the item Place volume icon in the taskbar.
A tick in that box ensures that the speaker volume control icon will now be in the notification area.
.
Vista

 In Vista, open Control Panel and locate and open
Taskbar and Start Menu.
Depending on your View choice, it'll be similar to one of these pictures.
.
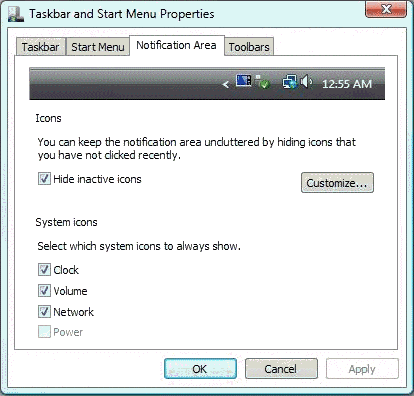
Click on the Notification Area tab.
In the lower part of the dialogue you'll see System Icons and Select which system icons to always show.
Put a tick beside Volume and your speaker icon will be restored to the notification area. top
.
Windows 7
Blimey! More changes, and Windows 8 looms on the horizon. OK. Here's how you control the display of the speaker—the volume icon—in Windows 7.
Click the Start button and, from the plain menu on the right, choose Control Panel.
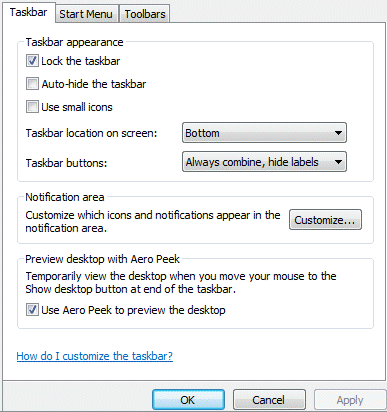
On the next page, click on Appearance and Personalisation.
Now click Task Bar and Start Menu.
Lots of options there; the one we're after is Notification area. It's about half-way down the page.
Beside Notification area there's a button labelled Customize.
Click the Customize button and another dialogue appears.
Just make sure that the wording beside Volume is Show icon and notifications and you can be sure that your volume control icon will be in the notification area. top
The Task Bar Proper
![]()
The middle part of the Task Bar shows which windows and programs you have open. At the left end of this part you can see the little dividing groove and the tiny raised bar with which you make this area longer or shorter.
The program that is being used at this very moment is highlighted—it appears to be pressed in and has a lighter colour than the rest of the bar.
Any of the windows showing on the Task Bar can be maximised or brought to the front with a single left click.
A right click on any of the buttons will offer a menu of options. The options vary according to the present state of the window.
If a window is in the background, hidden behind the window in which you're presently working, you are offered the option of having it maximised. This would bring it to the front, covering everything but the Task Bar.
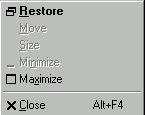 If a window is in the background, hidden behind the window in which you're presently working, but was maximised when last you were working in it, you can maximise it, or you can bring it back to the size you made it the last time you adjusted its size. Choosing the Restore option will bring the window to the front at that size.
 The window that is open and at the front right now may offer only the options to "Restore" or "Close". If you choose the "Close" option while you have unsaved work you will usually be prompted to save before closing.
There are other variations on the right button menu, but you now have the general idea. top
Hiding or Revealing the Task Bar
Some people like to have the Task Bar visible at all times. Others prefer to have it hidden until they want to use it. If you want to hide or—in Windows' unique language—"unhide" the Task Bar, here's how you go about it.
Find an unoccupied part of the Task Bar. It can be in any one of the three areas. Right click on the unoccupied part. A menu will pop up, and the last or second last item on that menu will be "Properties".
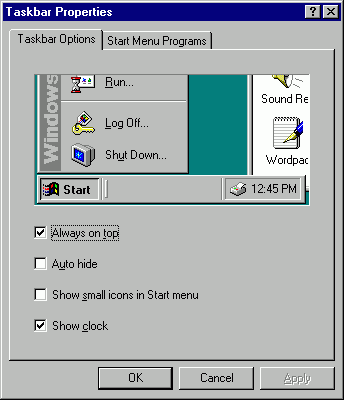 When you click "Properties" you get this box. Put a tick into the "Autohide" box if you want the Task Bar hidden. If you want it constantly visible, be sure that there is no tick in the box. You remove a tick in this sort of box simply by clicking; one click adds the tick, the next removes it. Always, always, always keep the tick in the "Always on top" box or the Task Bar can become almost irretrievably lost!
If you really can't find a place on the Task Bar that gives you the properties menu, rest your cursor over the little sizing bar between the Quick Launch and Task Bar areas and drag it to the right. This will scrunch up the items on the Task Bar proper, but it'll give you a good blank space at the end of the Quick Launch area, and your right click will bring up the needed menu. Remember to pull the bar back when you've finished or you won't have enough room to show your open windows. top
If you use Microsoft Plus!
I've just read that some of the special effect wallpapers included with this suite should never be used in conjunction with the Autohide setting. So, if you do have Plus! and are using Themes or just one of the special wallpapers, make sure that Autohide does NOT have a mark beside it!
I don't know if this is still true. Plus! has been discontinued.
Questions or comments? I'd love to hear from you. My email address is here.