Stationery in Outlook Express
Here's a printable version without the pictures.
You can print from here if you'd like to, but it uses an awful lot of coloured ink.
On this page:
The "Create Stationery" Wizard Making stationery the easy way
Putting new things into your stationery folder
Finding a file in a crowded box
Adding pictures to your email
Using unusual fonts Links to stationery lessons
Too Big for Every Day Use
If you simply want to put a single picture at the beginning of your email, do not use the Create Stationery Wizard. Just insert the picture when you begin your email, as explained in Adding pictures to your email.
If you've never used stationery before ...
...there are some things that Outlook Express may not show. To fix that, follow these steps.
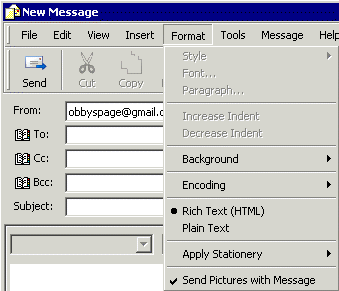 Click the "Create Mail" icon, as though you were about to begin a new email.
On the toolbar of the blank email that opens, click on the Format menu and see that the items are marked as shown here. You need to have a bullet beside "Rich Text" and a tick beside "Send Pictures with Message".
.
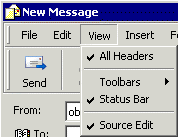 Again go to the toolbar of the email. ( Be careful here. There is a View item on OE's main toolbar. You want the one on the email itself.) Click on the View menu and make sure that items are ticked as shown here. You need a tick beside each of All Headers, Status Bar and Source Edit.
Now close the email. Outlook Express will ask if you want to save changes to this email. Click "No". From now on, all html emails will have three tabs, labelled Edit, Source and Preview, along the bottom.
.
Putting new things into your stationery folder
If you don't know how to find your stationery folder,
here are some guidelines.
Open the link in a new tab so that you can return to this page easily.
- Locate the stationery folder or the shortcut to your stationery folder.
- Have it where you can see it.
- Right drag the new stationery item onto it.
You'll know that it's going to go into the stationery folder when the label on the folder or shortcut changes colour. - Choose "Move here" from the menu that pops up.
If you don't have a handy shortcut to your stationery folder, it's a very good idea to make one, as the path you must "drill down" (navigate) to reach it is a long one.
It is My Computer\C:\Program Files\Common Files\Microsoft Shared\Stationery.
One easy way to make this shortcut is to locate the folder, right click on it, click on Send To, then click on Desktop (create shortcut).
Shortcuts to your most frequently visited folders can be put together in a single folder on your desktop. Then you only have to open that folder to quickly have access to any one of them—in this case, Stationery.
The Create Stationery Wizard
Making stationery the quick way
If you have created or acquired a background tile that you would like to use as a background for your emails, here's the easiest way to prepare it.
In this context, "stationery" is a bit of a misnomer. The Wizard makes and saves only backgrounds and left margins. Just the same, the results can be pleasing.
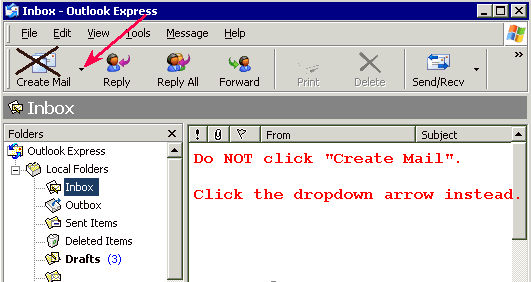
In Outlook Express, click the down arrow beside "New Mail".
Click the menu item "Select Stationery".
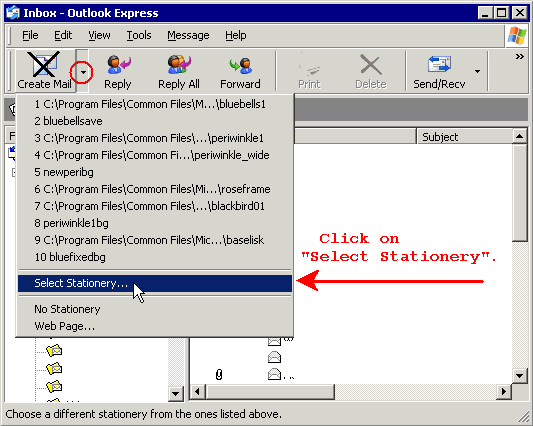
You move into this dialogue box.
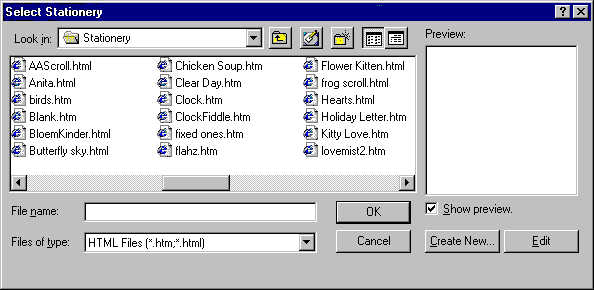
Or, if you have gathered up the provided stationery into a folder and perhaps added a few more folders yourself, it may look like this:
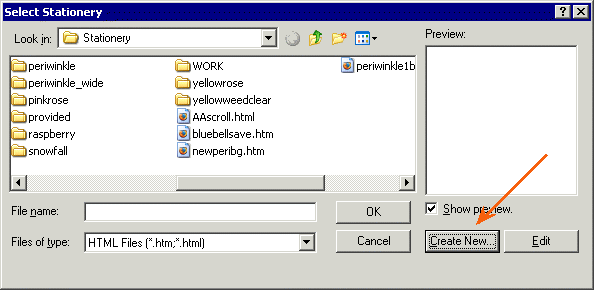
In either case, you will see only html files, although the folder (or folders) contains pictures as well. Html files wear the logo of the browser you use, your "default" browser. ![]() You can see, in the first picture of the Select Stationery dialogue, that I was using Internet Explorer, while in the second picture I'd changed to Firefox. You may use a different browser and html files will wear its logo.
You can see, in the first picture of the Select Stationery dialogue, that I was using Internet Explorer, while in the second picture I'd changed to Firefox. You may use a different browser and html files will wear its logo.
Html and htm are the same sort of files and behave in the same way as each other.
For this procedure, ignore the files shown in the dialogue. Click on "Create New".
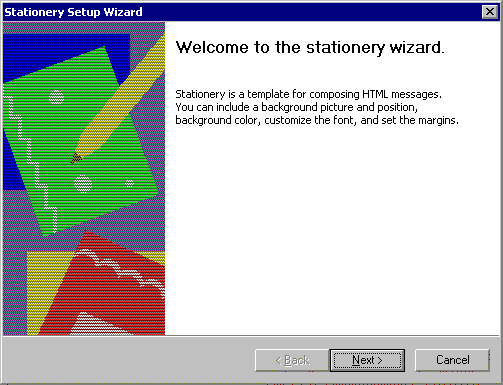
The Wizard's welcome screen comes up, giving you a brief description of what you are about to do. Click on "Next". This comes up.
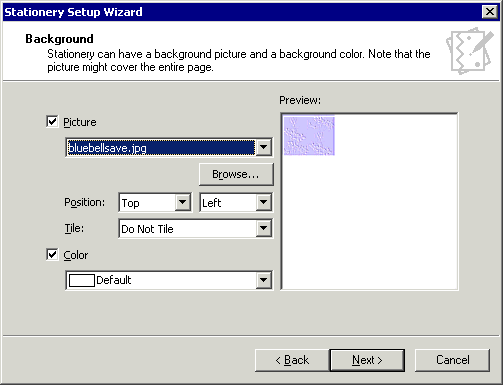
The first picture in the directory will have been automatically selected. If that is not the one you plan to use, hit the "Browse" button. With any luck you'll find yourself in the stationery folder. If this is not so, navigate to it.
(You can, in fact, choose a picture from any directory in your computer. Outlook Express will automatically make a copy of the picture and save it into your stationery folder.)
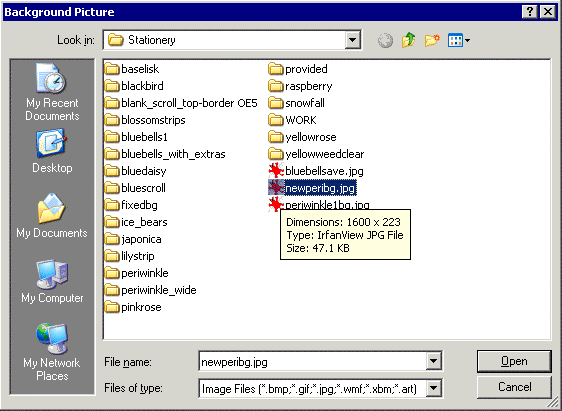
This time you will see no html files. You will see only folders and pictures. Just how they are displayed will depend on preferences that you have set in Windows. Mine are wearing the logo of IrfanView, my preferred picture viewer.
As you hover your cursor over each picture, a tool tip will appear, giving you some information. The one I am choosing has a width of 1600 pixels. It is a "wide" tile. Small square tiles are likely to show dimensions of around 200 x 200. You will also see how "big" the tile is; that is, how many kilobytes. I would only use stationery with such a big tile for friends that I know have a fast connection. It would not be suitable to send to someone on dialup.
Click on the picture that you want to use and click "Open". If there are lots of files in the folder, you can more easily locate the one you want by the following method.
Moving quickly to a file in a crowded box
Put your cursor on any file. Start typing the name of the file you want. As soon as you type the first letter the box will scroll to files beginning with that letter, or you will be offered a list of files beginning with that letter.
Double click the file you want, or click it once and click "Open". The chosen picture will then appear in the preview window.
Now look carefully at the options in the dialogue.
Position: Top Left is the sensible position, so leave that. (The other suggested positions are "right" and "center". "Center" does not mean the absolute middle of the whole page. It just means the middle of the top line.)
Tile: The next option asks whether you want to tile the picture: repeat it all over the page to make a pretty background. Of course you do! Change the Tile option to "Entire Page".
I know that many who use wide tiles choose to tile vertically. This will leave, on a screen wider than the tile, a blank area. The answer has been to make the tile wider and wider, adding to byte size. The truth is that there will always be a monitor wider than you anticipate. Better to give in gracefully and allow the pattern to repeat down the right on wide monitors.
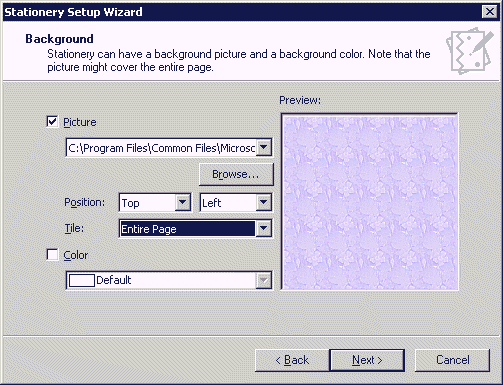
A simple square tile will make a background similar to this.
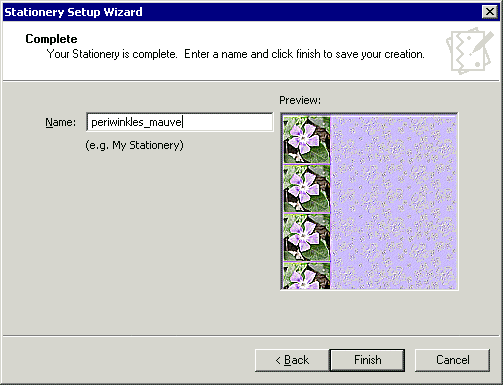
A wide tile with a strong picture on the left will make a background similar to this.
If you do choose "Do not tile", some email recipients will see the picture tiled anyway, because their email programs ignore the "Do not tile" command. This can sometimes make the email impossible to read.
If you want only one copy of the picture, do not use the Create Stationery Wizard to put it on the background. Just insert the picture when you begin your email, as explained in Adding pictures to your email.
Color: This refers to the colour that the background would be if, for some reason, the background tile disappeared. In the next step you will be choosing a font colour, and you'll choose one that will stand out against the background. Therefore, the "Color" in this option should be something like the colour of your background tile. However....
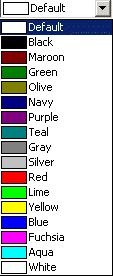 In hand-coded stationery you can choose exactly the colour you need, but the Wizard offers you only the very basic 16 colours. It's highly unlikely that any of them will come even close to the colour of your tile.
Do put a tick in the "Color" box and have a look at what's on offer—you could be lucky. Otherwise, just choose something that your intended font colour will stand out against. That is, if you have chosen dark blue background tiles, click on the dark blue or the navy colour swatch in the drop-down list box. You'll probably choose a light, bright colour for your text, and if your dark blue tile is lost and your recipient is left with white or aqua text on a white background the contents of your email will be forever a mystery.
This isn't entirely true. The recipient could go into Tools, Options, click on the Read tab and put a tick beside "Read all messages in plain text". Still, they may not think to do that, and they certainly won't want the bother.
OK. I've already decided that I'm going to use either purple or the bright, strong blue as my font colour, and I reckon white will do as well as anything.
Choosing a font
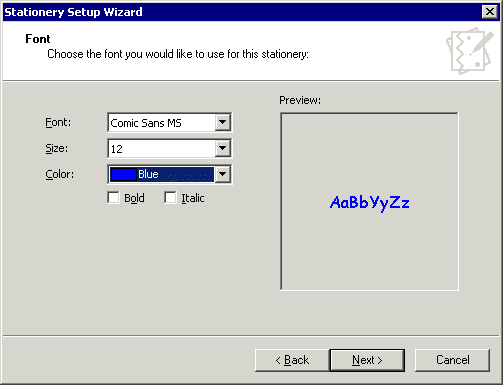
In the next box you're invited to choose a font. The problem is, if your recipient doesn't have the font you choose, it will be rendered as, for instance, Arial or Times Roman. You have no control over this, as it depends on the settings in the other person's PC. Therefore, it's better to choose a very ordinary font—one that you know just about everybody has.
Here's a demonstration of how fonts may appear on a different computer. Open this link in a new tab (by using your right mouse button and choosing "Open in New Tab") so that you don't lose your place on this page.
I've chosen "Comic Sans Ms". For most fonts, 12 or 14 is a reasonable size. The preview window will show you the font at the size you have chosen. A few fonts are better used at larger sizes, but only experimentation can make you certain.
Click the dropdown beside "Color" and click on the colour you plan to use. You can come back to this dialogue later if you want to change anything.
Click "Next" and you'll see a miniature version of your stationery with some lines of text on it.
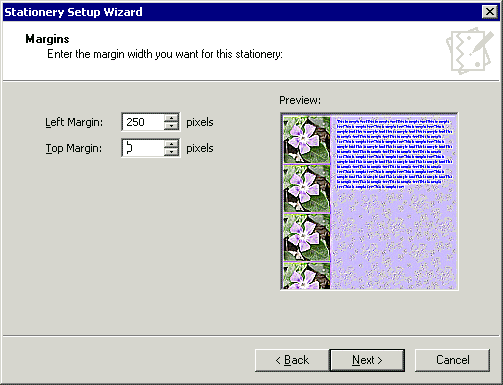
If the background is plain, you may wish to leave the margins as they are, although you can widen them if you'd like to. If the background shows a bright picture down the left side, you'll need to make the margin wide enough to avoid having text on top of it. For this particular background, I chose a margin of 250px. You can type the numbers you want, or you can use the arrows on the tiny spin button at the right of the "Size" box.
Sadly, you cannot set a right margin while using the wizard. This means that the text you type will wrap only at the right edge of the recipient's window, which makes for unreadably long lines for those who read emails full screen. Just hope that they use a smaller window!
Of course, you can tidy it up with carriage returns—something you should never do in a word processor.
You've nearly finished creating your new stationery. Click the "Next" button.
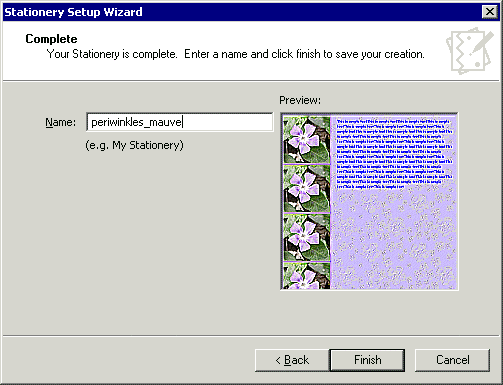
You are now invited to name the piece you've created. For goodness sake choose a name that has some meaning for you! If you went along with "My Stationery", I doubt you'd remember in six months what it looked like. Sure, you could look in the preview window, but who wants to trawl through piece after piece until they find the right one?
Click "Next" and you'll be back to the "Select Stationery" box. If you click OK you'll be presented with your new stationery, ready to write your letter, and the same stationery will be available from the "Select Stationery" dialogue from now on.
Changes while writing your email
Although you have nominated text size and colour and a font, you can still make changes to these while you are writing your letter. You can't turn your marks on as you can in a word processor, so it's easier to change things once the words are on the page, rather than before you start writing.
If you paste some text from the clipboard, it will usually keep its original formatting. Of course you can make the usual changes—change font and font size, underline, embolden, italicise and colour.
Adding pictures to an email
You can use this method to put a picture anywhere in your email, or to insert pictures in several places. For now, we'll just consider a picture inserted at the very beginning.
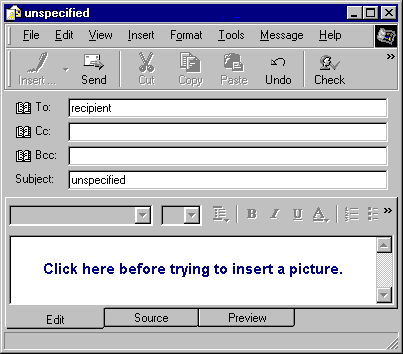
If you have just created a piece of stationery, OR if you have just clicked "New Mail", clicking the "Insert" item on the menu bar will do no good, as all commands except "File Attachment" are dimmed. You must first click into the writing space. Then click "Insert" and choose "Picture".
There is also an "Insert Picture" icon on the right of the format bar. ![]() .
.
Whichever of these two ways you decide to use, the next step will be this dialogue box.
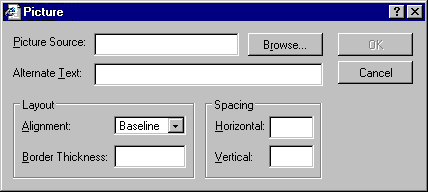
In this box, first hit the "Browse" button. You will see the contents of the "My Pictures" folder, or that of the folder from which you inserted a picture the last time. If your picture is in a different folder, navigate to it.
In XP, you'll be given a thumbnail view of each picture. In 98, you'll only be offered the names of the pictures.
When you find the picture you want, either double click it or click it once and click "Open".
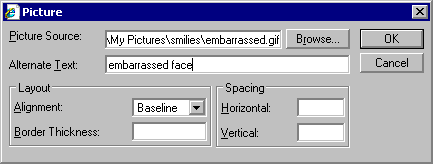
When you get back to this box, where the file name of your chosen picture will have been filled in, you may need to change a few things.
I'll leave Alignment till last, as there's quite a bit to say about it.
Spacing: If you are going to align the picture left or right, put anything from 4 to 10 in the Horizontal Spacing place. You'll decide what's best after you've done it a few times. You don't usually need to put anything into the Vertical Spacing box.
Border Thickness: needs to be used only if you want a black border around the picture.
Alternate text doesn't absolutely have to to be filled in. It's something to be there instead of a red "x" if your picture gets lost. A picture put in from here isn't likely to get lost, but write a brief description of the picture, eg "kittens chasing butterfly," just in case.
Alignment: If your picture is much narrower than the message window and you leave Alignment as "Baseline", you'll have a blank area all the way across your page. If it's a wide picture, that's OK, and if it's tiny, like a smiley, that works well too. If, however, the picture is about half as wide as the width of your message, you may like to change the alignment to "Left" or "Right", so that text will flow beside your picture.
Centring an Image
You'll notice that there are quite a few options in the Alignment dropdown—and most of them do absolutely nothing! If you try to centre an image by choosing "Middle" or "Absmiddle", nothing happens. But it is possible to centre a picture in Outlook Express.

Click OK as soon as you get back to the Insert Picture dialogue. You'll see your picture in the top left corner of the message.
Click on the picture to select it.
Go to the formatting bar and click on the icon for centring text. I've marked it with a red arrow in this picture.
![]()
A picture added in this way is part of the letter, not of the stationery. You can make it permanent by writing the stationery in Notepad, Notetab, or any other plain text editor. Find how to do this—it's easier than you think—by trying some of the lessons shown on the Making Pictures page.
top Go back to Creating Stationery
If you want to see what stationery looks like in a text editor, go into Outlook Express. Find an old letter on interesting stationery, highlight it, hold the Ctrl key down and press F2. When you've finished looking close the window.
What you see there is a bit more complicated than something you'd write yourself, because Outlook Express puts in some necessary bits—especially the very long numbers that you may see. Those represent the pictures in the email.
When you've used "Create Stationery" and are writing an email, you can look at the source and see how Outlook Express recorded your commands.
Tutorials in writing your own stationery
The basics of making stationery can be found through the Making Pictures page. You'll find step by step instructions for making seamless tiles, with lots of finished examples. There are also two scripts to copy and paste—one very straight-forward, the second more complex. You'll find links to downloads of free graphics software and, just to get you started, there's a detailed tutorial on getting the best from the Windows "Paint" program.
There are other sites with helpful tutorials. Some concentrate on graphics and are worth visiting even if just to admire.
To find these sites yourself, type Outlook Express stationery into Google.
Too Big for Every Day Use
Very large—and therefore slow to upload and download—artistic stationery is only suitable for use within a group of people who exchange complex stationery. There are plenty of such groups. They're very active and they like to show their own best efforts. They're often associated with one or more sites that show you how to make those lovely backgrounds or how to introduce special effects, such as scrolling. Type PSP Stationery into Google and you'll find such lessons.
Graphic intensive stationery isn't suitable for every day use. It can even make some recipients feel annoyed. A small tiled background that you designed yourself doesn't add much to the size of an email and makes it personal. A family photograph has a real purpose and is usually much appreciated. Big stationery, though, needs to be sent only to those you know like to receive it.
Within stationery groups, people are looking for and showing off original work. Downloaded complete stationery doesn't belong. Really, lovely as it may seem, that stuff isn't a good idea!
Questions or comments? I'd love to hear from you. My email address is here.
Return to top
Drop-Down Menu from Brothercake
Everything below this is a javascript menu. If you are using a reader,
please use the links here.