Control Panel
Settings
12/24 Hour Clock Accessibility Options Add New Hardware Add/Remove Programs Automatic Updates Browse Folders Choosing Your Own Sounds Controlling Sounds on Your Computer Desktop Wallpaper Display File Types Tab Folder Options Fonts General Tab I've Lost the Little Grey Speaker (XP) I've Lost the Little Yellow Speaker (98) Keyboard and Mouse My Pictures Slideshow Performance and Computer Information Performance Options Regional and Language Screensaver Security Centre Sounds and Volume Control System Tasks Time and Date Format View Tab Wallpaper Windows Setup
After clicking the Start button, you can get to Control Panel through a menu like one of these.The exact appearance of the menu depends on the way you have Windows set up.
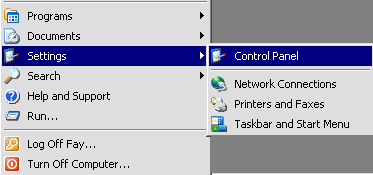
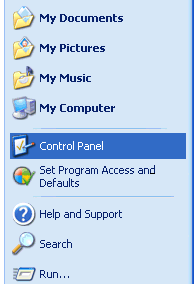
.
 If you then see a big heading "Pick a Category", click "Switch to Classic View" in the upper left.
You will then notice that the words there change to "Switch to Category View".  You can switch between the two views whenever you like. For this exercise, Classic View makes things easier to see.
The appearance of Control Panel can also vary, according to choices made on the View menu. "Thumbnails" and "Tiles" give bigger pictures than those shown here. "List" is what it says: a simple list with tiny icons. The view I've chosen is "Icons". Everything fits in a reasonably sized window, but the pictures are big enough to be quickly recognised.
The actual icons displayed in Control Panel vary from computer to computer according to devices and software installed. Of those that are common to most computers, many are self-explanatory. However, a few deserve some special attention.
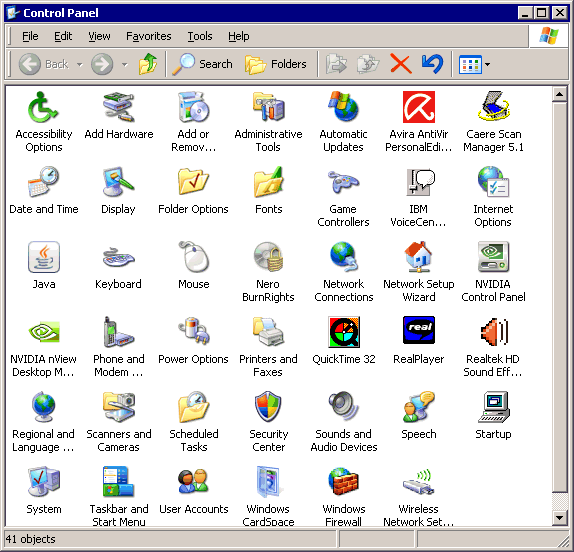
If you simply want to explore the dialogues opened from any of these icons, remember that you can do that without changing anything. Just be sure to use the Cancel button as many times as necessary to leave the dialogue. top
Accessibility Options
Through this icon you can set options that will make Windows easier to use if, for instance, you have problems with vision or if you find it hard to handle a mouse. If you have any disability, do explore the options available through this icon.
More information about making both your computer and the Internet more accessible can be found at http://www.microsoft.com/enable/, and there is also a range of Microsoft accessibility tutorials.
Add New Hardware
You may never need to visit this. When you acquire a new piece of equipment, read whatever paperwork comes in the box. Just how to go about installing varies from product to product. Sometimes you have to install the software before connecting the device to your computer; sometimes you're instructed to attach the device, let the New Hardware Wizard detect it, and proceed according to directions. Always do exactly as the manual says. top
Add/Remove Programs
 This is the right place to add a new program, to delete a program that you no longer want, or to change your Windows setup. Most programs put special files into Windows, and many can be called from within other programs. If you remove such programs by finding them on your hard drive and hitting the delete key, bits are left behind and can cause you trouble later on.
Windows Setup
Windows has many components, and some of these you'll never use. However, you may change your mind about this or that component, or maybe another person set up your computer and chose the things that they would want.
To the left of the main Add/Remove window is a sidestrip showing various things you may wish to do. Click the one labelled Add/Remove Windows Components.
In Windows 98, go to the Windows Setup tab. top
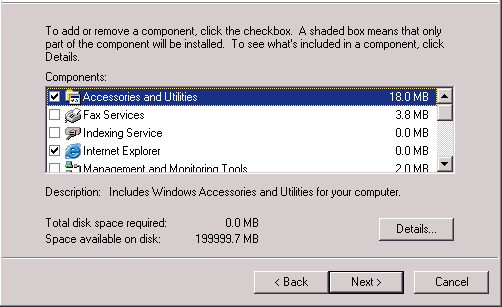
Click on the first heading, then click the Details button. This will open a new box, where the subcomponents are listed. If you highlight any of these and click the Details button, you'll get a brief description of that component and its use.
Look at each one and consider its use to you. You may want all—or nearly all—of the accessories: Paint, for instance, and the calculator. The clipboard is essential. It's worthwhile to look through every category—there's no saying where the thing you need may be hiding!
The first time you look through these dialogues, leave by pressing the Cancel button to be sure that you haven't accidentally chosen to do something you don't want to. If you do want to install or remove a component, make a fresh start.
To install new components, you'll need your CD. If you don't know your product key or serial number, manufacturers of new machines often put it on a tiny sticker somewhere on the case of your computer.
Automatic Updates
Please turn automatic updates on. They are an important part of your defence against the many dangerous programs (viruses, spyware and malware of all kinds) that infest the Internet. top
Display
This gives you access to the same settings that you can make if you right click on an empty part of the desktop and choose Properties.
You can choose a "Theme"—the way windows and dialogues will look. I like Windows Classic, but you may prefer something different.
Desktop Wallpaper
To choose wallpaper for your desktop, click the Desktop tab. To make one of the offered Background wallpapers fill the whole of your monitor, change the Position to "Stretch".
There are other ways to install desktop wallpaper—through a graphics editor or, with most browsers, by simply right-clicking on any picture on the web and choosing "background" or similar from the menu.
If you prefer a plain desktop, choose "None" as the background. You can then click the Color drop-down on the right and make the desktop background whatever colour appeals to you. The colours that appear immediately are basic; click Other to choose something more subtle and more to your liking. top
Screensaver
On the screensaver tab you can choose those provided, or you can choose (None). It is recommended, though, that you do use a screensaver, even if you have an LCD monitor. Whatever, if you're leaving your computer for any length of time, the best thing to do is to turn it right off. Why spend money on power you're not using?
My Pictures Slideshow
Best of all the screensavers (in my opinion) is "My Pictures Slideshow". After choosing it, 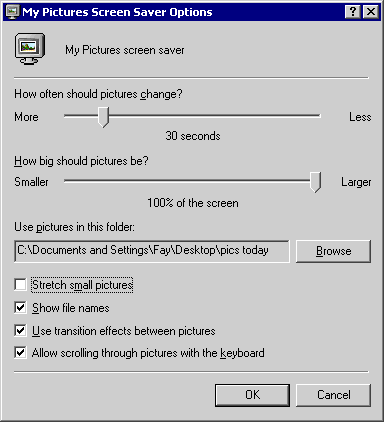
- Hit the Settings button.
- Find "Use pictures in this folder".
- Click the Browse button.
- Navigate to the folder containg pictures you'd like to display.
- Highlight that folder.
- Click OK.
You might choose to use the folder into which you load new pictures from your camera. The pictures in subfolders are shown as well. For instance, if the folder you choose is called "holidays" and contains subfolders labelled "canada", "yachting" and "mountains", pictures from all those subfolders will be displayed.
Other Settings
These are the settings that are best for me. You may prefer not to display file names. They don't add to the beauty of the pictures.
Small pictures stretched can look pretty awful, especially if they're very small. top
For other screensavers and power management adjustments, please see Screensaver.
Folder Options
General Tab
Tasks
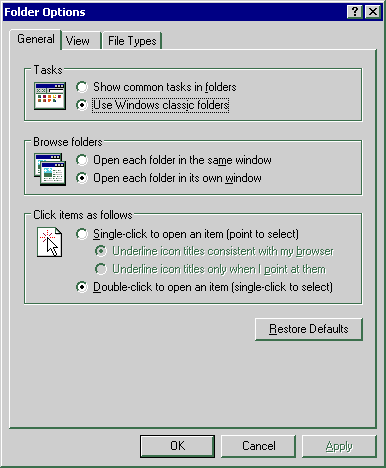
On the General tab, you can choose to have a sidebar on each folder that you open. You enable this by choosing "Show common tasks in folders". "Tasks" may include "Rename", "Move", "Copy", "Email", "Print" and "Delete". Almost all of these operations are available from your right click menu. The exception is "Move", which is more quickly effected by draggging and dropping.
The Common Tasks sidebar does also offer quick links to "My Computer", "My Documents", and several components of Control Panel. Again, these can be accessed in other ways—from the Start Menu, or from desktop shortcuts. top
Browse Folders
When you are navigating down through a series of subfolders, you can have each folder take over from the previous one by choosing "Open each folder in the same window", so that there's only one folder open at a time, which keeps things looking tidy. It can make things awkward, though. You may want to drag a file from one folder to the folder above it, for instance.
If you've enabled "Open each folder in its own window" and find yourself with half a dozen consecutive windows open at once, you can close them all in one go by holding the Shift key while you click the Close button of the last one you opened.
Click items as follows
Choose whichever works better for you. I haven't really played around with this, and can see no reason for preferring one or the other. top
View Tab
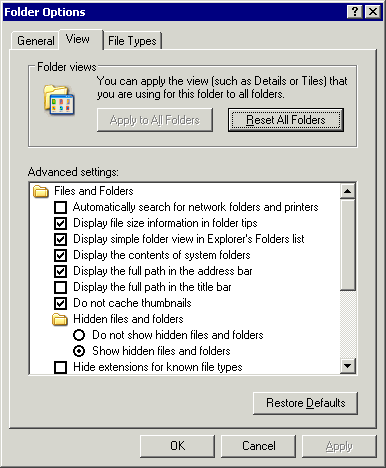 The default in Folder Options > View is to have some files not displayed, and some displayed without their extension (doc, gif, txt, jpg or whatever).This can cause all sorts of problems and confusion. Mark the checkboxes so that files and file extensions are displayed.
On the View tab, you can set options for all folders in one go if you have "Show common tasks" enabled. However, in XP you can also set each folder individually, which is great. For instance, I like meaningful icons, such as those in Control Panel, displayed as icons, whereas if I have a folder full of, say, document files, I prefer to see them as a list.
You can also, in individual folders, choose "Details", which lets you display your own choice of details pertinent to the files in that particular folder.
Experiment and see which view you like best for each individual folder. top
File Types Tab
Eeek! It seems that every file type known is listed here. You can browse for interest if you like, but if you do need to change the "Association" of a particular file type, don't try to do it here. Right click on it, choose Open with > Choose Program. You will then find it easy to choose a program and tick the "Always use" box.
Fonts
This gives you a quick display of all installed fonts, plus the opportunity to view, install or uninstall individual fonts. Proceed with great caution. Some fonts are essential to the proper display of windows, dialogue boxes, and various Windows components. Some belong to installed programs which won't function properly without them. It's OK to uninstall a font that you installed yourself, but unwise to mess with the rest.
For the least confusing view, you could open the View menu and choose "Hide Variations". To see what a particular font looks like, double click it's icon.
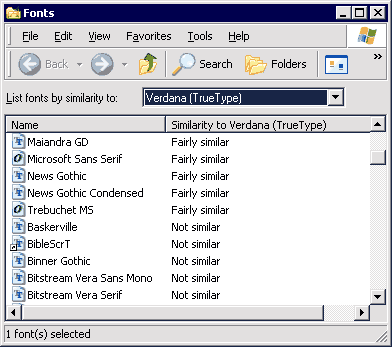 To see which fonts look most like the one in which you're interested, Choose "List Fonts by Similarity". The window will change and you'll see a dropdown list box. Choose the font of interest from the list box and those in the main window will be grouped into "Very similar", "Fairly similar" and "Not similar".
If you want to install a lot of extra fonts, remember that too many fonts can use resources and slow your computer, so get hold of a font manager, either free or professional. A font manager will help you to install, uninstall, view fonts without installing them, and can put uninstalled fonts into a special folder for reinstallation if you change your mind. Professional font managers have many more features. top
Keyboard and Mouse
These let you adjust the speed with which the devices respond, and you can set some keys to carry out specific functions.
In Pointer Options of the mouse options, you can choose an item "Show location of pointer when I press the CTRL key. If you choose this, pressing the CTRL key will cause a circle to appear very briefly. You may find this disconcerting, as it necessarily responds to every press of that key, but I've found it invaluable, because I do sometimes lose track of the pointer.
On the Pointer tab, you can change the regular pointers to something fancy, but everyone I know who's done that has changed back after a day or two. The standard pointers are much more meaningful.
Security Centre
This is very important. Check it from time to time just to make certain that everything is in order.
It is essential that you have both a firewall (either the one built into Windows or one you've obtained yourself) and anti-virus software running at all times.
It is strongly recommended that you have Automatic Updates turned on. Some people prefer to install Windows updates manually, but you should only do this if you're quite sure you'll never forget. And if there is ever a problem with Windows updates—for some reason they can't be downloaded or installed, or you find that you can't go to the website, that's a red alert. Seek help from a competent person immediately.
Protection against spyware, scumware, adware isn't listed in the Security Centre, but you need that as well. Here's excellent advice about protecting your computer from malware. top
Sounds and Volume Control
Volume control icon in systray or notification area
I've Lost The Little Yellow Speaker (98)
Sometimes people remove the little yellow volume control from the sys tray, decide that they want it after all and can't find it. No wonder; it's beautifully hidden.
To get it back,
- click on the Start button.
- Click on Settings.
- Click on Control Panel.
- Find and open Multimedia.
- Near the bottom left of the Audio tab is a box labelled Show volume control on the taskbar.
- Check the box, click OK and your little yellow speaker will be back.
I've Lost The Little Grey Speaker (XP)
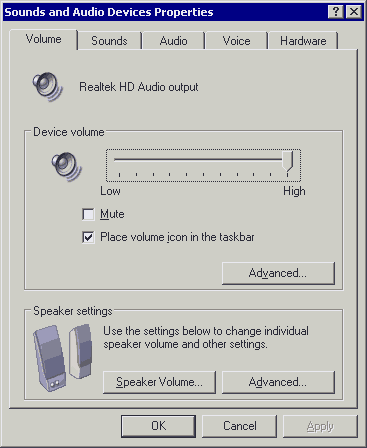 In XP, the lost speaker can be turned on again more simply. In Control Panel, double click Sounds and Audio Devices. The Volume tab is at the front and looks like this. Place a tick beside "Place volume icon in the taskbar".
The speaker icon in the notification area gives you access to several things. If you give it a left click, you can adjust the volume up or down, or mute all sounds.
A right click lets you choose Volume Control, where you can adjust the volume of individual audio devices, or, you can choose Adjust Audio Properties, which is a shortcut to Sounds and Audio Devices. top
.
Controlling sounds on your computer
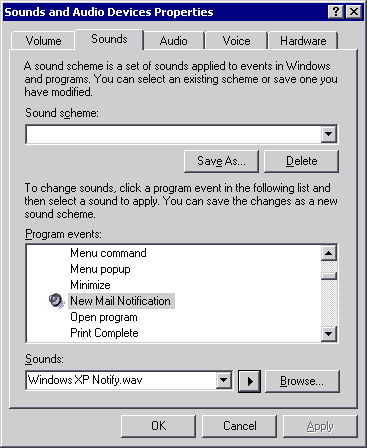 While you have the Sounds and Audio Devices dialogue open, you may wish to change or turn off some of the default sounds that Windows uses. You probably do want to be notified when a new email arrives, but a loud bang when you make a false move in Freecell can be unnerving.
On the Sounds tab, scroll up and down and try to find the annoying noise you want to get rid of. The names aren't always helpful, but if you click the right-pointing arrow to the left of the Browse button, the sound will be played. If you want no sound for this event, scroll right to the top of the list and you'll find (None). Choose that and click OK or Apply.
Choosing your own sounds
On the other hand, you may have some sounds that you've collected and would like to use instead of those offered by Windows. Maybe you've recorded a funny comment you'd like to hear when you empty the recycle bin.
Hit the Browse button and navigate to the sound you want to use, click it and then click Apply or OK in the sounds dialogue. top
System
Performance and Computer Information
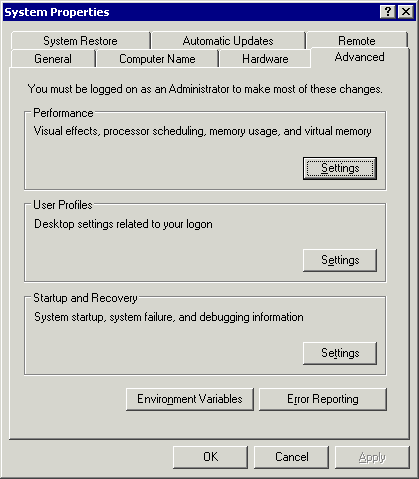 Windows XP is crammed full of special effects. If you've worked your way up from DOS, through 3, 3.1, 95 and 98, you'll find them pretty off-putting. If you're a new user, you may be charmed for a while, but do be aware that all that eye candy is using resources and not helping you to actually use your computer.
So, first to System. A double click will open it and you'll be presented with several tabbed pages.
On opening, the General tab will be at the front. This gives you information about your computer: processor, speed, installed service packs and so on. top
.
Performance Options
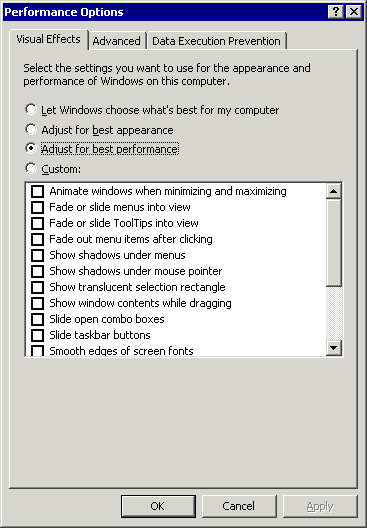 Click the Advanced tab. In the part labelled Performance, click the Settings button.
Now you'll see a long list of special effects, many of them ticked.
At the top, you'll see four choices: Let Windows choose what's best for my computer, Adjust for best appearance, Adjust for best performance, and Custom.
When you choose Adjust for best performance, all the special effects lose their ticks.
If you then put a tick beside any one effect, the checkmark at the top will move down to Custom. I find "Show window contents when dragging" useful while using certain programs.
Each special effect degrades performance to some extent. Seeing this, it's likely you'll settle for best performance. If that's your choice, make sure that it's marked before you click OK or Apply. top
Regional and Language
Time and Date Format, Currency, Extra Languages
Here you can show how you want dates, numbers and money to be displayed throughout your computer, and you can ask to have additional languages installed.
On Regional Options, once your Language and Region have been selected, the usual formats will be shown, but if you want to change any of those, click the Customise button and you'll then be able to make individual choices.
12/24 Hour Clock
The Time tab in Customise Regional Options lets you change the Notification Area time display between a 12 hour and a 24 hour clock.
.
Other pages about the Start Button are linked below.
Start The bottom of the start menu, from Shut Down to Help.
Find Find any file on your computer.