Backgrounds from Existing Pictures
The printable version—fewer pictures, fewer pages—is here.
When you begin with an existing picture, you can follow the steps in Making Seamless Tiles until the end of paragraph 12. From that point onward you have to do things a little differently. The work involved takes a little longer and sometimes needs a bit of patience. The results, though, can be very pleasing, and fiddling with colour can make any number of backgrounds from the one tile.
 To use this picture for your first experiments, right click on it and choose Save Picture As from the menu. If you have a picture of your own that you'd prefer to use, it might still be better to run through the exercise with this picture first, just to get the feel of the steps.
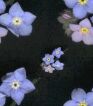
 At first glance this flower scan looks as though it'll tile nicely without fiddling. It's an isolated picture with a uniform background.
When it's cut and joined or examined in sTile, though, we see that the background is not uniform after all. There's a very noticable difference in the background colour from top left to bottom right. When the edges meet the join is obvious. As well, there's the flower stem, which stops suddenly, emphasising the join.
Blending Hard Joins
There are a couple of different ways to deal with this. You could try both.
First Method
I'm assuming that you've followed paragraphs 1 through 11 in Making Seamless Tiles and that your tile has been turned inside out and looks similar to the picture above. If you haven't, do that now.
 In Paint, zoom in on the centre of your inside out tile so that you can see the join. You'll see that the black area is made up of several brown shades. Using the eye-dropper colour picker tool
 ![]() click on a light brown color in the zoomed picture. Now click on the spray can tool.
click on a light brown color in the zoomed picture. Now click on the spray can tool. ![]()
 Spray pixels of the light colour into the darker area. Try different sizes of spray, remembering that the small size will apply more of the sprayed colour in a smaller area, while the large size will scatter the pixels more widely, but may put some brown where you don't want it. Work your way along one join and down the other, not concentrating on any one spot.
To illustrate the process, the colour used in the picture is deliberately lighter than the one you'd really use. You're looking for a smooth effect—not a lot of speckles!
Use the colour picker to sample the dark colour and spray it into the lighter area, again working all the way along the join that runs from left to right and all the way down the join that runs from top to bottom.
Zoom out from time to time. When you feel that you've blended the joins, copy the picture and paste it into sTile. If you're not sure how to do this, the directions are here.
Click the ![]() show tiles icon and look to see whether the joins have disappeared. If they have, save your work and carry on from Now Make It Smaller top
show tiles icon and look to see whether the joins have disappeared. If they have, save your work and carry on from Now Make It Smaller top
Second Method
There's no need to cut and reassemble your picture to do this, provided that it is a central picture on an unimportant background.
 If, though, the background colour is similar to the colour of the main subject, this method won't be particularly useful. It's good for flower scans, because they usually show light colours on a near-black background. A white rabbit on a snow field is going to give you lots of trouble.
With the picture open in sTile, click on the eye-dropper colour picker at the top of the toolbox. Click it in the brown area of the picture's background. This makes the colour background for the pen change to the same brown.
Now click on the mauve-blue background that has the words Brush Color. A colour chart will appear. Click on black, which is at the bottom of the first column of colours. Click OK.
Now go to Effects on the menu bar, click on Color and then on Exchange Colors.

.
 Two things happen. The background of your picture will change—perhaps more than you'd like. (If this is so, click the Undo button on the toolbar.
![]() ) At the same time, the words “Exchange Color” will appear on the toolbox, and just below them you'll see a tiny window with the number 25 in it.
) At the same time, the words “Exchange Color” will appear on the toolbox, and just below them you'll see a tiny window with the number 25 in it.
Now, if the colour exchange went as you wanted, there's no more to do than save and exit. If, however, parts of your subject lost colour and you clicked the Undo button, highlight the 25, overwrite it with, say, 15, and try the Effects > Color > Exchange Colors sequence again.
When the picture is to your liking, check it by clicking the Show Tiles icon ![]() and save it. top
and save it. top
Now Make It Smaller


Now click the Effects menu again. This time choose Size/Aspect and then Resize Smooth. Had the picture been square, I'd have replaced the figures in the Pixels column with 100 in each case. Since it's oblong, and there's no Preserve Aspect tick box here, and since I don't feel like doing mathematical calculations right now, I'll take the easy way out and put a check mark beside Percent and accept 50 in both width and height boxes.
OK. right now I've had enough of this tile, but tomorrow I may want to do further work on it. A picture 93 by 105 is going to be too small to work on, so I won't overwrite my original. Instead, I'll save this smaller copy with a slightly different name. I'll have two tiles; the small one and one on which I can continue working. top
Adding Something
To make the tile a little less brick-like, I decided to add a smaller copy of the picture. With the saved picture in the sTile window, I clicked Edit > Copy. I opened Paint and clicked Edit > Paste. I dragged the pasted image slightly down and to the right, because I don't like working in corners. Then, holding the Ctrl key, I continued dragging until I had a second copy of the picture.
The selection rectangle was still active, so I went to the menu bar and clicked Image > Stretch/Skew.
 I changed the 100 in both the Horizontal and Vertical windows to 30. I ignored the lower part of the dialogue box and clicked OK.
![]() I now had one copy of the picture slightly less than a third the size of the other. The smaller copy still had a selection rectangle around it. After clicking the Paste Transparent icon at the bottom of Paint's toolbox, I dragged the smaller picture onto the larger, positioning it near the middle, but not dead centre. Then I selected the larger picture, being careful to select exactly along the edges, and copied it.
I now had one copy of the picture slightly less than a third the size of the other. The smaller copy still had a selection rectangle around it. After clicking the Paste Transparent icon at the bottom of Paint's toolbox, I dragged the smaller picture onto the larger, positioning it near the middle, but not dead centre. Then I selected the larger picture, being careful to select exactly along the edges, and copied it.
The image I copied five minutes ago was still open in sTile's window. I clicked Edit > Paste > Replace Image and my new picture appeared in the window. I clicked the Show Tiles icon to check for any white space I might have picked up. All was well, so I clicked OK and went straight to sTile's File menu, clicked Save As and gave the changed picture a new name. I then used Effects > Size/Aspect > Resize Smooth and made the tile smaller before saving it again. top
Altering the Colours
With sTile, this is dead easy. The Brighten menu—found under Colors—in spite of having only one word as its name also lets you flatten or soften colours, increase or decrease contrast or render the picture in various shades of one colour.
With the picture in the sTile window, you click Effects > Color > Brighten.


The toolbox you need is the one shown on the right. If you have the one on the left, click the three coloured crayons button and the bottom part of the toolbox will pop down.

 I've shown the toolbox with the Saturation slider pulled towards the right. This intensifies all of the colours in the picture; blue becomes bluer, pink more pink and black gets to be utterly black. If you pull it to the left, all colours are removed.
The Lightness slider, when pulled to the right, softens all colours equally. You can use this in combination with one of the colour sliders to make a background that is muted and seems to have shades of one colour only.
When you like what you see, click on the big green tick and save your new picture with a new name. One of the great things about this program is that you can then repeatedly click the Undo button until you are back to your original. Then you can start a completely different set of adjustments.
Fixing Little Things
 When there's an error in a small part of the picture, it's often just as easy to fix that one thing rather than make changes to the whole picture. Here, when I changed dark brown to black, I had the tolerance too wide and a line of pixels was torn from the shadowed side of the flower stem. Nothing else in the picture was affected.
 The simplest way to deal with this was to paste the picture back into Paint, zoom in, use the eye-dropper colour picker to pick up the colour of the nearest surviving pixels and replace the missing ones with the pencil tool.
Questions or comments? I'd love to hear from you. My email address is here.