Headers and Footers
Repeating Text on Every Page
Please Note: “Footers” should not be confused with footnotes, which are not the same on every page. For help with footnotes, consult the help file in Word. That’s a more advanced subject.
Text that you would like to have appear on every page may include:
- Your name
- Contact details
- The name of the document
- A copyright notice
- Page numbering
- or just about anything else you can think of
Because of the dynamic nature of word processors, it isn’t wise to do this manually. When you type straight onto paper, things stay where you put them. When you type into a word processor, things can change position, and, if the document is of any length, this can give you a lot of extra work.
If you add a few lines somewhere in the text above a manually placed page heading, that heading will appear a few lines down from the top of the page on which you typed it.
Should you send a document to another computer, either on a disk or by e-mail, it may be changed by settings in the other computer. It’s also possible that the recipient may wish to make wider or narrower margins or alter the line spacing of your text. This too will probably move your manually placed headings or page numbers.
Here’s what can happen to the top of a page with manually placed headings and page numbers.
On the left is the top of the original carefully typed page. On the right is the top of the same page after editing the text somewhere before it.
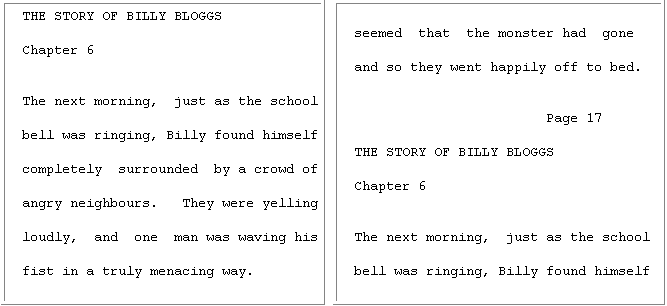
Unfortunately, this can give the reader a poor impression, and instead of giving their full attention to the story or article you’ve submitted, they'll be niggled by the formatting and may be less likely to react positively to your work.
The way that you make sure that this doesn’t happen is to turn the headings and page numbering over to the control of the word processor.
All good word processors have a way that you can do this with reasonable ease.
These directions show how to do it in Microsoft Word.
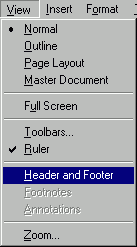 Toward the left end of the menu bar, find the heading View. Click on View.
This is the menu that will open. It may look slightly different, depending on the version of Word that you’re using.
Notice the highlighted item. It reads Header and Footer. Text that is entered through using this box will appear on every page of your document, or on every odd or even page, or on every page in a section, according to your choices. (Sections can be discussed later. One thing at a time.)
Text inserted in this way will always appear on the top or bottom of the page, no matter what changes you make to margins, line spacing, or anything else.
Anything you place in the Header will appear at the top of the page.
Anything you place in the Footer will appear at the bottom of the page.
When you click Header and Footer you get this special toolbar, and you will see the top of your page with a dotted line around the header area.

The first button represents a page with yellow boxes for header and footer. We can call this the change button.
If you want to go to the footer area, click this button. To return to the header, click it again.
The next three buttons are only of concern when you are using sections.
The button with a # will insert a simple page number and is followed by buttons to insert date and time.
To insert more complex page numbering, see notes on “NumPages” below.
Better yet, read and print out the
expert help at mvps.org.
The button showing an open book takes you to Page Setup, where you can make adjustments if you wish.
The last box makes it possible for you to hide the main document text if you find it distracting. This button is a toggle; you use the same button to show the text again.
When you first click on Header and Footer, your insertion point will be in the header area. Just begin typing, or click any of the buttons on the toolbar.
Buttons on the ordinary Formatting toolbar are also available, and you can set tabs as you would in the main document. You can also make use of the Insert menu to add a field or a special character.
You won’t run out of space. If you type more than the header area can accommodate, it will expand downwards.
When you’ve finished editing the header area, click the change button ![]() and edit the footer area. The footer area will expand upwards if necessary.
and edit the footer area. The footer area will expand upwards if necessary.
After editing the footer area, you can click Close on the end of the Header and Footer toolbar and you’ll be returned to your document.
It’s perfectly in order to use only one of the two areas offered if that’s sufficient for your needs.
Once you’ve made your header and/or footer and are back in the main document, click the Print Preview button ![]() on the Standard toolbar.
on the Standard toolbar.
This takes you to a window where you get a reasonably accurate picture of the way your document will look when it’s printed. It has buttons that let you look at one, two or many pages together.
If you’ve set up pages with mirrored margins, print preview will show you paired pages so you’ll have a clear idea of the appearance of facing pages in your finished document.
Picture 1
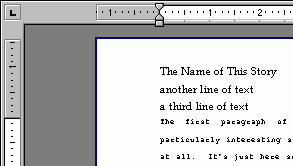 You should see a ruler at the top of the print preview window and another, vertical, ruler on the left.
If you can’t see the rulers, click the View menu and put a tick beside Ruler.
The grey parts of the rulers represent the margins and the white parts represent the body of the document.
In this example, the header area has been filled with text and there is no white space between header and body text. It looks ugly.
Picture 2
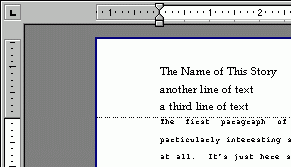 When you move your cursor over the ruler at the place where grey and white meet, a double headed arrow will appear as shown in picture 2.
.
Picture 3
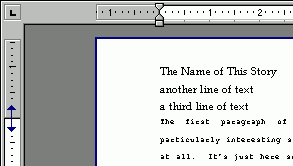 Press with your left mouse button and a dashed line will appear across the image of your page, as shown in picture 3.
.
Picture 4
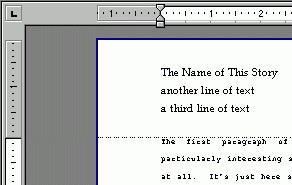 Now, still pressing the mouse button on the ruler, drag the margin down until you’re happy with the amount of white space between the two areas.
You have now adjusted the margin throughout the document—or throughout the section if you are using sections.
This is much the easiest and clearest way to adjust margins.
Follow Publishers' Guidelines
If you’re preparing a manuscript for submission to a publisher, remember that wide margins—as well as double spacing—are a general requirement.
Informal Documents
In less formal documents, such as personal letters, you can put pictures or fancy text into the header area. You can also use coloured or fancy fonts.
Unusual Headers
It’s also possible to have a header vertically down the left side of the page. This, though, is a little more complicated to achieve, and not something you’d need to do often.
You'll find instructions for this and other unusual arrangements in online help, and, if you're lucky enough to have a big fat manual, you'll find it more fully explained there.
Using fields in headers and footers
Many things that you might want to have repeated on each page can be managed with Fields. A field is a piece of text that updates itself on request, on the reopening of a document, and on printing. You could, for instance, put the Title field into your header. If, then, you changed the title in the document properties box, the change would be reflected in your header. Time, date and date of printing, number of words, name of document and disk size of a document can all be managed with fields.
A very useful field is NumPages. It inserts the number of pages in the document or section.
NumPages
In some versions of Word, “Page x of n” can be put in through a facility in the header/footer toolbar, but it’s inserted within a frame and can be problematic. To do it yourself, follow these steps.
- Click the View menu and choose Header and Footer.
- Type the word “Page” and a space.
- Click the Insert menu and choose Field.
- Scroll down the right hand window until you find “Page”.
- Click “Page” and click OK.
- Type a space, the word “of” and another space.
- Click the Insert menu and choose Field.
- Scroll down the right hand window until you find “NumPages”.
- Click “NumPages” and click OK.
- That’s it!
More complex page numbering is explained at mvps.org.
It is usually a requirement, when a manuscript is being prepared for submission, to include the number of words on the title page. If the “NumWords” field is inserted once, it will update when you print.
Text inserted with fields can be formatted just like any other text.
Special things like pictures, logos and fancy lettering can also be repeated on every page by being placed in the header.
There isn't a limit to the size of the header, which can even be made to hold a “watermark” or softened picture that lies behind the text on every page. Once you’re using headers and footers confidently, you could read about this under the heading Watermark in Word’s own help.
Questions or comments? I’d love to hear from you. My email address is here.
Return to top
Drop-Down Menu from Brothercake
Everything below this is a javascript menu. If you are using a reader,
please use the links here.