Begin by opening Paint. Either re-open “workspace.bmp” or start a new 400 by 400 picture and save it as a 16 colour bmp, calling it “workspace.bmp”.
If you’re re-using the previously saved “workspace.bmp”, select the rectangle tool, the “filled shape with no-border” icon and draw a white rectangle over any old and unwanted work.
After hitting the Save button you’ll receive a warning about loss of colour information. Since your painting is at this stage a plain white background, I wouldn't be over-perturbed. Just click Yes.
For this project, while you’re making and saving the full colour background, it’s important to keep to the 16 colour bmp format while you’re working in Paint and the gif format when you save. Formats with millions of colours, such as the jpg format, will smooth the edges of coloured areas, and that makes this sort of picture look mucky.
![]() Click on the ellipse tool
Click on the ellipse tool ![]() in Paint’s toolbox. Choose the lowest of the three options below the toolbox—the one meaning “filled shape without a border”. The dark blue border is the highlight that shows it’s been selected.
in Paint’s toolbox. Choose the lowest of the three options below the toolbox—the one meaning “filled shape without a border”. The dark blue border is the highlight that shows it’s been selected.
Click on the pink colour in the palette and hold the Shift key while you draw a circle of colour. Watch the numbers at the right hand end of the status bar—which is right at the bottom of your Paint window—and stop when the circle is about 75x75.
![]()
Hold down the Ctrl key while you tap s. This will save your work.

![]() Click the little magnifying glass and zoom in. Using the pencil tool and black, draw a mark similar to that in the picture. That represents the shine on the balloon, but we can’t use white at this stage or other colours would show through. We’ll change it to white later.
Click the little magnifying glass and zoom in. Using the pencil tool and black, draw a mark similar to that in the picture. That represents the shine on the balloon, but we can’t use white at this stage or other colours would show through. We’ll change it to white later.
The next step is to make a bunch of balloons, identical in all but colour. Each time we make a copy of the balloon, we’ll change its colour before the next copy is made.
![]() OK. Click on the transparent option below the toolbox. It’s the lower of the two and in this picture shows a dark blue “selected” highlight.
OK. Click on the transparent option below the toolbox. It’s the lower of the two and in this picture shows a dark blue “selected” highlight.
Click also on the rectangular selection tool. ![]() Make sure, too, that your right button colour is set to white.
Make sure, too, that your right button colour is set to white.
Select the pink balloon and hold the Ctrl key while you drag a copy away from the original.
Save your work.
I’ve shown the copy very close to the original so that I could make a small picture. In practice, the copy would be better dropped further away.
Now click on the flood fill tool and click on red in the palette. Click the flood tool on your original balloon. Your original becomes a red balloon.
Drag a copy—remember to hold the Ctrl key—of the red balloon and place it so that it’s overlapping the pink balloon. Save your work.
Again click the flood tool, and this time click dark blue in the palette. Ctrl drag a dark blue balloon onto the other two. Click the flood tool again and make your original green. Ctrl drag a green balloon onto those you’ve already assembled. Continue until you have six balloons. Please don’t use yellow; we need that for the background. Save your work.
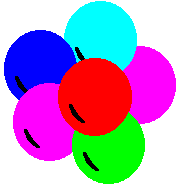 The group would look better if the central balloon were on top. Make a second copy of a red balloon and position it approximately over the first one.
If you want to make any other changes to the stacking order, temporarily colour the replacement balloon grey until you have it in position. Trying to position a replacement exactly on top of something the same colour is just too hard. With the red it doesn’t matter; you aren’t trying to match edges.
![]() Click the rectangle tool.
Click the rectangle tool. ![]() Click yellow in the palette. Choose the bottom icon under the toolbox—the one that means “filled shape without a border”. Hold the Shift key to force a square and drag until the square measures 200x200 pixels according to the numbers at the right-hand end of the status bar.
Click yellow in the palette. Choose the bottom icon under the toolbox—the one that means “filled shape without a border”. Hold the Shift key to force a square and drag until the square measures 200x200 pixels according to the numbers at the right-hand end of the status bar.
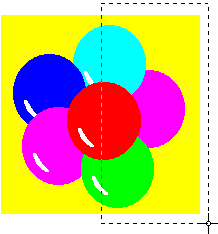
Click the rectangular selection tool. Now, after checking that you have white on your right button and that the transparency option is highlighted, draw a selection rectangle around the bunch of balloons.
Hold the Ctrl key so that you are making a copy and drag the balloons into the middle of the yellow square.
If it turns out that your bunch of balloons overlaps the yellow square, don’t worry. You have a copy of the balloons, so you can afford to lose the ones you just pasted. Just drag another square over the top of the old one, making it big enough to cover everything and leave some space around the edges, as in the picture. As we’re going to reduce the size of the tile when it’s finished, its working size isn’t important. When you feel that you have a square of a suitable size, Ctrl drag another copy of the balloons into its centre.
![]() At last the black splodges can come off the balloons! With white on your right mouse button and black on your left, click on the eraser tool. With your right button pressed, drag over the black marks until they all change to white.
At last the black splodges can come off the balloons! With white on your right mouse button and black on your left, click on the eraser tool. With your right button pressed, drag over the black marks until they all change to white.
Now it’s time to turn the tile inside out. If you did the lesson on the main page, you already have this down pat. Otherwise, here are the steps.
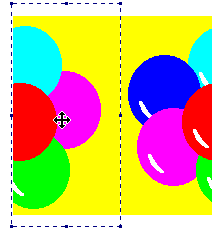 Make sure that there’s plenty of white space to the left of your square. If there isn’t, select the whole square and drag it towards the right.
Then select the right half of your square. Don't worry about being precise. Approximately half is fine.
Drag the selected piece across the left half to the white space on the other side. Make it join the left edge. Watch to see that the tops of the two pieces are lined up properly. Be careful not to overlap the edges, but also be sure that no white is showing between the two pieces.
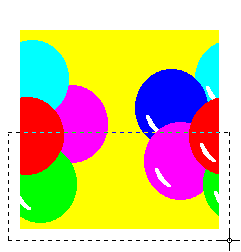
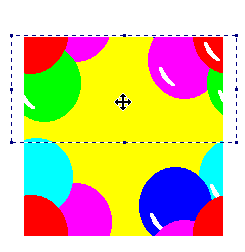 Make sure that there's plenty of white space above your square. If there isn’t, select the whole square and drag it down to make room.
Then select the bottom half of the square. Again, precision isn’t necessary. Drag the bottom piece up above the top piece, line it up carefully and join it to the top piece.
You’ll need some space now, so, after saving your work, drag a selection rectangle around the inside-out tile that you’ve just made and drag it to the left, just under your spare bunch of balloons.
Ctrl drag a copy to the top right corner of your window as well.
 Click on the text tool
 ![]() and drag an area in which to put your text. The picture will give you an idea of the size. If the text toolbar doesn’t appear, click on the View menu and click Text Toolbar.
and drag an area in which to put your text. The picture will give you an idea of the size. If the text toolbar doesn’t appear, click on the View menu and click Text Toolbar.
Choose a chunky font. Click on dark blue in the palette. Type “Happy Birthday”. Click on any other tool—the selection rectangle will do—then click red in the palette. Click the text tool again and drag an area in which to type. Type “Happy Birthday” a second time. Click the selection rectangle. Save your work.
![]() Check that you still have white on your right mouse button. Drag a selection rectangle around the red text and move it onto the blue text. Let just a tiny bit of the blue text show. Click anywhere away from the text, then drag a selection rectangle around the doubled text. (If you kept the selection rectangle with which you selected and moved the red text, only the red text would be affected by the next operation.)
Check that you still have white on your right mouse button. Drag a selection rectangle around the red text and move it onto the blue text. Let just a tiny bit of the blue text show. Click anywhere away from the text, then drag a selection rectangle around the doubled text. (If you kept the selection rectangle with which you selected and moved the red text, only the red text would be affected by the next operation.)
Click the Image menu and click on Stretch/Skew. Ignore the top part of the box. In the Skew part, type “10” into both the Horizontal and Vertical boxes. Click OK.

 Draw a selection rectangle around the word “Birthday” and drag it into a position just under the word “Happy”, as shown in the picture.
Click away to cancel your selection of “Birthday”. Draw a new selection rectangle around “Happy Birthday” and Ctrl drag it into position on the yellow centre of the tile. Keeping a copy means that you can easily repeat the operation if you’re unhappy with the result. Save your work.
Now you can have a look at your tile as a seamless background.
Using the rectangular selection tool, outline the tile.
![]() You’ll find it easier if you click the little magnifying glass in the toolbox and click it over the tile. Make sure that all of the tile is showing in the window; Paint does not scroll while you’re selecting.
You’ll find it easier if you click the little magnifying glass in the toolbox and click it over the tile. Make sure that all of the tile is showing in the window; Paint does not scroll while you’re selecting.
![]() Put the crosshair cursor exactly on the top left hand corner of the tile. One line of the cross should be in the top line of colour, one should be in the leftmost line. Colour should show through the little eye of the crosshair. Drag to the bottom right corner.
Put the crosshair cursor exactly on the top left hand corner of the tile. One line of the cross should be in the top line of colour, one should be in the leftmost line. Colour should show through the little eye of the crosshair. Drag to the bottom right corner.
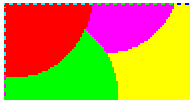 As you drag, a heavy dotted outline will appear and you can see whether or not this is exactly on the outside edge of the tile. If it’s further out, the dashes will all be black.
When the dotted outline is exactly on the outside of the tile all the way around, click on Edit on the Paint menu bar. Click Copy on the menu that appears.
Minimise the Paint window by clicking the ![]() in the top right corner. Double click the icon for sTile.
When the program opens, click on the Edit menu, then on Paste and choose Replace Image. The main window will fill with your tile image.
in the top right corner. Double click the icon for sTile.
When the program opens, click on the Edit menu, then on Paste and choose Replace Image. The main window will fill with your tile image.
![]() At the right hand end of the sTile toolbar you’ll see this icon. Click it once and you’ll be given a preview of your tile as a background. You’re looking to see whether the tiles join correctly and whether you like the overall effect. If there are any white lines showing, the tile needs to be copied again.
At the right hand end of the sTile toolbar you’ll see this icon. Click it once and you’ll be given a preview of your tile as a background. You’re looking to see whether the tiles join correctly and whether you like the overall effect. If there are any white lines showing, the tile needs to be copied again.
![]() If there are white lines showing, restore the Paint window by clicking its button on the taskbar and try again.
If there are white lines showing, restore the Paint window by clicking its button on the taskbar and try again.
When sTile shows you a perfectly matched background, click OK to come out of the tile display window, click File > Save As on the sTile menu bar and save your tile as balloons01.gif. The gif format is important because you don’t want any blending or smoothing to happen between areas of different colours.
Click on the Paint button at the bottom of your window to restore Paint. Click the File menu and click Save As, type “balloons” into the save box and click OK. This means that you’ll have preserved a copy in case you want to work on it later, while “workspace.bmp” can be cleared next time you want to use it.
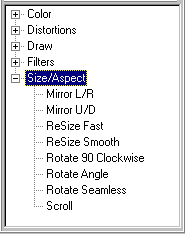
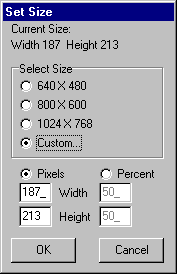 Now reduce the size. With the tile open in the sTile window, click on Size/Aspect in the Effects Tree at the left. (If you prefer, click Effects > Size/Aspect on the menu bar.) Choose ReSize Smooth from the next branch or menu. With a check mark in Pixels, change the number in both the width box and the height box to 100. Click OK, then click File > Save As and save this smaller tile as balloons02.gif.
The smaller tile is now open in the window. Go to the Tree or to the Effects menu, click on Color and choose either Lightness or Brightness. If you can’t see the sliders, click the three coloured crayons button and they’ll appear. Drag the Lightness slider towards the right. The image in the window will change.
When you think you like the degree of lightness, click the big green tick to agree to the change and click the Show Tiles icon. Don't miss this step, because it's hard to judge how a background will look by looking at a single tile. Go to the File menu and click Save As. This version can be balloons03.gif. Once you've saved, you can, if you wish, click the Undo button until balloons02.gif is once again in the window, then go back to the lightness slider and make a different adjustment—either lighter or darker than the previous one. Save each changed tile with the next consecutive name (balloons04.gif balloons05.gif balloons06.gif etc.).
When you're happy with the degree of lightness, click Resize Smooth and resize the softened tile to 50% and Save again. This tile will be the background for the text area.
That’s it. All that remains is to put the tiles into a piece of stationery and email it to the birthday person.